- Microsoft Defender offers very strong protection if it is updated and hardened with advanced registry and policy settings.
- Features such as ransomware protection, account control, firewall, and exploit mitigation are key to securing Windows.
- Security is improved by combining good user practices (passwords, local accounts, parental controls) with proper technical configuration.
- In professional environments, Intune and group policies allow for a uniform security strategy to be applied across all devices.

If you use Windows 10 or Windows 11, you already have a fairly decent antivirus installed by default: Microsoft Defender . The problem is that almost no one bothers to configure it thoroughly, and as it comes from the default settings, you're protected… but not as protected as you could be. With a few well-thought-out adjustments, you can take your system security to the next level.
In this guide, we'll see how to fine-tune Microsoft Defender to provide the best possible protection , both on a home PC and in a professional environment. We'll cover everything from basic interface options to advanced registry settings, ransomware protection, privacy settings, parental controls, and centralized management with Intune or Group Policy.
Update and check the status of Microsoft Defender
Before getting creative with the settings, make sure Defender's engine and signatures are fully up to date . An outdated antivirus is almost worse than having no antivirus at all.
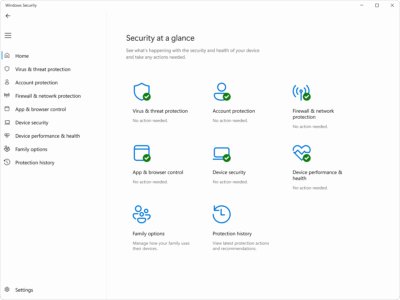
The quickest way to check for protection updates is to right-click the Windows Security icon in the system tray and choose "Check for protection updates ." You can also open Windows Security, go to Virus & threat protection , and click on Virus & threat protection updates.
It's a good idea to periodically open this section to check that no updates are stuck and that the system status is correct. This ensures that the analysis engine, heuristics, and malware signatures are up to date.
Harden Microsoft Defender from the Windows Registry
If you want to get the most out of Defender, you can activate options that don't appear in the graphical interface and that significantly increase the aggressiveness and depth of the scans . This requires modifying the Windows Registry, so be very careful what you do.
Navigate to the path HKEY_LOCAL_MACHINE\SOFTWARE\Policies\Microsoft\Windows Defender . Within that key, create two new child keys called MpEngine and Spynet (right-click on “Windows Defender” > New > Key, and enter the appropriate name).
Now go into the MpEngine key and, in the right pane, create a new 32-bit DWORD value called MpBafsExtendedTimeout . Assign it the value 0x19 in hexadecimal (25 in decimal). Then create another 32-bit DWORD called MpCloudBlockLevel and set its value to 0x2 in hexadecimal.
These settings control how long Defender can temporarily block a suspicious file while it queries the cloud and the level of aggressiveness when assessing cloud threats. Setting MpBafsExtendedTimeout increases the maximum blocking time to around 60 seconds, reducing the chance of a dubious file running before the cloud service classifies it. Setting MpCloudBlockLevel to 2 sets the cloud protection level to very strict, making Defender more likely to block anything with a poor reputation.
Next, open the Spynet key and create the following 32-bit DWORD values:
- DisableBlockAtFirstSeen with value 0.
- SpynetReporting with value 2.
- LocalSettingOverrideSpynetReporting with value 1.
- SubmitSamplesConsent with value 1.
Setting DisableBlockAtFirstSeen to 0 ensures that the system performs real-time checks against Microsoft Active Protection Service. This means that new files can be blocked as soon as they are viewed for the first time if their reputation is questionable.
A SpynetReporting value of 2 activates an advanced subscription to Microsoft's reputation service, sending more details about detected malware: file names, behavior, and system impact. This helps improve cloud defenses, but at the cost of sharing more information with Microsoft, which impacts privacy.
LocalSettingOverrideSpynetReporting with a value of 1 indicates that local settings can override group policy regarding data sending, useful when you need to adjust something on a specific computer even if a corporate GPO exists.
Finally, setting SubmitSamplesConsent to 1 causes samples of suspicious files to be sent automatically when telemetry allows. This increases Microsoft's ability to generate rapid signatures and detection models for emerging threats.
When you're finished, close the Registry Editor and restart your PC. From that point on, Defender will operate with a much stricter protection profile , especially against newly discovered threats.
Choose which files, folders, and processes Defender scans
Although it may sound strange, for maximum security it's sometimes necessary to tell Defender what not to scan . This is done to avoid conflicts with certain critical applications or development tools, and to optimize performance.
Open Windows Security and go to Virus & threat protection . Scroll down to Virus & threat protection settings and click Manage settings . At the bottom, you'll see the Exclusions section . Click Add or remove exclusions and then Add exclusion.
You can exclude a specific file , a file type (by extension), an entire folder , or a process. If you choose a file or folder, Explorer opens so you can select the path. If you choose a file type or process, a dialog box appears asking you to type the extension or the executable name.
As you add exclusions, they will be listed on the same screen. To remove any, click the small arrow next to it and then click Remove . It's advisable to use these exclusions wisely: each excluded item is something Defender no longer monitors , so you should only exclude what is strictly necessary and, if possible, restrict those exclusions to closed folders or processes you absolutely trust.
From the same Antivirus and Threat Protection panel, you also have access to the different types of scans :
- Quick testTypical folders where malware usually hides.
- complete exam: in-depth analysis of all files and drives.
- Personalized examYou choose which folders to review.
- Microsoft Defender Offline ScanOffline analysis to eliminate persistent threats.
If you suspect a specific folder (for example, Downloads or a directory where you work with third-party files), the best option is to use the custom scan . Select the location with "Scan now," select the folder, and click "Select folder." Defender will begin the scan and display a progress bar with the number of files scanned, the elapsed time, and the estimated time remaining.
Just below that is the Threat History , where you can see the date and type of the last scan, the number of threats found, the scan duration, and the number of files reviewed. It also shows quarantined threats and those manually allowed by the user.
From this section you can remove everything that is quarantined at once, or review item by item and decide what to permanently delete or what to restore (assuming, of course, the risk of reactivating a potentially dangerous file).
Protect yourself against ransomware with Microsoft Defender
One of Defender's most important functions, which is often disabled by default , is ransomware protection based on folder access control.
Ransomware encrypts your personal files and then demands a ransom (usually in cryptocurrency) to restore access. Paying guarantees nothing, and often the attackers' email addresses or contact channels are shut down, leaving you with both your money and your data.
To activate this protection, open Windows Security and go to Virus & threat protection . Scroll down to the "Ransomware protection" section and click on "Manage ransomware protection." There you will see the "Control folder access" option.
Enabling this feature prevents unauthorized applications from modifying or encrypting protected folders . Windows protects system folders and certain user paths by default, but you can add others as needed.
In the same panel, you can view the lock history, add new protected folders with "Add a protected folder," and remove those you no longer wish to protect (except for system folders, which cannot be disabled). The idea is to include everything critical to you here: work documents, photos, projects, etc., so that ransomware cannot easily access them.
Additionally, you can link your backup to OneDrive . If you sign in with your Microsoft account, you can set up automatic backups of your most important files to the cloud. This doesn't prevent the attack itself, but it does help you recover your data even if your PC has been completely encrypted.
Activate Defender tamper protection
Another very useful layer is tamper protection . This feature prevents malware or third-party applications from changing key Defender settings to silently disable or weaken it.
To activate it, go back to Windows Security, open Virus & threat protection , go to Virus & threat protection settings , and click Manage settings . There, find the tamper protection section and turn it on.
From that point on, any attempt to modify critical Defender settings from outside authorized channels will be automatically blocked . Note that this protection only covers Windows Defender itself; if you use a third-party antivirus, you'll need to check its settings for similar protection.
Identity theft monitoring with Microsoft Defender
Defender has grown beyond classic antivirus and in some plans and regions integrates identity theft monitoring features , relying on third-party technology such as Experian.
This feature, called Identity Theft Monitoring, is responsible for checking whether your personal data (such as email, ID documents, etc.) appears on suspicious sources or the dark web . It's not a superficial function: the service performs continuous monitoring and alerts you if it detects potential fraudulent use of your identity.
To use it, log in to your My Defender dashboard , select the "Get Started with Identity Monitoring" option, and create a profile. You'll be asked for some personal information, which will be cross-referenced with data found on the dark web and other sources. You can also add family members so the service can protect more than one person under the same subscription.
Additional security and privacy settings in Windows
In addition to Defender, Windows includes several security options that should be properly configured if you're looking for a truly robust environment . Many of them impact both protection and your privacy.
Protect your login: password, PIN, or fingerprint
The first thing is to prevent anyone from sitting in front of your PC and logging in without permission. To do this, you need to set up a secure login method: password, PIN, fingerprint, security key , or even picture password.
Go to Settings > Accounts > Sign-in options . From there, choose the option that best suits you (for example, Windows Hello with fingerprint or PIN) and follow the wizard. When you're finished, restart your computer if prompted so that the new protection is applied from startup.
Force periodic password changes
In business environments, it's very common to force passwords to expire periodically. The idea is that, even if someone has stolen it, its window of use is relatively short.
In versions of Windows that support it, you can configure this by opening Run (Win + R), typing netplwiz , and pressing Enter. In the window that appears, go to the Advanced tab , enter Advanced options in the Local Users and Groups section, and select Users . Then, in the right pane, double-click the desired user and uncheck "Password never expires."
By default, Windows usually requires a password change every 42 days , although this can be adjusted through group policies. If you don't have access to group policies, you can use the command line with an administrator-level command prompt!
Run this command to activate account expiration on all accounts:
wmic UserAccount set PasswordExpires=True
And if you want to apply it only to a specific user:
wmic UserAccount where Name=UserName set PasswordExpires=True
Replace Username with the actual account name. This ensures that the credentials are renewed periodically.
User Account Control (UAC)
User Account Control (UAC) is that annoying pop-up window that appears when a program wants to make significant changes to the system. But it's precisely this annoyance that prevents malicious software from tampering with sensitive parts of the system without your knowledge.
To verify that User Account Control (UAC) is enabled, open Control Panel and go to System and Security > Security and Maintenance . Expand the Security section and check the User Account Control status . If it appears as disabled, click the link to change settings and choose a level that will prompt you when an application attempts to make changes (don't set it to the lowest level if you're prioritizing security).
Use a local account instead of a Microsoft account
Microsoft is trying to get almost everyone to use cloud accounts, but a traditional local account has clear advantages in terms of privacy and control. It doesn't sync settings or data between devices, but it also reduces the attack surface.
If you're currently signed in with a Microsoft account and want to switch to a local account, go to Settings > Accounts > Your info and look for the option " Sign in with a local account instead ." If the local account doesn't already exist, first create one from Accounts > Family & other users > Add someone else to this PC , choosing "Add a user without a Microsoft account."
Once created, in Your Information enter the new username and password, answer the security questions if prompted, and then log out and log in with your local account. This will give you a profile that is more isolated from the cloud.
Parental control and family protection
Windows integrates a Family Options section in Windows Security designed to control what children do on the PC and on the Internet.
In the family dashboard, you can add child accounts linked to your Microsoft account and set screen time limits, web content restrictions , allowed apps and games, as well as receive activity reports.
Among the most important options are:
- Define which websites the minor can visit (whitelists or blacklists).
- Set a daily PC usage limit, after which the computer is locked for that user.
- Choose which apps and games are allowed or block all of them except the ones you select.
Other advanced security settings
Beyond the main functions, there is a set of settings worth reviewing if you want a very well-protected Windows , especially in professional or high-risk environments.
Customize vulnerability protection (Exploit Protection)
Windows 10 and 11 include a built-in exploit mitigation system that you can find by searching for " Vulnerability protection " or "exploit" in the Start menu. It's located under Windows Security > App and browser control ; it's also recommended to review Windows security vulnerabilities related to exploits and patches.
This tool has two configuration areas: one for the entire system and another specific to each program. The global configuration is usually quite fine-tuned by default, with most mitigations enabled, so there's no need to overcomplicate things there unless you have a specific case.
The really interesting part is the per-program configuration tab. From there, you can add specific applications using " Add program to customize " and adjust mitigations for each one, such as data execution protection (DEP), arbitrary code protection, blocking of low-integrity images, and other mechanisms.
The idea is that the most vulnerable applications (browsers, PDF readers, office suites, design software, etc.) should have a higher level of hardening, minimizing the likelihood that an unpatched vulnerability can be successfully exploited . However, it's advisable to review each option in Microsoft's documentation to understand its function and avoid compromising critical programs.
Check and keep the Windows Firewall active
As obvious as it may seem, there are still computers where the Windows Firewall is disabled or misconfigured. A good antivirus is of little use if you leave all network ports open; consider using the best free program to manage the Windows Firewall and strengthen it.
To check this from the Control Panel, go to System and Security > Security and Maintenance > Security and review the firewall status. You can also view it in Windows Security under Firewall and Network Protection , which displays the status for domain, private, and public networks.
Make sure that, at a minimum, public networks are strictly protected , and that there are no strange rules allowing incoming connections that you don't recognize.
Manage Microsoft Defender notifications
Defender starts up with Windows and continues working in the background. Its system tray icon displays a green circle with a white checkmark when everything is working correctly. From there, you can access its settings and, among other things, adjust notifications.
Click on the icon, tap the gear in the bottom left corner and go to the Notifications section , where you will see the "Manage notifications" link.
On that screen you can control three main blocks :
- Virus and threat protection notifications.
- Account protection notifications.
- Firewall and network protection notifications.
Within the virus and threat notifications, you can disable the general "Get informational notifications" switch or select which alerts you want to receive: recent scan results, detections that do not require user action, or blocks of suspicious files that have already been neutralized.
Account protection notifications refer, for example, to problems with Windows Hello or dynamic locking, while firewall notifications alert you to network configuration changes or traffic filtering incidents. You can enable only the notifications you find truly useful to avoid constant noise without missing important information.
Security vendor management
On the Antivirus and Threat Protection screen , there is an unassuming but very useful link called “ Manage providers ”, just below “Who protects me?”.
Clicking it will show you which components handle antivirus, firewall, and web protection. If you only use Defender, it will appear as the primary solution. From here, you can switch to other installed products, open their settings, and, if you wish, search for additional security apps in the Microsoft Store to enhance web protection (for example, additional browsing filters or anti-phishing).
Disable update downloads from other devices
Windows 10 and 11 include an option called "Distribution Optimization" that allows you to download updates from other PCs on the network and even from computers on the Internet, turning your computer into a kind of P2P node for updates.
This speeds up downloads, but it also allows your PC to share data with others . If you're looking for security and control, it's best to block it.
To do this, go to Settings > Update & Security > Windows Update , enter Advanced options , and then Distribution Optimization . There, turn off the Allow downloads from other PCs switch.
Check and automate Windows updates
Keeping Windows up to date is key to ensuring that security patches cover newly discovered vulnerabilities . From the Windows Update section, you can check for pending updates and force their download and installation.
Open Settings > Update & Security > Windows Update and check the status. It's best to leave automatic updates enabled so you don't have to remember to do it manually.
While you're at it, take the opportunity to regularly review the list of installed programs in Settings > Apps. If you see anything suspicious or that you don't remember installing, investigate it and, if in doubt, remove it. Many problems originate from software added "through the back door" alongside other downloads.
Managing Microsoft Defender in professional environments
In organizations with many teams, it doesn't make sense to adjust Defender one by one. For this, Microsoft offers integration with Intune and management through Group Policy , allowing for the deployment of uniform policies.
Configure Defender with Microsoft Intune
From the Intune Admin Center, you can create antivirus policies specific to Windows and macOS. These policies group settings such as real-time protection, scheduled scans, access control, Windows Security user experience, and much more.
The basic workflow for a new Windows antivirus policy is:
- Open Intune, go to Endpoint Security > Antivirus.
- Create a new policy, selecting the platform as your platform Windows 10, Windows 11 and Windows Server and the profile Microsoft Defender Antivirus.
- Fill in the name and description, then configure the desired options in the section Defender (for example, real-time protection levels, analysis times, actions on malware, etc.).
- Assign scope labels if you use them to segment administration.
- Assign the policy to the corresponding device or user groups and create it.
For macOS the process is similar, choosing the macOS platform and the Antivirus profile , with specific settings documented for Microsoft Defender for Endpoint on Mac.
If you need to modify an existing policy, simply select it from the list, click Edit in the settings section, make the necessary changes, and save. Intune will then propagate the new policies to the managed computers.
Using Group Policy Objects (GPOs) for Defender
In Active Directory domains, it's common to manage Defender using administrative templates . It's important to know that if tamper protection is enabled, some Group Policy Object (GPO) changes to protected configurations will be ignored. You can't, for example, disable tamper protection directly from the GPO; you would have to use troubleshooting mode to temporarily disable it, and it will be rolled back.
To configure always-on protection using group policy on a local computer (or in a domain GPO), do the following:
Open the Local Group Policy Editor by typing gpedit in the search box and selecting “Edit Group Policy” . Then navigate to Computer Configuration > Administrative Templates > Windows Components > Microsoft Defender Antivirus.
In the right panel, enable the option “Allow the antimalware service to start with normal priority” . This ensures that the Defender service loads properly at system startup.
Next, go to the Real-time Protection section and review the different policies available (depending on the latest ADMX version). From there, you can define, for example, whether to temporarily disable real-time protection, and whether to inspect downloaded files, scripts, email attachments, etc.
In the Scan section, activate at least the "Enable heuristics" policy , which makes Defender use behavior-based analysis techniques to find unknown malware, not just by signature.
If you ever need to disable real-time protection via GPO (for controlled testing, for example), you can enable the "Disable real-time protection" option within the Real-time Protection settings . Again, keep in mind that tamper protection may prevent this change if it's active and managed from the cloud.
To keep all these policies up to date, make sure you're using the latest Microsoft ADMX administrative templates so you have access to all the settings available for the latest versions of Windows.
With all these adjustments, combining hardening of the Defender engine, ransomware protection, account policies, update control and centralized management, you can leave your Windows in a state of security well above average , without always having to resort to expensive and, in many cases, redundant third-party products.