- Bambu Studio is an open-source, cross-platform, project-oriented slicer with optimized profiles for Bambu Lab and third-party printers.
- It offers intelligent material management, advanced multi-color printing, detailed layer simulation, and cutting algorithms that improve quality and time.
- It integrates remote monitoring, Bambu Handy, MakerWorld, and automatic calibration tools to simplify daily use and management of multiple printers.
- It allows you to export printing metrics and integrate them into analysis and management systems, making it a valid solution for both hobby and professional use.
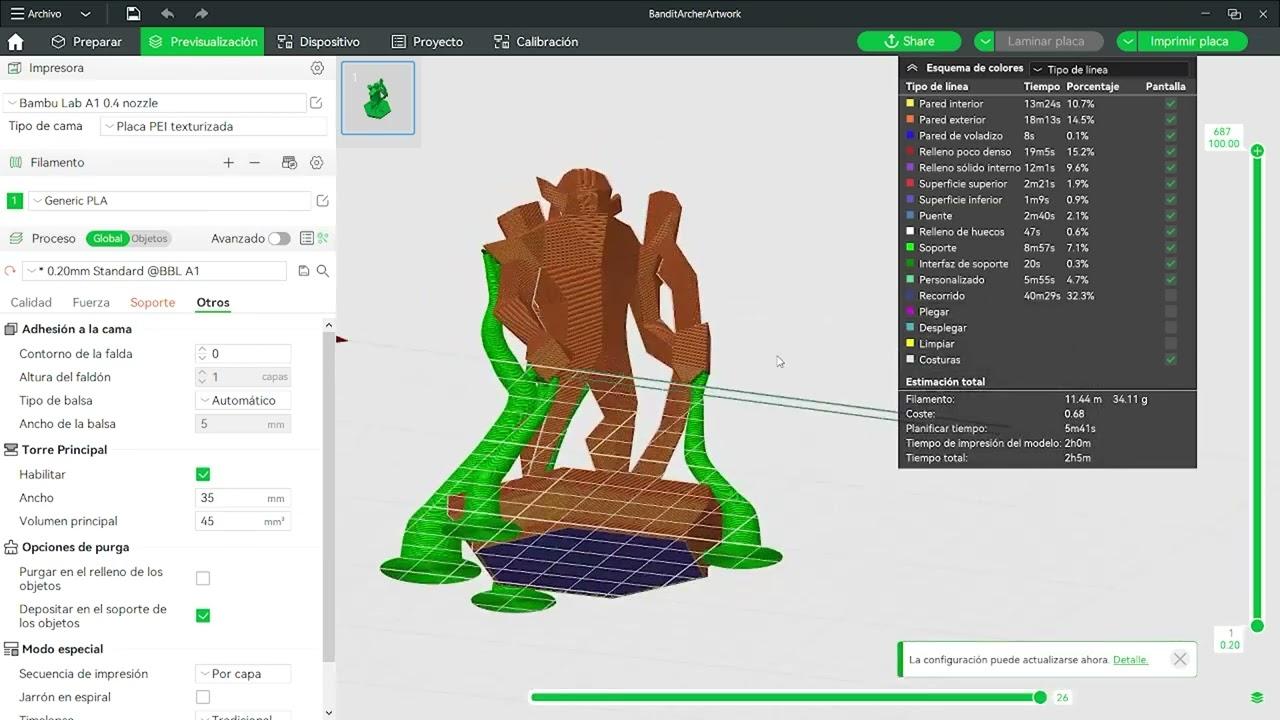
Bambu Studio has carved out a strong niche among modern slicers because it combines ease of use, advanced tools, and near-perfect integration with Bambu Lab 3D printers. Whether you're new to 3D printing or have been experimenting with profiles and G-code for a while, this software lets you get the most out of your machines without getting bogged down in complicated configurations.
In addition to being an open-source, cross-platform, and feature-rich software , it stands out because it is not limited to "cutting" models: it manages complete projects, filaments, remote monitoring, and automatic calibrations designed to get the most out of both home computers and small workshops or professional environments.
What is Bambu Studio and why is it getting so much attention?
Essentially, Bambu Studio is an advanced slicing software initially designed for Bambu Lab's FDM 3D printers, but which now also supports many machines from other manufacturers. Its main function is to convert a 3D model into G-code, that is, into detailed instructions that the printer understands to create the part layer by layer.
This program is based on PrusaSlicer as a starting point, but Bambu Lab has thoroughly modified it to adapt it to its ecosystem and add its own tools. The result is a slicer with a very practical approach: projects, advanced profiles, multi-color functionality, and an interface designed so you don't have to waste half an afternoon looking for where each setting is.
One of its biggest advantages is that it's open-source software available for Windows, macOS, and Linux . Regardless of your operating system, you can install it without problems and benefit from its continuous updates, as the company is currently expanding and improving its entire ecosystem.
It's also worth noting that the slicer includes pre-configured profiles for all Bambu Lab printers (such as the X1C and P1P) and for a good number of third-party printers, in addition to profiles for common materials. This greatly reduces setup time and allows you to focus on printing, not wrestling with the parameters.
Interface, sections, and project workflow
Once installed, the first thing you'll notice is that Bambu Studio's interface is organized into very clear sections : Home, Prepare, Preview, Device, Project, and Calibration. Each one has a specific purpose and facilitates an organized workflow, even when managing multiple printers or complex projects.
The Home section is the program's main interface: access to recently used files, the creation of new projects, shortcuts to the most common functions, and a user manual linked to the official Bambu Lab wiki. For beginners, having these resources readily available is a huge help in getting started.
The Prepare section is the heart of the slicing process. Here you place the model on the bed, choose the printer, print bed, filament, layer height, quality, speed, supports, and other key options. One interesting feature is the ability to work with different print surfaces and configurations simultaneously , which is very useful for comparing materials, colors, or print beds without having to switch profiles constantly.
Once everything is ready and you click "Slice," the G-code is generated, and you move to the Preview section . In this view, you can review layer by layer how the machine will print, visualize supports, perimeters, infill, and movements , and detect potential errors before wasting filament and printing time. Detailed layer simulation is one of the key tools for improving the success rate of your prints.
The Device section, on the other hand, focuses on real-time printer control. From here, you can monitor temperatures, filament consumption, and printing progress , as well as activate the integrated camera on compatible devices and use the "Go Live" function to see what's happening on the print bed live, even remotely.
The Project tab becomes useful when you're dealing with complex projects with many parts. Instead of having individual models, you can organize the project as a set of related elements , manage revisions, versions, specific configurations, and coordinate all the preparation for large part runs or assemblies.
Finally, the Calibration section handles fine-tuning extrusion and flow settings. It includes options such as Flow Dynamics Calibration and Flow Rate Calibration , which adjust extrusion behavior in response to changes in filament, nozzle, or parameters, and correct problems like overextrusion, underextrusion, or poor surface quality.
Material management, multi-color and dynamic bed control
One of the features most valued by advanced users is Bambu Studio's intelligent material management . The software can automatically adapt temperatures, speeds, and other critical parameters according to the selected filament, minimizing typical errors in the first layers and improving adhesion.
This intelligent material management system relies on meticulously crafted profiles for different filament types and brands . Furthermore, the user can select not only the material but also the color for each spool, which is especially important when working with multi-color devices or Bambu Lab's proprietary AMS (Automatic Material System).
Another key difference is the dynamic heated bed control . The slicer works in conjunction with the printer, adjusting developments and compensations to correct potential warping during printing, improving adhesion without the need for complicated manual calibrations . This is especially useful for large parts or materials prone to warping.
Regarding multicolor printing, Bambu Studio offers comprehensive tools for coloring models . It allows you to assign colors to different parts, manage filament changes, control purge times, and optimize print paths to reduce waste. For those coming from a simpler slicer, the leap in control over multicolor printing is remarkable.
This entire material and multi-color management system integrates with an all-in-one, project-based workflow , making it easy to switch between viewing individual components and the overall system without losing context. When working with multiple components or color combinations, having everything organized into projects saves countless clicks and prevents oversights.
Optimized slicing algorithms and advanced layer simulation
Bambu Studio stands out not only for its interface; under the hood, it boasts highly refined segmentation and slicing algorithms . These algorithms have been continuously optimized to improve printing times without sacrificing quality, and to produce smoother movements that reduce vibrations and artifacts in the printed parts.
Thanks to these algorithms, the software can optimize printhead paths to reduce unnecessary retractions, minimize idle travel, and smooth out abrupt changes in direction. This has a direct impact on surface quality and the robustness of parts with many details or complex geometries.
The layer simulation view allows for a thorough inspection of the nozzle's path: perimeters, infill, supports, anchor lines, etc. The ability to anticipate problems before printing results in fewer failed attempts, less wasted material, and better control over the final product, both in home and professional settings.
This approach is reminiscent of advanced solutions that apply techniques close to artificial intelligence to optimize movements and times , but with an interface simple enough for the average user to take advantage of them without needing programming or numerical control knowledge.
In industrial or small production scenarios, these efficient cutting algorithms combined with a good support, infill and layer height strategy allow you to reduce many machine hours throughout the week , something that is really noticeable when you work with several teams and tight deadlines.
Cloud integration, Bambu Handy, and multi-printer management
Beyond the cutting itself, one of the strongest points of the Bambu ecosystem is its integration with the cloud and remote monitoring tools . Bambu Studio connects with the brand's online services so you can control your printers from anywhere, as long as you have an internet connection.
The Bambu Handy mobile app , available for iOS and Android, acts as a control center for Bambu Lab printers. From your mobile device, you can monitor print progress, switch between different printers, and launch pre-configured jobs without having to use a computer for every simple task.
This integration includes the "Go Live" function , which allows you to view live video of what's happening at the printer via the integrated camera. Combined with notifications and remote control, this is especially useful when managing multiple machines from a workshop, a small factory, or even your home while you're in another room or away.
Bambu Studio also connects with MakerWorld and MakerLab , platforms that centralize the management of models, projects, and templates. This means you can store, organize, and launch prints from a single platform , sharing configurations and designs across different teams and users.
In more corporate environments, some users combine Bambu Studio with custom solutions and cloud services like AWS or Azure to centralize model libraries, manage project backups, and integrate production information into internal management systems. In these cases, cybersecurity plays a crucial role, and it's advisable to implement robust protocols and access controls.
Automatic calibrations and advanced flow adjustments
One of Bambu Lab's competitive advantages is its strong commitment to automating calibration tasks . Bambu Studio incorporates features designed to reduce the burden of manual adjustments and ensure that quality remains consistent when changing filaments or nozzles.
Within the Calibration section, you'll find the Flow Dynamics Calibration tool , which Bambu Lab has automated for many of its official filaments. This option analyzes how the material responds to different extrusion conditions and adjusts internal parameters to improve consistency , which is especially useful when switching from one filament brand to another or changing types (PLA, PETG, etc.).
The Flow Rate Calibration option is more advanced and focuses on the relationship between the expected extrusion volume and the actual volume. If you detect overextrusion (excess material), underextrusion (insufficient material), poor surface quality, or structural weakness , this calibration allows you to fine-tune the extruder's behavior to correct these problems.
These functions become especially important when using third-party filaments or nozzles other than the standard ones . In those cases, proper calibration can be the difference between a perfectly finished part and a print riddled with defects.
What's interesting is that, despite the complexity behind it, Bambu Studio presents these settings in a fairly accessible way , relying on the BambuLab Wiki documentation and the community to guide users step by step when they need to fine-tune beyond the standard profiles.
Exporting metrics, cost analysis, and professional use
Bambu Studio isn't just for hobbyists; it also includes tools for analyzing printing performance and costs . The software allows you to export metrics and data for each job, enabling more rigorous control over time, material consumption, and results.
This data can be integrated into external control panels, for example in Power BI or other business intelligence tools, to study productivity, consumption per machine, costs per piece or per customer, and other key indicators of interest to companies that mass-produce or manage a small fleet of printers.
In this context, some organizations go a step further and connect Bambu Studio with internal software or custom-developed solutions to automate part of the flow: from receiving the order to generating the G-code, planning print queues and registering finished parts.
Combined with scalable cloud services and automation strategies with AI agents , the software can become the core of a connected additive manufacturing system, where each print generates data that is then used to optimize parameters, adjust times, or make investment decisions on new machines.
All of this makes Bambu Studio more than just a simple home slicer ; it becomes a strategic tool for those who want to introduce 3D printing into their value chain, from independent designers to small factories or engineering departments.
Hardware requirements and frequently asked questions about performance
As with any modern editing software, Bambu Studio's performance is heavily dependent on the PC hardware you're running it on, especially when working with large models or scenes with many parts. Bambu Lab itself publishes minimum and recommended specifications in its quick start guides.
Key aspects include graphics capabilities and OpenGL support . For a smooth experience, it's important to have a GPU or integrated graphics card that competently supports at least OpenGL 2.0, as the 3D view, layer previews, and certain effects depend on it.
In forums and online communities, it's common to see questions about whether certain budget mini PCs are sufficient to run Bambu Studio . For example, the case of systems with 11th-generation Intel processors like the N5095, along with 8 GB of RAM and a 256 GB SSD, has been raised. While in many cases these mini PCs meet the minimum specifications, the actual experience can vary depending on the size of the model and the use of advanced features.
If your budget is tight, it's reasonable to make sure you meet or exceed official recommendations , pay attention to OpenGL 2.0 or higher support, and, if possible, opt for 16 GB of RAM when you're going to work with complex models or perform many slice operations per day.
In any case, the Bambu Lab community is very active, and you can easily find reviews from users with similar setups to yours . This will help you know in advance whether a particular mini PC is more than enough, just enough, or falls short for your actual use with Bambu Studio.
Installation, getting started, and community resources
The Bambu Studio installation process is quite straightforward and intuitive . Once you download the installer for your operating system, the wizard guides you through connecting your printer, selecting filaments, and loading the most common print profiles. In just a few minutes, you can be preparing your first model.
Once you complete this initial setup, the user interface is presented in a clean and uncluttered way . The Home section provides access to recent files, a clear button for new projects, and direct links to documentation—all designed so that even if you're new to 3D printing, you can navigate the process with ease.
If you ever get stuck, you can use the Bamulab Wiki (the brand's technical encyclopedia) , which explains both the software's functions and general 3D printing concepts. This combination of official documentation and pre-configured profiles makes learning less daunting than with other, more basic slicers.
Furthermore, Bambu Lab boasts a large and active community , especially on its official forum and Facebook group, which has well over tens of thousands of members. There, users share personalized profiles, tips, troubleshooting solutions, and all sorts of experiences with Bambu Studio and the brand's printers.
This ecosystem of documentation and community greatly reduces the feeling of being lost. Even for those new to 3D printing, the environment is designed to be accessible and user-friendly , avoiding that initial barrier that sometimes discourages people when they first encounter a slicer.
Overall, Bambu Studio has established itself as a leading slicer that combines power, automation, and cloud integration . Its project-based workflows, intelligent material management, advanced multi-color printing, remote monitoring, and calibration and analysis tools make it a software capable of supporting both the beginner hobbyist and the professional looking to scale their production with multiple FDM 3D printers.