- Configure Storage Sense to remove old Downloads files without affecting your important documents.
- Take advantage of automatic cleaning of temporary files, trash, and OneDrive to continuously free up space.
- Use File Explorer to locate the largest files and move them to external drives when necessary.
- Control Disk Cleanup from Settings and Control Panel to avoid deleting downloads you want to keep.
We all have that Downloads folder on our computers that ends up becoming a real mess : installers we've already used, documents we only needed once, duplicate photos, huge videos… and, over time, all of that takes up an absurd amount of disk space. If you've never paid attention to it, it's quite likely that your Downloads folder is currently a small digital jungle.
The good news is that Windows 10 and Windows 11 include several features designed to keep digital clutter under control almost automatically , so you don't have to remember to delete files every few minutes. Among them, Storage Sense stands out, but there are also manual options and classic tools like Disk Cleanup. Let's see how to make the most of them, how to avoid surprises, and how to combine them with some simple tricks to stop your Downloads folder from becoming a permanent dumping ground.
Why it's a good idea to keep your Downloads folder clean
The Downloads folder is usually the default destination for everything you download from the internet: programs, documents, compressed files, images, music, videos, and even copies of things you already have . At first, it's not a problem, but as the months go by, the files accumulate and problems begin.
On the one hand, every file takes up disk space . A single PDF might be small, but several game installers, high-resolution videos, or large documents can add up to several gigabytes without you even noticing. As your disk fills up, Windows is more likely to slow down and you'll start seeing low disk space warnings; to mitigate this, learn how to speed up a slow Windows.
Furthermore, it's very easy to lose track of what's in your Downloads folder . You end up with several files named "document (1).pdf", "document (2).pdf", or "setup.exe" that you no longer know what they are or why you downloaded them. This makes it difficult to find what you actually need and increases the likelihood of accidentally deleting something useful or saving duplicate copies because you can't locate the original.
There's also a security point: keeping lots of executables and unknown files in Downloads increases the risk of running something you don't remember where it came from . Regularly cleaning that folder (and if possible, automatically) reduces that risk surface if you learn how to use Windows Sandbox.
In short, keeping your Downloads folder organized is a matter of order, performance, and security . The good news is that Windows comes with several built-in tools to help you, and if you configure them properly, you'll hardly have to think about it again.
What is Windows Storage Sense?
Storage Sense is a built-in feature in Windows 10 and Windows 11 that automatically manages disk space . Its purpose is to detect temporary files, unused data, and other unnecessary items and delete them without you having to do it manually each time.
On a practical level, Storage Sense analyzes temporary application files, cache data, Recycle Bin contents, and even the Downloads folder . Based on rules you configure, it deletes what it considers unnecessary, always respecting the timeframes you've chosen.
One of its most interesting features is its ability to focus on the Downloads folder and keep it clean automatically . This means that after a certain number of days of inactivity, Windows can delete a file for you. Ideal if you're the type of person who downloads something, uses it once, and then completely forgets about it.
The Sensor isn't limited to downloads. It can also delete files that have been in the Recycle Bin for more than 30 days , clear system and application caches, and manage files synced with OneDrive so they only take up space when you need them.
The curious thing is that, despite how useful it is, this feature goes unnoticed by many Windows users . Many people still delete things manually or simply never clean up until their disk is full and the system starts complaining.
How to enable Storage Sense in Windows 10 and 11
To start using Storage Sense, the first step is to enable it in Windows settings. The process is very similar in Windows 10 and Windows 11 , with slight cosmetic changes, but the basic steps are as follows:
1. Press Windows key + I to open the Settings app.
2. Enter the section System.
3. Within System, access Storage.
4. Activate the power switch Storage sensor if it is disabled.
Once you activate it, you'll see a link like "Configure Storage Sense or run it now ." That's where the real magic happens, because you'll be able to define exactly what you want Windows to clean and how often.
At the top of that screen, you can select how often you want the Sensor to run : every day, every week, every month, or whenever the system detects that it's running out of space. If you have a small hard drive or tend to fill it up quickly, setting it to run more frequently can save you from many low-space warnings.
Further down you'll find interesting options related to temporary files, the Recycle Bin, and, of course, the Downloads folder. It's a good idea to carefully review all these sections the first time , especially before enabling any automatic deletion of content you don't want to lose accidentally.
Configure automatic cleaning of the Downloads folder
Within the Storage Sense settings, you'll find a specific section dedicated to downloaded files that haven't changed in a while . This is where you can tell Windows what to do with that forgotten material sitting in your Downloads folder.
This option usually appears as a drop-down menu with several time intervals. The typical choices are: Never, 1 day, 14 days, 30 days, or 60 days . Your selection here will determine how many days a file can remain unmodified in Downloads before the system automatically deletes it.
If you select "Never ," you disable automatic cleanup of Downloads: the Sensor will still handle other items (temporary files, trash, etc.), but will leave that folder untouched. This is the right option if you prefer to manage your downloads manually or if you're worried about deleting something important.
If you choose a short period, such as 1 day , the Sensor will delete almost everything you don't use immediately. It's quite aggressive and only recommended if you're absolutely certain that you'll quickly move what you download to another location or use it right away. For most users, it's usually excessive.
Intermediate options, such as 14, 30, or 60 days , offer a much more reasonable balance. Setting it to 30 days, for example, gives you time to use downloaded files without worry and, at the same time, prevents them from being forgotten for months. For most people, this timeframe is a good middle ground between convenience and cleanliness.
Keep in mind that the Sensor uses files that haven't changed in that time as a reference . If you open or modify a downloaded file, its date is updated, and therefore the system assumes it's still in use and doesn't delete it. In other words, it primarily targets the typical files you download once, never open again, and that just sit there taking up space unnecessarily.
Manage temporary files, the recycle bin, and OneDrive with the Sensor
In addition to the Downloads folder, Storage Sense can handle many other digital "waste" files that silently accumulate. A key part of its usefulness lies in how it manages temporary files and the Recycle Bin.
In the temporary files section, you can tell Windows to automatically delete temporary data that applications no longer use . This includes caches, installation remnants, and small files created on the fly for certain tasks. They are usually not essential and, over time, can take up a considerable amount of space.
Another key feature is the Recycle Bin. The Sensor allows you to activate an option to delete files that have been in the Recycle Bin for more than 30 days . This prevents you from using the Recycle Bin as permanent storage and filling it up with files that you're unlikely to restore.
If you use OneDrive, you can also make synced files you haven't recently opened "online only ." This means they'll still appear in File Explorer, but their content will only be downloaded when you open them; until then, they won't take up any disk space. This is a significant help for laptops with small SSDs.
Combining these options not only makes your Downloads folder, but the entire system much lighter ; it's also advisable to remove bloatware from Windows 11 to improve the result.
Use File Explorer to locate and sort large downloads
Beyond automation, it's still very useful to learn how to quickly locate which files are taking up the most space and manually decide what to keep and what to delete . For that, Windows File Explorer is more than sufficient if you know where to look.
Start by opening File Explorer from the taskbar and navigate to "This PC". In the left pane, you'll see your main folders: Documents, Pictures, Videos, Music, and, of course, Downloads. All of these are likely to accumulate large files, but the Downloads folder is often the one that hides the most surprises.
To clearly see what's taking up the most space, switch the folder view to "Details" using the View tab , and then sort the files by size. Right-click an empty space in the folder, choose "Sort by," and select "Size ." The largest files will appear at the top.
With that list in front of you, you can identify old installers, huge videos, or backups you no longer need . You'll likely find several forgotten files, some hundreds of megabytes or even several gigabytes in size. Deleting them or moving them to another location can free up a significant amount of space in just minutes.
If there's content you don't use often but want to keep, consider moving it from Downloads to an external storage device , such as a USB drive or SD card. This way, you still have access to it, but it no longer takes up space on your main drive.
How to move Downloads files to an external drive
When you perform a manual cleanup, you often find things you don't want to delete, but you also don't need to keep them permanently on the system disk . In those cases, the best solution is to move them to an external drive.
The process is simple: connect a USB flash drive, external hard drive, or SD card to your PC and wait for Windows to recognize it. You'll see the new drive in the left pane of File Explorer, with its corresponding drive letter (for example, E:, F:, etc.).
Next, go to your Downloads folder and select the files or folders you want to remove . You can use the Ctrl key to select multiple items or Ctrl+A to select all, and then deselect the items you prefer to keep on your PC.
Once selected, click the "Cut" button in the top ribbon (or use Ctrl + X). Then, navigate to the external drive, open the folder where you want to save them, and press "Paste" (or Ctrl + V). The files will be moved to the external drive and will no longer take up space on your local disk.
This way you can free up space on your main computer while keeping a safe copy of anything you don't want to lose . Just remember that you can only access these files when the external drive is connected, so don't store anything there that you need frequently.
Disk cleanup: differences between Control Panel and Settings
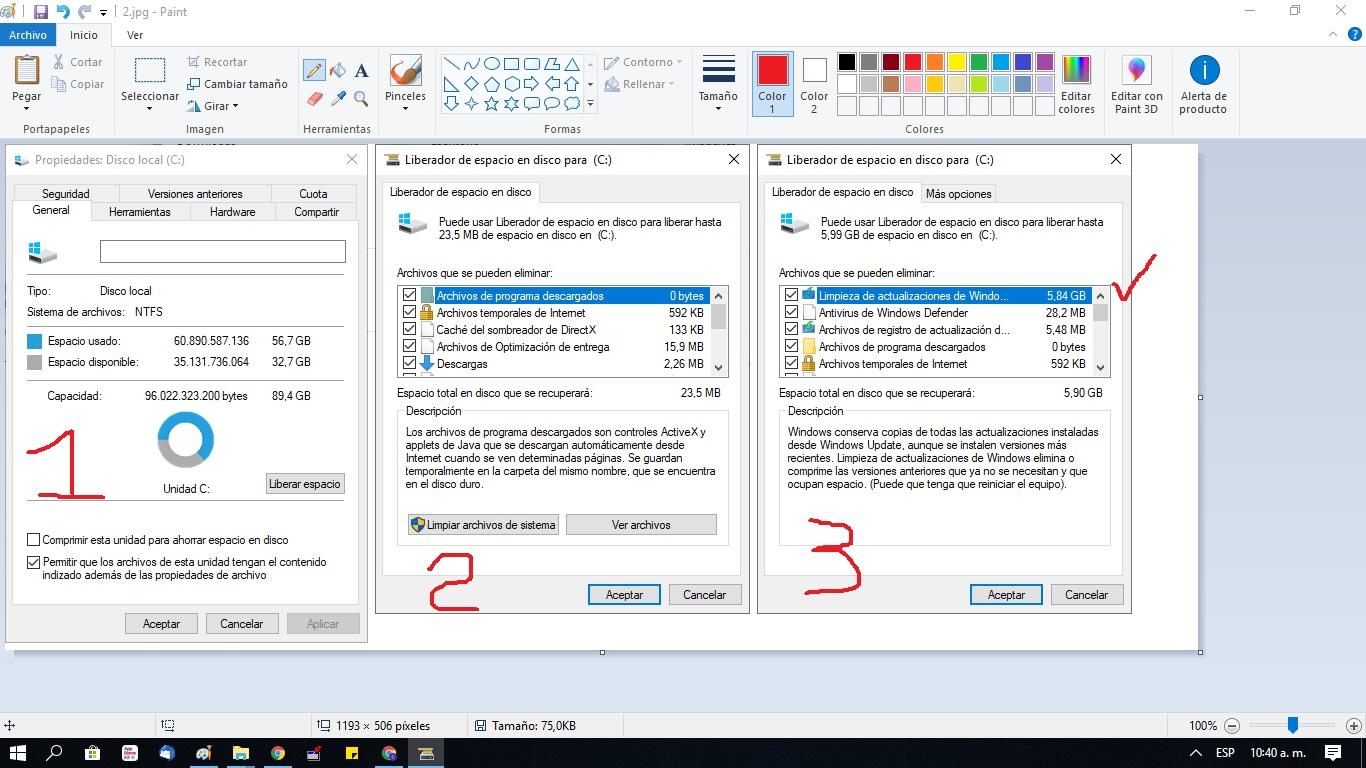
In addition to Storage Sense, Windows has included the classic Disk Cleanup tool for years , which is still available, though somewhat hidden. Interestingly, you can access it from two places: the old Control Panel and the modern Settings interface, and its behavior isn't exactly the same.
If you access Disk Cleanup from the Control Panel , you'll see the familiar window with a list of checkboxes. This list includes items like temporary files, thumbnails, Recycle Bin files, update remnants, and so on. In this classic version, the Downloads folder doesn't appear as an item to clean , so you can safely select all the options without fear of accidentally deleting your downloads.
When the system detects that you are running out of space, this Disk Cleanup tool can help by deleting data that Windows considers unnecessary , but without affecting your personal files or Downloads folder if you use it from the Control Panel.
Things change in the version integrated into Windows 10's modern Settings . There, the options are more organized and better integrated with Storage Sense, but a specific checkbox for the Downloads folder is also included. This means that if you inadvertently select it, you could end up deleting files from Downloads when the cleanup is run.
To access this feature, go to Settings > System > Storage and look for the space cleanup options . There you can enable automatic cleanup and choose what you want to delete, including (if you choose) the contents of your Downloads folder after a certain period. It's a very powerful feature, but use it wisely to avoid any unpleasant surprises.
Precautions to avoid deleting important files
The fact that Windows can automatically delete files from the Downloads folder is very convenient, but it can also be unsettling, especially if you have the feeling that there are programs or documents that may still be necessary.
The first thing you should know is that, in general, deleting files from your Downloads folder doesn't break programs that are already installed . Most applications are installed in other locations (like Program Files), and the installer you downloaded remains only as a copy. Deleting it doesn't uninstall anything; it simply frees up the space that the installation file occupied.
Where you really need to be more careful is with files you use as portable installations, configurations you've saved manually, or work documents that you habitually leave in Downloads instead of moving them to your project folders. In those cases, if you activate an aggressive automatic cleanup, you could lose useful files without realizing it.
Therefore, before activating very short deletion times or checking boxes without looking, it's a good idea to do an initial manual review of your Downloads folder . Move anything you want to keep to Documents, Pictures, Videos, or other organized folders, and leave only what will be completely unnecessary after a while in Downloads.
If you're worried that Windows may have deleted something without your consent, or if you suspect system errors, Microsoft itself recommends checking that the option to delete Downloads files within 30 days is disabled (set to Never) in your storage settings. If you continue to experience unusual behavior, you could consider performing a system integrity scan using tools like sfc /scannow and the DISM commands, always from a command prompt with administrator privileges.
In any case, with careful configuration and a little initial organization, it's perfectly possible to automate a good portion of the cleanup without any real risk to your important files . The key is not to rely solely on automatic deletion without first organizing your folders at least minimally.
If you make good use of Storage Sense, Disk Cleanup, and File Explorer's options for locating and moving large files, your Downloads folder can go from a bottomless pit to a manageable space . With a minute of setup and a couple of simple habits, and by learning how to use PC Manager , you'll gain space, speed, and peace of mind knowing that Windows is taking care of sweeping up the digital junk you no longer need.
Table of Contents
- 1 Why it's a good idea to keep your Downloads folder clean
- 2 What is Windows Storage Sense?
- 3 How to enable Storage Sense in Windows 10 and 11
- 4 Configure automatic cleaning of the Downloads folder
- 5 Manage temporary files, the recycle bin, and OneDrive with the Sensor
- 6 Use File Explorer to locate and sort large downloads
- 7 How to move Downloads files to an external drive
- 8 Disk cleanup: differences between Control Panel and Settings
- 9 Precautions to avoid deleting important files