- Customizing Ubuntu with themes, icons, and docks allows you to make its appearance closer to Windows 11 or macOS without sacrificing the stability of Linux.
- Tools like Gnome Tweak Tool and lightweight docks like Plank are key to easily applying and managing these changes.
- The position of the window buttons, the multitasking view, and the hot corners help maintain a comfortable and productive workflow.
- It is possible to balance aesthetics and performance, adapting the configuration to the needs and resources of each team.

If you use Linux daily but are drawn to the polished aesthetics of Windows 11 or macOS , you're in luck: you don't need to switch systems to enjoy a similar look and feel. With a few well-chosen tweaks, you can make your Ubuntu system maintain the stability and flexibility of Linux, but with a visual environment much more familiar if you're coming from Windows or a Mac.
Many users find themselves in a hybrid environment, dual-booting between Windows and a Linux distribution . If you're migrating from Linux to Ubuntu , you'll likely find yourself missing features in one system that you love about the other. Others have become so accustomed to the GNOME or Ubuntu workflow that they want to replicate that experience in Windows, or vice versa: they want their Ubuntu to resemble Windows 11 or have the visual appeal of macOS. In this article, we'll focus on how to shape Ubuntu to bring it closer to these two worlds, combining themes, icons, docks, and advanced customization options.
Understanding the starting point: GNOME, Ubuntu, Windows 11 and macOS
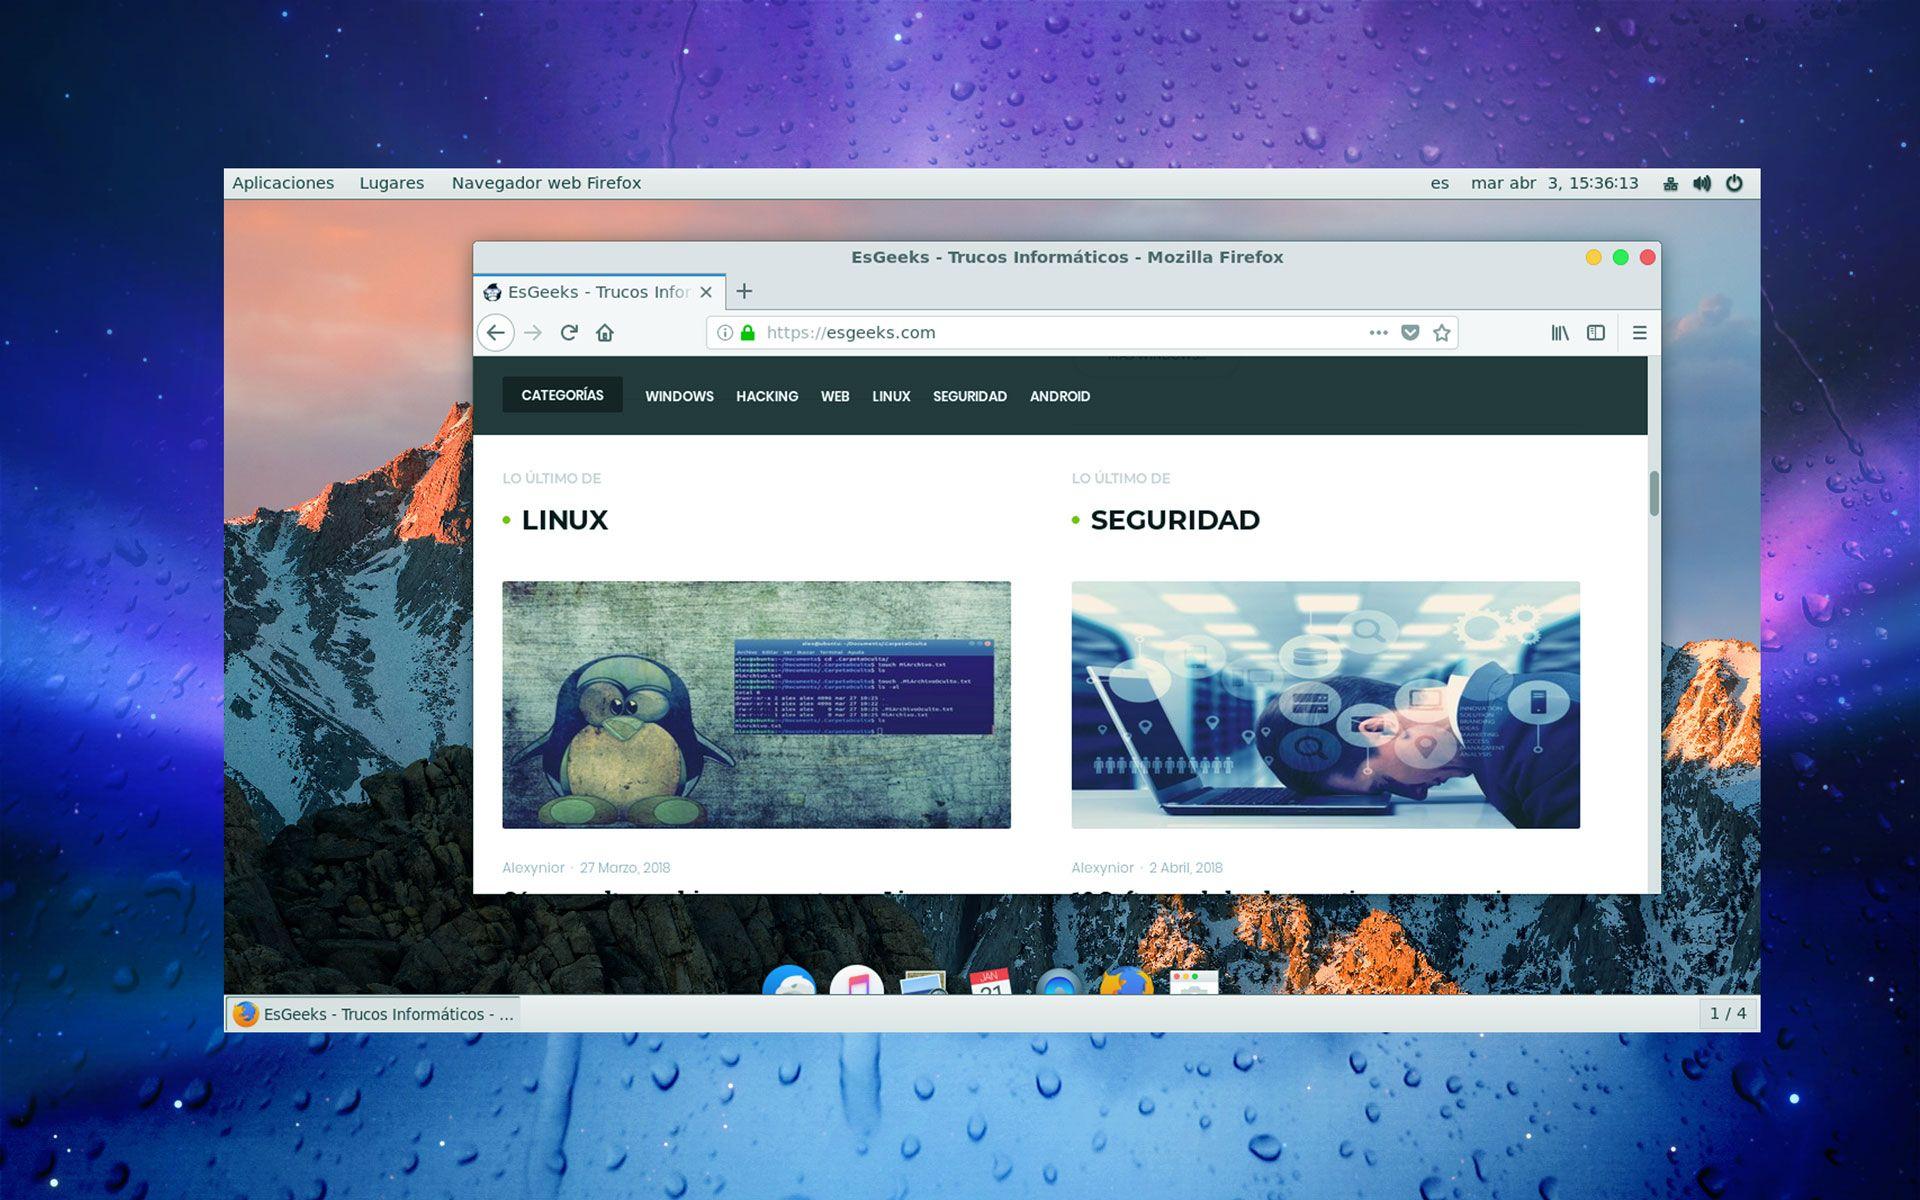
Ubuntu uses the highly customizable GNOME desktop environment as its base , but with some of its own tweaks (side dock, themes, and pre-configured extensions). The key to making Ubuntu resemble Windows 11 or macOS lies in leveraging this customization capability without sacrificing the system's ergonomics.
In traditional GNOME, you'll see a top bar with a clock and system tray , a full-screen activity area (where open windows and virtual desktops are displayed), and usually a dock or "dash" on the side or bottom. Windows 11, on the other hand, features a bottom taskbar with centered icons, a redesigned Start menu, and rounded window corners. macOS is characterized by its fixed top bar and a floating dock at the bottom, as well as window controls on the left.
The idea is to replicate, as much as possible, the visual organization and workflow of Windows 11 or macOS, while still using Ubuntu's tools and philosophy. We're not going to clone these systems 100% (nor do we need to), but we will get close enough to make the transition smooth and the experience very similar.
It's also important to be aware of a limitation: in environments like GNOME, certain elements, such as the minimize and maximize buttons , cannot always be deleted or moved as freely as in other desktop environments. Many things can be adjusted through the preferences, while others require tweaking advanced options with gsettings or extensions.
Another important detail is that some tasks still rely on Windows for compatibility reasons (for example, professional software that doesn't work well with Wine or requires specific kernel-level permissions). That's why many people still use dual booting, but they still want their Linux desktop to be visually appealing and consistent with the rest of their workflow.
Basic requirements for transforming the Ubuntu desktop
To give Ubuntu an aesthetic inspired by Windows 11 or macOS, you'll need three main ingredients: a visual theme (GTK and shell) , an icon pack, and a dock or taskbar that resembles the one in the system you want to imitate.
Unlike Windows, Linux offers a vast array of desktop environments and configurations, making it impossible to provide precise instructions for every scenario. We'll focus on Ubuntu with GNOME, but the explanation will be general enough to guide you even if you use a different GNOME-based distribution or a similar desktop environment.
Before you start applying themes, it's highly recommended to install the advanced tweaking tool. In Ubuntu, it's known as the Gnome Tweak Tool or simply "Tweaks ," and it allows you to change themes, fonts, window behavior, extensions, and many other details not included in the standard settings.
In Ubuntu, you can install Tweaks from the software store or with a simple command in the terminal. Once installed, you'll see a much more comprehensive panel for changing the desktop's appearance. This tool will be the "Swiss Army knife" for all the customization we'll be doing from now on.
In addition to the theme and Tweaks, you'll need a flexible and customizable dock . GNOME already has its own dash, but if you want a more macOS-like style, it's common to use external docks like Plank, while if you're leaning towards Windows 11, you might prefer to enhance the bottom bar and application menu to resemble the Windows taskbar and Start menu.
Give Ubuntu a macOS-like look and feel
If you've always liked the look of the Apple desktop but prefer the Linux philosophy, a convenient option is to transform your Ubuntu desktop into something very similar to macOS . The goal is for it to visually resemble a Mac: a clear top bar, a bottom dock with large icons, window buttons on the left, and a clean, consistent theme.
To do this, you'll need a good macOS-style theme (that changes colors, buttons, and the overall appearance of windows) and a macOS-inspired icon pack (for folders, applications, panels, etc.). There are many community projects that recreate the look of macOS Sierra, Big Sur, or later versions, and most are installed in your user folder and activated from Tweaks.
Once the theme is installed, you need to enable it in your desktop environment. In GNOME with Ubuntu, open the Tweaks application and, in the Appearance section, select the macOS application, shell, and icon themes . Doing so will instantly change the colors of windows, menus, buttons, and the appearance of system icons.
Because there are so many different desktop environments in Linux, many tutorials are deliberately kept general. However, the basic idea is almost always the same: download the theme, place it in the correct location, and then activate it in the customization tool. In Ubuntu, this process is especially simple with Tweaks and doesn't require modifying system files if you only want to affect your user account.
The result, if you choose a well-designed theme, will be an Ubuntu that visually resembles macOS , but with the robustness and package ecosystem of your familiar distro. At first glance, you'll have the feeling you're using a Mac, even though underneath it's still Linux and you'll continue using your usual applications.
Configure a macOS-style dock with Plank
One of macOS's defining features is its floating dock with large icons at the bottom of the screen. While many docks are available for Linux, Plank is one of the most highly recommended for this purpose because it's lightweight, minimalist, and integrates seamlessly with macOS-style themes.
Plank stands out for its simplicity: it consumes very few resources, offers basic options that cover the essentials (position, icon size, auto-hide behavior), and many macOS themes for Linux include their own specific Plank theme . This ensures the dock bar will be perfectly aligned with the rest of your chosen visual theme.
Installing Plank on Ubuntu is usually done from the distro's repositories , either through the software center or using an installation command in the terminal. Once installed, you can launch it like any other application; upon startup, a dock will appear at the bottom (or wherever you configure it) where you can pin your most frequently used applications.
Run these commands:cp /usr/share/applications/plank.desktop ~/.config/autostart
chmod +x ~/.config/autostart/plank.desktop
With this small adjustment, every time you log into your Ubuntu session, Plank will launch automatically, and you'll have your macOS-style dock ready from the start . From there, you can spend a few minutes adding or removing icons, resizing them, adjusting the auto-hide behavior, and playing around with the theme to make it match the rest of your desktop.
Adjust window controls to macOS style
Another detail that distinguishes macOS from other environments is the position of the close, minimize, and maximize buttons . On macOS, they are located to the left of the title bar and change color in a characteristic way; on most Linux desktops and Windows, these buttons are usually on the right.
On some Linux desktops, you can change the position of these buttons from the appearance or window settings . In system preferences, you'll sometimes find a setting to move window controls from right to left or even remove some of them. It's worth checking your environment's graphical options first before venturing into advanced settings.
However, there are cases where there isn't a clear visual option, and you have to resort to commands. In gsettings , many environment preferences are managed through tools that allow you to modify desktop aspects from the terminal. To approximate the behavior of macOS, you can rearrange the layout of the window buttons.
For example, a typical command to change the arrangement of these buttons in GNOME is:
gsettings set org.gnome.desktop.wm.preferences button-layout close,minimize,maximize:
This adjustment rearranges the sequence of controls and can help bring the button placement closer to what you're used to seeing on macOS. Each environment is different, and some allow for more customization, while others impose certain design limitations ; therefore, if you want to delve even deeper, it's advisable to consult the specific documentation for customizing your desktop.
To emulate the Windows 11 experience in Ubuntu
If you're coming from Windows 11 and have grown accustomed to its modern style, you might prefer your Ubuntu environment to resemble that one more than macOS . Here, the goal is different: a bottom bar reminiscent of the taskbar, centered icons, an application menu similar to the new Windows Start menu, and convenient window management.
The GNOME top bar, with its clock and system tray, can be complemented by a dock-like bottom bar reminiscent of Windows 11. Instead of a floating macOS-style dock, you can opt for a dock or extension that attaches to the bottom, keeping application icons neatly organized and visible, mimicking the behavior of the taskbar.
GNOME has extensions that allow you to separate the "dash" (the area where applications are displayed) from the activity view and turn it into a permanent side or bottom dock. This gives you a more Windows-like experience: a list of pinned applications and open windows always visible, without having to enter the full-screen activity view.
If you like the idea of having the dock on the side, similar to how Ubuntu positions its bar by default, you can also move it to the side of the screen and simulate a kind of vertical taskbar . This can be even more convenient on widescreen monitors, and in practice allows for a very streamlined workflow, with windows opening in the remaining space.
As for the applications menu, GNOME offers a full-screen view similar to the Windows 10 Start screen, though not identical to that of Windows 11. Even so, you can configure it so that launching applications, searching for programs, or switching virtual desktops feels quick and natural, either using the Super (Windows) key or a mouse gesture.
Multitasking and hot corners in the style of GNOME and Windows
Multitasking is another key element if you want your Ubuntu system to have the user-friendly aesthetics of Windows 11 or macOS, while maintaining the smooth workflow of GNOME . The activity view and virtual desktops are two powerful features that can be easily integrated into your daily routine.
GNOME lets you configure the multitasking view to open when you press the Super key or move the mouse to an active corner . This view displays all your current windows and desktops. If you're coming from macOS, this will remind you of Mission Control; if you're coming from Windows 10 or 11, it will sound like "Task View." The important thing is that you can access this screen naturally to switch between programs and stay organized.
If you're interested in maximizing productivity, it's a good idea to set up a hot corner similar to GNOME's , where dragging the mouse to a corner opens the activity view. This way, even if your desktop visually resembles Windows 11 or macOS, you'll still benefit from the best of GNOME: fast desktop switching, a clear window view, and integrated search.
In some cases, GNOME extensions allow you to further customize these behaviors: you can define specific actions for each corner or combine the Super key with mouse or touchpad gestures so that the system responds exactly as you want.
All this makes it possible that, even while mimicking the appearance of other operating systems, you can still enjoy modern and powerful window management , adapted to your habits and your hardware (whether it's a small laptop or a desktop with multiple screens).
Balancing appearance and functionality on your Ubuntu desktop
It's important to test changes gradually : install a theme, see how it integrates with your applications, adjust the dock, redefine the position of window buttons, and only then move on to the next step. This will prevent too many changes from happening at once and make it difficult to pinpoint what broke something if a problem arises.
Also keep in mind that some applications are designed with the default visual style of GNOME or Ubuntu in mind. Even if you change the theme and icons, there will still be small details reminiscent of the original system, but this isn't necessarily a bad thing: maintaining certain standard elements often improves visual consistency and readability .
Finally, if you share your computer with other people or have multiple user accounts, you can choose whether to apply these changes only to your account or to the entire system. Working at the user level (for example, by placing themes in your personal folder and using Tweaks) is safer and more reversible, while modifying global settings requires greater care.
With all these adjustments, Ubuntu can transform into a highly versatile desktop environment: on the one hand, it can mimic the user-friendly appearance of Windows 11 or the refinement of macOS , and on the other, it retains the freedom of Linux to install whatever you want, customize every detail, and continue working with your usual tools. The interesting thing is that, by understanding how themes, icons, the dock, and window controls work, you can fine-tune your desktop until it perfectly matches your preferences and your daily workflow.

Table of Contents
- 1 Understanding the starting point: GNOME, Ubuntu, Windows 11 and macOS
- 2 Basic requirements for transforming the Ubuntu desktop
- 3 Give Ubuntu a macOS-like look and feel
- 4 Configure a macOS-style dock with Plank
- 5 Adjust window controls to macOS style
- 6 To emulate the Windows 11 experience in Ubuntu
- 7 Multitasking and hot corners in the style of GNOME and Windows
- 8 Balancing appearance and functionality on your Ubuntu desktop