- Widgets make it easy to access relevant and customizable information from the taskbar in Windows 11.
- You can add, remove, and reorder widgets to adapt the dashboard to your daily routine.
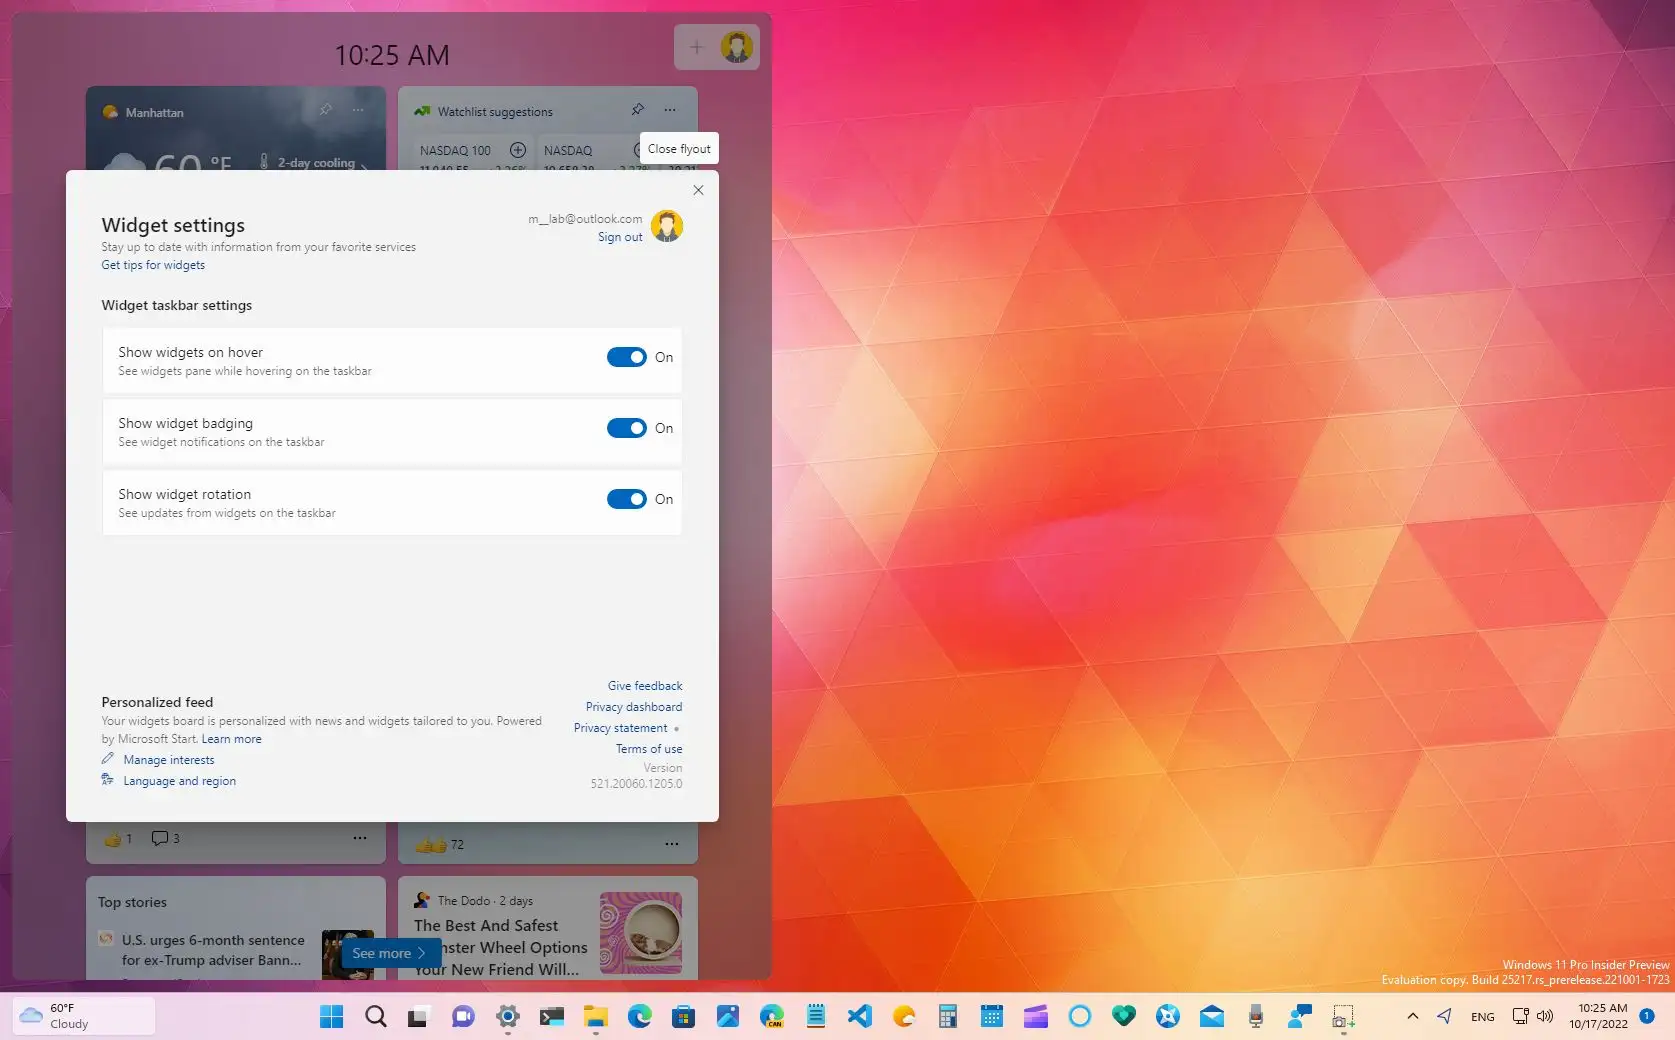
- The widget panel allows you to customize notifications and the news feed based on your interests.

Windows 11 has brought with it a notable renewal in its interface, offering New ways to personalize your desktop and access relevant information quickly. Among the most interesting new features are widgets, small panels that display dynamic and useful information directly from the taskbar, without having to open additional applications. Many users are intrigued by the possibilities these widgets offer, but they may also have questions about how to add them, customize them, and get the most out of them in their daily lives.
In this article you will learn How to add widgets to the Windows 11 desktop, as well as fully customize them to suit your preferences. Plus, we'll explain all the tricks, options, and details so you can configure your experience to your liking and not miss any of the useful features Microsoft offers with this feature. If you've ever wondered how to get the most out of Windows 11 widgets, you've come to the right place.
What are widgets in Windows 11 and what are they for?
The widgets in Windows 11 are integrated tools that provide real-time information directly on your desktop or taskbar. Its goal is to make your life easier, allowing you to consult News, weather forecast, upcoming calendar events, sports scores, traffic information, and much more. with a single click or quick access using keyboard shortcuts.
These widgets are not only designed to show you data of interest, but also can be customized according to your needs, making it easy for you to receive only the information that matters most to you without cluttering your screen. Plus, their integration with the taskbar keeps them visible and up-to-date at all times.
How to access the widgets panel in Windows 11
Microsoft has made it easier to access widgets to maximize their usefulness. You have several ways to open the widget panel:
- You can click on the widgets icon Located on the taskbar, next to the Start menu. This icon usually looks like a square divided into several sections.
- Another quick and direct way is pressing the Windows + W keys on your keyboard, which will instantly open the widget panel.
- On touchscreen devices, you can swipe from the left to display the widget panel.
When you open the dashboard, you'll immediately see several pre-configured widgets, including weather, daily news, and other suggestions based on your interests or Microsoft account.
Add widgets to the Windows 11 desktop
The process for Adding new widgets is very intuitive and fast. Follow these steps to expand the functionality of your widget panel:
- Access the widget panel using any of the methods described above.
- Go to the top right of the window and press the “+” button (Add widgets).
- You will be shown a list with the available widgets at that time, which may include weather forecasts, calendars, traffic, sports scores, personalized news, stocks, to-do lists, and many more.
- Click on the “+” symbol that appears next to each widget you want to add to your dashboard.
- Once selected, closes the widget list to see the changes reflected. The new widgets will appear on the dashboard and begin displaying relevant information.
It's a good idea to review this list periodically, as Microsoft adds new widgets over time, and you may find useful features you weren't aware of before.
Customize widgets and the widget panel
One of the strong points of this functionality is its high degree of customizationYou can adjust the widget content, layout, size, and even their presence on the panel. You can also modify the settings to fully adapt the panel to your work style and preferences.
Change the content and preferences of a widget
- Locate the widget you want to customize in the widget panel.
- Click on the three dots that appear in the upper right corner of that widget.
- Select option “Customize widget”.
- Configure the information you want to display based on the options offered by that widget (for example, change your location over time, interests in sports news, actions to monitor, etc.).
- Save the changes so that the widget starts displaying content according to your preferences.
Resize widgets
Each widget offers several sizing options: small, medium or large. To modify it:
- Access the widget's three-dot menu.
- Select the size you prefer. For example, you can make the time zone take up more space if it's what you check most.
Reorder widgets on the dashboard
- Hover over the widget header area until you see the cursor change to a hand shape.
- Click and drag the widget to the desired position within the panel.
Pin or remove widgets from the dashboard
- In the options menu of each widget (three dots) you can find “Pin” or “Remove widget”.
- If you choose to delete it, it will disappear from the panel and stop displaying information.
- If you want to pin it so it remains visible on your dashboard, select the pin option.
Manage and identify widget notifications and ads
Widgets can display notifications and small announcements relevant directly on the taskbar. For example:
- The weather icon changes to show important alerts, such as storms or sudden changes in the weather.
- Sometimes you will see badges or banners that provide breaking news, financial alerts, or relevant information from other installed widgets.
The taskbar dynamically cycles through these ads to avoid cluttering your experience. If you don't interact with them, you'll soon return to your usual status, such as the daily weather forecast.
Configure widget notifications
- Open the widgets panel.
- Click the button setting at the top of the panel.
- Enter the section Notifications and decide if you want to see notification badges in the taskbar and relevant ads. You can enable or disable these options according to your preferences.
- From the same Notifications tab, choose what type of alerts you want to receive, if you only want to see weather information or also news and featured events.
Customize your news feed and interests in widgets
The widget panel shows you a news feed collected based on your interests, which means you can see relevant headlines on topics that really interest you. To customize it:
- Within the widgets panel, access the section Widget settings.
- Choose “Personalized Feed” to start adjusting your preferences.
- Click on “Manage interests”, which usually redirects you to a special page in Microsoft Edge called “My Interests.” Here you can browse between topics (sports, technology, business, entertainment, etc.) and follow or unfollow categories according to your tastes.
- If you no longer enjoy a category, you can easily remove it from your feed by blocking or disabling it.
Remove widget icons from the desktop or taskbar
If at any time you prefer that the widgets panel not be accessible from the taskbar, you can remove its icon following these simple steps:
- Go to Settings of the system (you can access it from the start menu or by pressing Windows + I).
- Select the tab Personalization. and access Taskbar.
- In section Taskbar items locate the option Widgets y turn it off. This way, the shortcut will no longer appear on the taskbar.
Remember that Microsoft offers documentation and official help through its website, as well as personalized support in case of problems or incidents, so you can get the most out of the widgets and improve your experience in Windows 11.

Table of Contents
- What are widgets in Windows 11 and what are they for?
- How to access the widgets panel in Windows 11
- Add widgets to the Windows 11 desktop
- Customize widgets and the widget panel
- Manage and identify widget notifications and ads
- Customize your news feed and interests in widgets
- Remove widget icons from the desktop or taskbar