- GRUB often breaks after partition changes, installations of other systems, or updates, but it is almost always recoverable.
- The GRUB console itself allows you to locate /boot/grub, load the kernel manually, and boot without relying on a LiveCD.
- Once the system has started, it is essential to reinstall and update GRUB from Linux to prevent the failure from recurring.
- In more serious cases, methods using LiveUSB, chroot, and tools like Boot-Repair offer a deeper repair.
If you've ever turned on your computer and, instead of seeing your operating system's logo, you've been met with a black screen and a message like "error: no such device" or "grub rescue ," you'll know exactly how panicky it feels. Suddenly, it seems like you've lost your entire system, that you'll have to format, and that your data is at risk... but the reality is that, in most cases, it can be fixed without resorting to such drastic measures.
The good news is that, although it seems like a serious problem, repairing GRUB without a LiveCD is entirely possible using the GRUB console itself, provided the disk damage isn't catastrophic. With a little patience, a few well-typed commands, and an understanding of what's happening behind the scenes, you can restart your Linux system, reinstall the boot manager, and have it ready for future reboots.
Before we start typing like crazy, it's important to understand the role GRUB plays in booting your computer. GRUB 2 is the boot manager used by most modern GNU/Linux distributions: it's usually installed in the MBR or at the top of the partition and is responsible for displaying the menu with available operating systems and loading the Linux kernel with its appropriate parameters.
This boot manager relies on files that typically reside in the /boot/grub directory of your installation: modules, configuration files, kernel images, initrd, etc. If this directory becomes inaccessible, is moved, corrupted, or changes disks without GRUB noticing, you'll start seeing errors like "no such device," "unknown filesystem," or the dreaded grub rescue> prompt.
The typical causes of the manager breaking are quite well known: installing Windows after Linux and overwriting the MBR , messing with partitions (resizing, moving, deleting, creating new ones) with tools like GParted or similar, or even a kernel or system update that, for some reason, leaves inconsistent references in the GRUB configuration.
In addition to all this, some users prefer to install /boot on a separate partition , a common practice in advanced configurations or environments where the rest of the disk is to be encrypted. In these cases, any change to that partition or its disk number can leave GRUB unable to locate its own modules and configuration.
GRUB Error Types and Console Modes
When GRUB fails, it doesn't usually just disappear: it typically leaves you in some kind of console or rescue menu that you can use to manually boot the system. The behavior varies slightly depending on the severity of the problem and the version of GRUB you have installed.
In many distributions you will see that the system tries to load GRUB and ends up crashing. a prompt with the text grub rescue>This mode is quite limited, but it allows you to launch some key commands such as ls, set o insmod, enough to locate the correct partition and force the loading of the Linux module.
In other cases, you will see the normal GRUB menu (the list of operating systems), but the boot attempt will fail, or the menu will appear corrupted. From there, you can press the 'c' key to enter the full GRUB command line, which is much more powerful than rescue mode, with a wider range of available commands.
In older installations, some systems still use GRUB Legacy (not GRUB 2), such as certain versions of CentOS 5/6 or other older distributions. In these cases, the command syntax changes slightly, but the general idea is the same: locate the /boot directory, tell GRUB where its root directory is, and manually load the kernel and initrd.
How to repair GRUB without a LiveCD using rescue mode
When the computer cannot find the boot manager correctly configured, it is quite common to see a message like “Error: no such device” followed by “grub rescue>” . This means that GRUB has managed to run, but it doesn't know where its configuration files or the modules it needs are located.
In this scenario, you have a mini command interpreter that allows you to discover the partitions, locate /boot/grub, and load the kernel manually . The process may sound lengthy, but it's quite systematic.
List available disks and partitions
The first step is to find out which disks and partitions GRUB is seeing on your machine. To do this, at the grub rescue> prompt, type:
ls
The command will display something similar to (hd0) (hd0,1) (hd0,2) (hd0,3) (hd1) (hd1,1) (hd1,2). Each hdX represents a different hard drive: hd0 would be the first physical disc, hd1 the secondand so on. Variants with a comma, such as (hd0,1), indicate the numbered partitions of that disk.
Depending on your computer, you might see a single disk like (hd0) with two or three partitions, or several disks: (hd0,1) (hd1,1) (hd1,5) (hd2,1) (hd3,1) . In any case, the goal now is simple: open each partition until you find the one containing the /boot/grub directory.
Locate the partition using /boot/grub
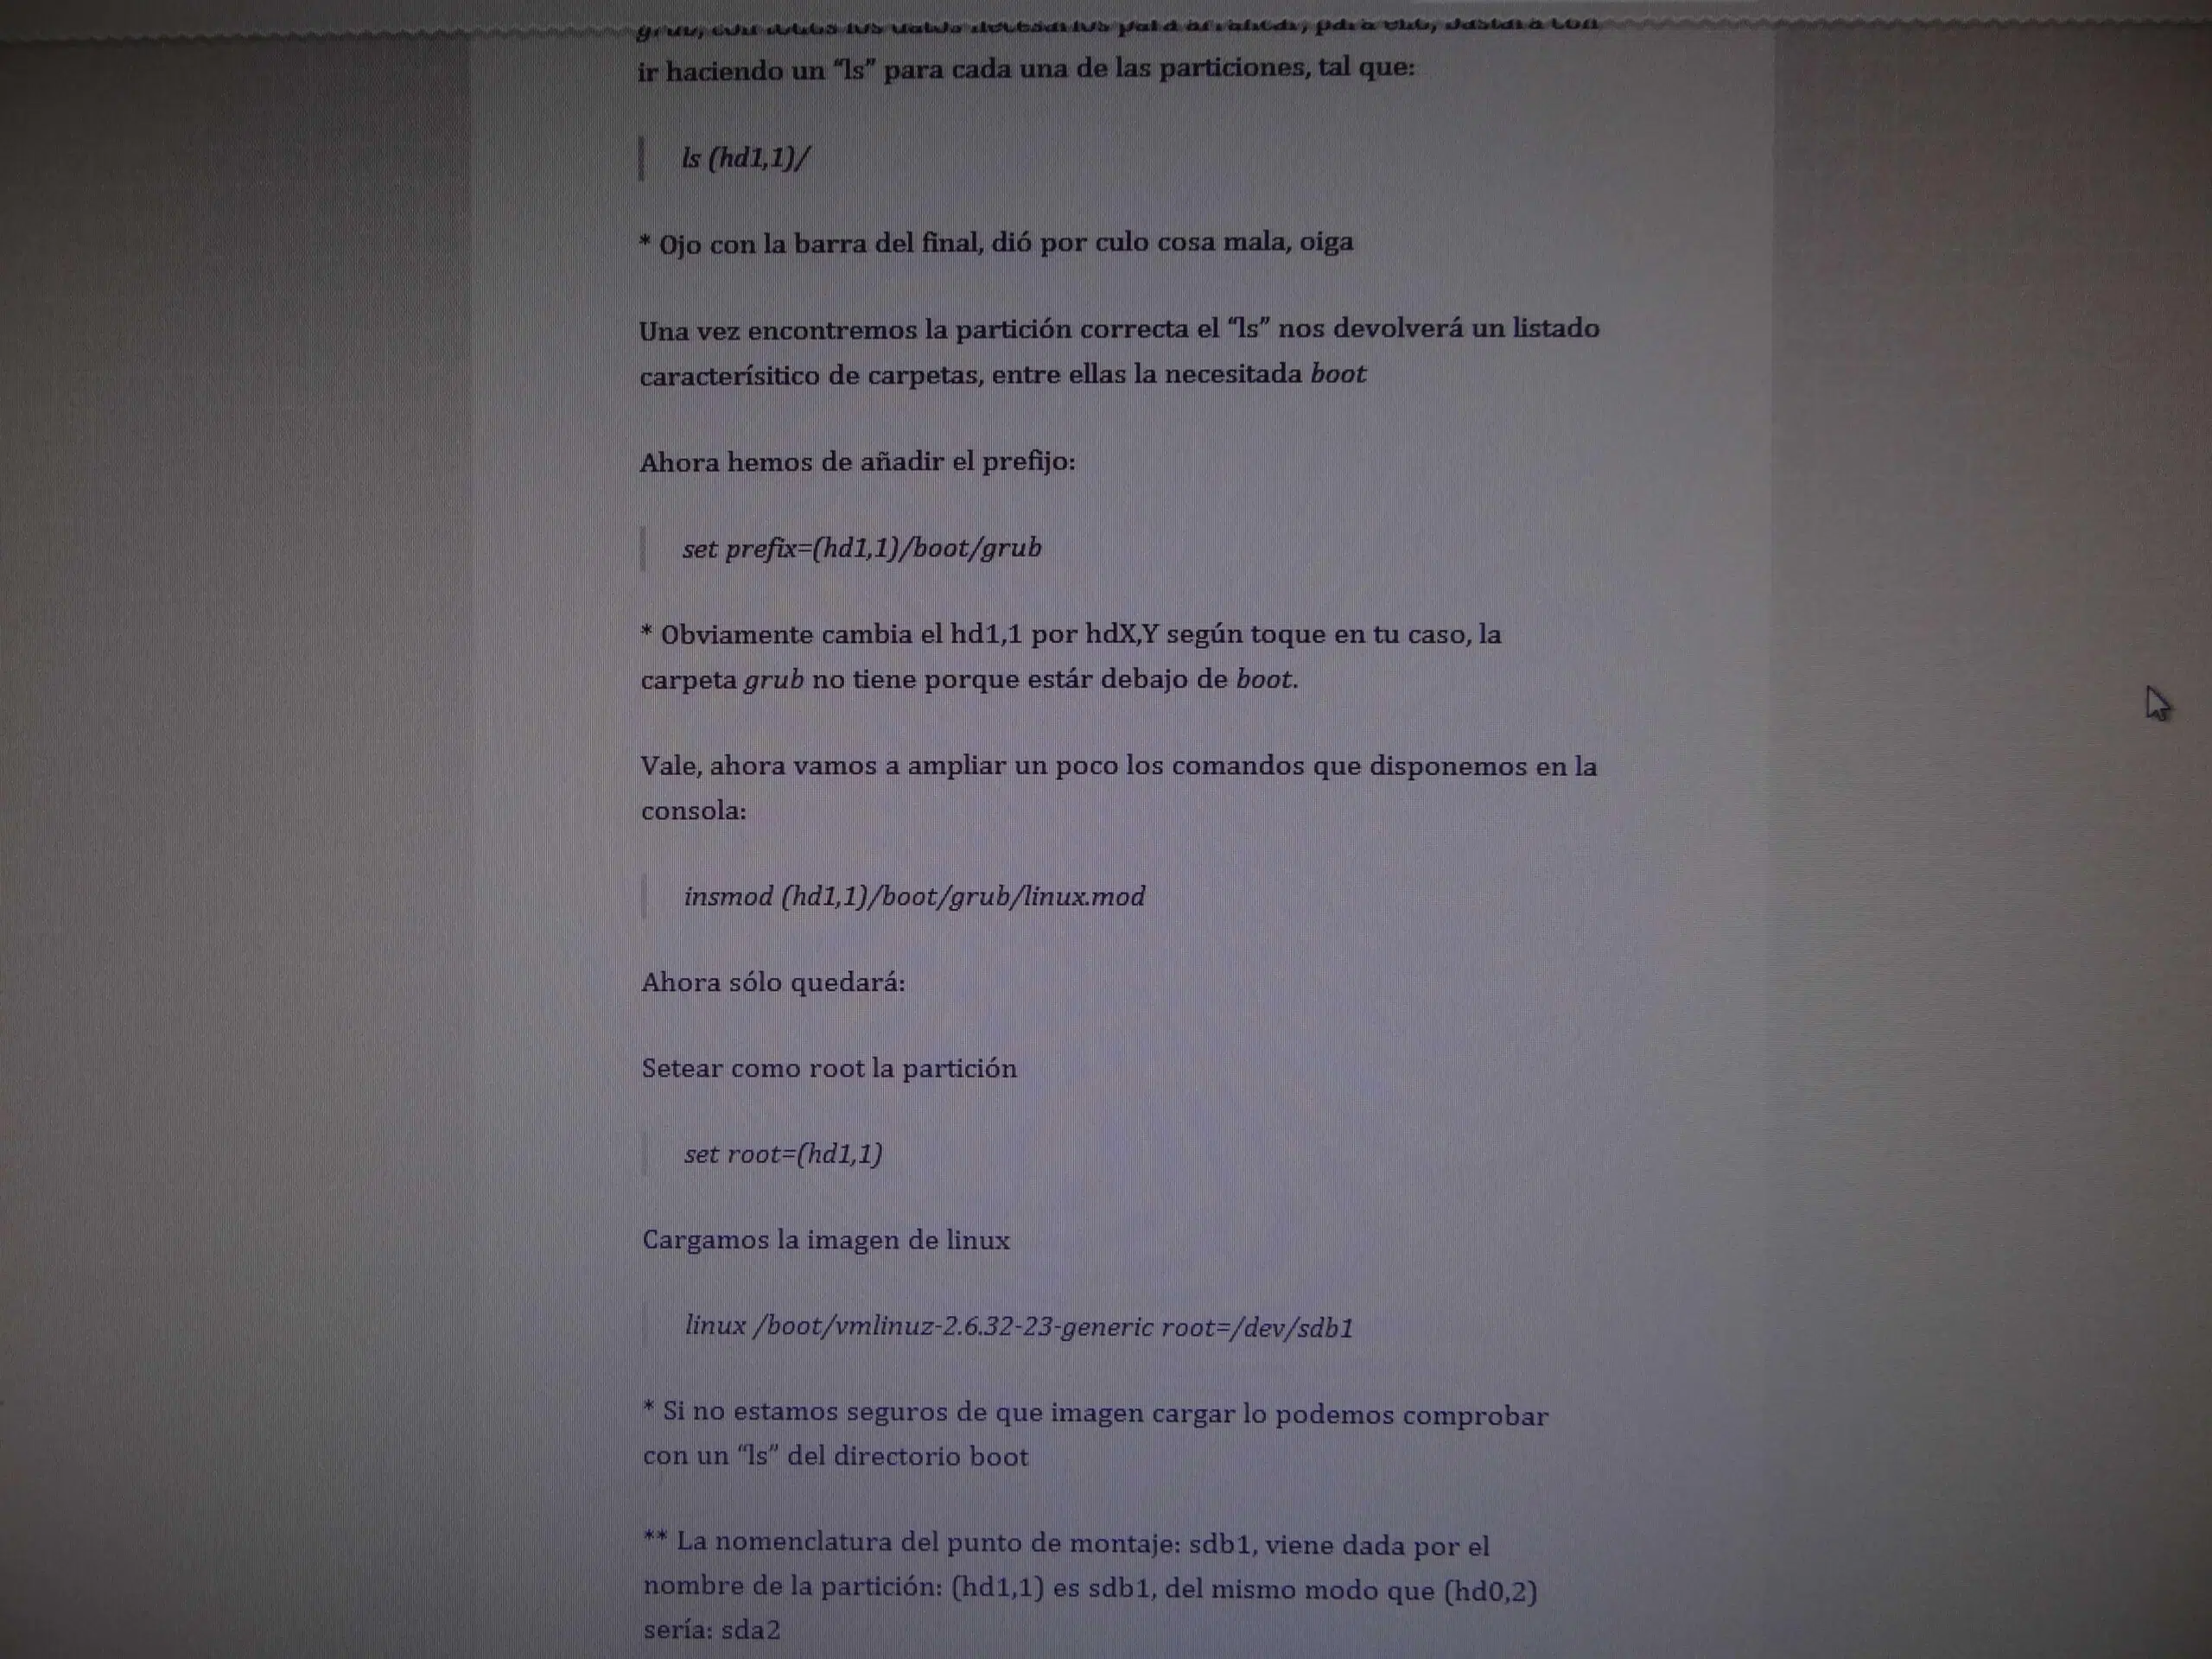
To inspect the contents of a partition, we use again ls but adding the partition name and a trailing slash. For example: inspect the content It will help you identify if it is the correct one.
ls (hd0,1)/
If that partition has a file system that GRUB recognizes, it will display a directory listing: you'll see names like bin, etc., home, boot, root , etc. In that case, that partition could be your root (/) or a separate partition from /boot, depending on the structure you had when you installed the system. If the listing indicates a file system that GRUB recognizes , you're on the right track.
If, when running the previous command, you see a directories called boot , you can delve deeper and check if it contains the grub folder:
ls (hd0,1)/boot/grub
When you find a list of files that includes modules like linux.mod or other typical GRUB files, you've located the partition you're looking for . If nothing appears or you get an error, keep trying the other partitions: ls (hd0,2)/ , ls (hd1,1)/ , etc., until you find the right one.
Tell GRUB where your files are located.
Once the correct partition has been identified, GRUB needs to be told where its modules and configuration are located . Let's assume we've discovered that /boot is on (hd0,1). The next step is to set the prefix:
set prefix=(hd0,1)/boot/grub
With this instruction, the system manager will know that its support files are located in that path. We also need to tell it which root partition to use to find the kernel and the rest of the system data:
set root=(hd0,1)
It is important to write the pair correctly. (disk, partition) and always use the trailing slash / when we list content with lsAlso keep in mind that the GRUB console keyboard layout is usually American, so the parentheses and slash keys may not match what you see printed on them. A good practice is to make sure set the prefix correctly before attempting to load modules.
Load the GRUB modules and the Linux kernel
With the prefix configured, the next step is to force the loading of the GRUB Linux module . In many guides you'll see something like:
insmod (hd0,1)/boot/grub/linux.mod
In many modern systems, the appropriate module may be normal.mod or others, but the idea is the same: if you're unsure of the exact names, use the command ls (hd0,1)/boot/grub To list the files, choose the appropriate module based on your GRUB version. The function of insmod This involves loading the necessary module to continue the boot process. Please note that insmod It is the instruction that actually incorporates the module into the loader.
Next you will have to load the Linux kernel image indicating its path within the file system. Example startup: linux /boot/vmlinuz-4.13.3-generic root=/dev/sda1
The exact kernel name will vary on your machine (it may be vmlinuz-2.6.32-23-generic, vmlinuz-6.1.0-10-amd64 or any other version). You can use, again, ls /boot To see what images you have available and choose the most recent one. The important thing is not to forget the parameter. root=/dev/sdXn with the correct root partition.
To avoid confusion with the equivalence between GRUB and Linux naming conventions, keep in mind that hd0 corresponds to /dev/sda, hd1 to /dev/sdb, hd2 to /dev/sdc , and so on. The partition number format also changes: (hd0,1) becomes /dev/sda1, (hd1,2) becomes /dev/sdb2, etc.
In some cases, after loading the kernel image, it's advisable to load the initrd image (the initial RAM disk) if your distribution requires it. The typical command would be:
initrd /initrd.img
As with the kernel, you can check which initrd files are available with ls / o ls /boot and use the TAB key to autocomplete names and avoid spelling errors.
Boot the system and reinstall GRUB from Linux
With the kernel and any initrd loaded, you just need to tell GRUB to start the boot process . To do this, simply type:
Start up: boot
If all goes well, the kernel will take control, the operating system will boot as usual, and you'll be able to log into your Linux system. At this point, you'll have managed to salvage the situation without needing a LiveCD, but there's still one important step: reinstalling GRUB to prevent it from breaking again on the next reboot.
Once inside the system, open a terminal with superuser privileges (root or using sudo) and run: grub-install /dev/sdX
where /dev/sdX is the disk (not the partition) where you want to place the boot manager, for example /dev/sda or /dev/sdb if you are on a different disk. Remember that you should not specify the partition number here: the command writes the boot manager to the MBR or the boot area of the entire disk.
In many Debian- or Ubuntu-based distributions, it's also highly recommended to regenerate the GRUB configuration file to ensure it correctly detects all installed systems. You can do this using:
Run: update-grub o update-grub2
And, if you also want to update the initial boot image, update initramfs with:
Command: update-initramfs -u
In other cases, the problem with GRUB is not so radical and you do see the boot menu , but some systems do not boot, an error appears when selecting a specific entry, or you simply suspect that the menu is misconfigured.
In these cases, when you see the GRUB menu when you turn on the computer, you can press the direction arrows (up or down) to stop the automatic boot countdown, and then press the c key to access the full command line.
From that advanced console, the The commands are basically the same than in rescue mode, but you'll have more tools to inspect the system. For example, you can use ls to list disks and partitions, set to view and modify GRUB environment variables, insmod to load additional modules or even commands like cat to read the contents of text files.
Following the same scheme, you will first determine which disks and partitions you have with:
ls
and you will see an output of the type (hd0) (hd0,msdos1) (hd0,msdos5) or (hd0,1) (hd1,1) (hd1,5) (hd2,1) , depending on whether your partition table is MBR (msdos) or GPT, and the number of disks present in the computer.
Then you will check each partition with commands like:
ls (hd0,msdos1)/
until you find the boot directory and within it the grub folder . Once identified, you will repeat the process of setting the prefix and root with:
set prefix=(hd0,msdos1)/boot/grub
set root=(hd0,msdos1)
From there, you'll look for available kernels by listing the contents of /boot:
/boot list: ls /boot
and you will choose one of them to load with:
linux /boot/vmlinuz-6.1.0-10-amd64 root=/dev/sda1
Adapting the kernel version and root partition to your specific case. Remember the disk mappings: hd0 → /dev/sda, hd1 → /dev/sdb, hd2 → /dev/sdc , etc. You can use the TAB key to autocomplete paths and filenames.
Finally, you will load the initrd if necessary and execute the command boot To start the system. Once logged in, the operation to perform is the same as in the previous scenario: Reinstall GRUB on the disk and update its configuration using grub-install /dev/sda y update-grub.
Repairing GRUB on systems with GRUB Legacy
Although most distributions have adopted GRUB 2 today, you can still find older machines or specific systems that use GRUB Legacy . The interface in these cases is slightly different, but the underlying concept remains the same: you can use an interactive bootloader shell to restart the system.
Upon startup, this classic GRUB usually allows access your command line by pressing a specific key (often the key c or the key e (to edit entries). Once at the prompt, you have commands such as find which are especially useful.
For example, if you want to locate the /boot directory that contains the kernel images and initrds, you can use:
find command: find /boot/grub/stage1 or a similar route
Depending on whether /boot is a separate partition or it's within the root, the path will be /boot or simply / with other subfolders. When you find the correct partition, GRUB Legacy usually displays something like (hd0,0) or another disk/partition pair that you can reuse.
Next, you will need to define the GRUB root with a command like this:
Example of root: root (hd0,0)
and tell it where the kernel and initrd are located. Again, you don't usually need to type the full filenames, as the TAB key autocompletes and helps you avoid typos in long paths.
To fine-tune even further, you can use the command cat to read the GRUB configuration file (for example, /boot/grub/menu.lstand check which device is mounted on the root directory, what kernel parameters are passed, etc. It's a very practical way to Copy the same configuration that the system used when it was working properly..
Finally, when you have the lines root, kernel e initrd For lists, simply run the command boot to boot the system. Once inside, the final step will be to reinstall GRUB from within Linux itself with grub-install on the corresponding disk, ensuring that you do not have to repeat the manual process on subsequent restarts.
Other common methods (using LiveCD, chroot, and Boot-Repair)
So far, we've seen how to resolve the situation using only the GRUB console , without resorting to any external means. However, it's also worth knowing the classic methods with LiveCD/LiveUSB and graphical tools, because in some cases the damage is so extensive that booting from a bootable system is the only option.
A technique commonly used in Debian and Ubuntu-based distributions is to boot from a LiveCD or LiveUSB (for example, an Ubuntu, Linux Mint, Debian Live image, etc.), mount the root partition of the damaged system, also mount /boot if it is a separate partition, and then chroot onto that file system to reinstall GRUB as if we were operating from the installation itself.
The process, broadly speaking, consists of identifying the partitions with fdisk -l, determine what the root is (for example, / Dev / sda2) and which is the boot partition if it exists (for example, / Dev / sda7Then they are assembled with:
Mounting partitions (e.g.):sudo mount /dev/sda2 /mntsudo mount /dev/sda7 /mnt/boot (if you have a separate /boot file)
and the bind mount of /dev, /dev/pts, /proc and /sys is done inside /mnt:
Bind mounts:sudo mount --bind /dev /mnt/dev
sudo mount --bind /dev/pts /mnt/dev/pts
sudo mount --bind /proc /mnt/proc
sudo mount --bind /sys /mnt/sys
From here, you can access the installed system using:
Login with: sudo chroot /mnt
And from within, you can run grub-install pointing to the disk:
Installation from chroot: grub-install --boot-directory=/boot/ --recheck /dev/sda
to reload the boot manager into the MBR or equivalent area, followed by:
Generate the configuration: grub-mkconfig -o /boot/grub/grub.cfg
to regenerate the configuration file. Upon exiting chroot with exit and restart the computer (sudo reboot), normally The GRUB menu reappears normally..
Another very convenient option for users who prefer to avoid the terminal is the Boot-Repair tool , which can be installed in a live Ubuntu environment and offers a graphical interface capable of detecting operating system installations and repairing GRUB almost automatically . Simply run the tool, select the "recommended repair," and let it analyze and rewrite the bootloader.
While these solutions based on LiveCDs or external utilities are very practical, the advantage of mastering the techniques we saw at the beginning is that you don't depend on having a USB drive or disk on hand . You can get by with the GRUB console itself in many situations, especially when the problem is "only" that the boot manager has lost the correct reference to the partition where /boot resides.
With all that said, it's clear that a broken GRUB doesn't necessarily mean a lost system : you have tools in the bootloader itself, on the command line, and in the Live environment to locate the correct partition, load the kernel manually, boot your GNU/Linux, and reinstall the boot manager so that it works like new again.
