- System Restore allows you to return to a previous Windows state without deleting personal files, only reverting settings, drivers, and programs.
- It is possible to access the restore from normal Windows, Safe Mode, the Recovery Environment (WinRE) or the command prompt using rstrui.exe.
- Installation or recovery media help repair computers that won't boot, offering advanced options such as System Restore and Startup Repair.
- Combining restore points with backups and, if necessary, data recovery software, minimizes the risk of data loss.
When Windows starts running slowly, freezes after an update, or a new program leaves your PC in disarray, the natural reaction is to format the drive… but that usually means losing files. The good news is that Windows includes several features to restore your hard drive to a previous state without deleting your personal documents , provided you know how to use them properly.
In this article, I'll explain in detail, and as clearly as possible, how to restore your computer to a previous state using System Restore, Safe Mode, the Recovery Environment (WinRE), boot disks, and even the Command Prompt . We'll also see what happens to your data, what gets deleted and what's kept, and what options you have if you need to recover files that are missing after the restore.

What does it mean to revert to a previous point in Windows?
Reverting to a previous state in Windows means the system reverts settings, system files, drivers, and installed programs to a previously saved state . This saved state is called a "restore point" and acts as a snapshot of how the system was at that moment.
The key is that System Restore doesn't delete your personal files (documents, photos, videos, etc.) . What it can change are the applications and drivers you installed after the restore point date, as well as modifications to the Registry and system settings.
Windows automatically creates these restore points before important events such as software installations, driver updates, or critical system configuration changes , and you can also create them manually when you are going to make a sensitive change.
When you apply a restore point, the system recovers system files, registry settings, and programs as they were when that point was created , helping to fix instability or crashes that may have appeared afterward.
This feature is especially useful if, for example, after a Windows update or the installation of a new driver, your computer starts malfunctioning , restarts on its own, or fails to boot properly. System Restore acts as a safety net to undo these changes without needing to reinstall the entire operating system.
When does it make sense to restore Windows to a previous point?
System restore is a good idea when problems have arisen following a relatively recent change to the computer . Some typical scenarios where it makes a lot of sense to use it are these:
- After installing new software or an updateIf after installing a program, a large update package, or a new version of a driver the system starts to malfunction, restoring to a previous date can reverse that change.
- Possible malware or spyware infectionCertain malware can modify your system to the point of rendering it almost unusable. Reverting to a previous state can help you. undo some of the effects of the malwarealthough it's always a good idea to combine it with a good virus scan.
- Driver conflict failuresIf, after updating a driver for your graphics card, network card, or any other component, you start experiencing blue screens, A previous restore point is usually the fastest way to regain stability.
- Serious errors after a crash or unexpected shutdownA power outage or system crash at the worst possible time can damage system files. Revert to the previous state using System Restore. It can restore a stable state and save you from formatting..
However, it's important to understand that System Restore is not a complete backup and cannot undo everything . It won't recover personal files deleted before the restore point was created, nor can it replace a good backup system for your important data.
How System Restore works in Windows 10 and Windows 11
In Windows 10 and Windows 11, System Restore remains one of the first lines of defense when something goes wrong. It works in the background, creating restore points and allowing you to revert Windows to one of those points relatively quickly and safely.
For this to work, system protection must be enabled on the drive where Windows is installed (usually drive C:). If it isn't, no restore points will be created, and you'll have nothing to revert to.
When you perform a system restore, the system restarts your computer, applies the necessary changes to system files, the Registry, and drivers , and then restarts Windows. During this process, you should not turn off your computer or interrupt the operation.
If something goes wrong, Windows usually undoes the restore and reports that it couldn't be completed , leaving the computer in its state before the attempt. At that point, you can try a different restore point or move on to more advanced methods.
Also keep in mind that some antivirus or very restrictive security tools may interfere with System Restore . If you see recurring errors, it's sometimes worth temporarily disabling that software (provided it's safe to do so) before attempting to restore.

Restore Windows to a previous point from within the system itself.
If your computer still boots normally (or at least you can log in, even if it's not working properly), the easiest way to reset it is to run System Restore from within Windows . This method applies to both Windows 10 and Windows 11.
To access the tool, you have several options. One of the fastest in almost all modern versions of Windows is to use the Run dialog box with the Windows + R key combination and type the appropriate command to open the system restore point.
On many systems, you can also type "create a restore point" in the Start menu search bar , and from there directly open the System Properties window in the System Protection tab. There you will find the button to start System Restore.
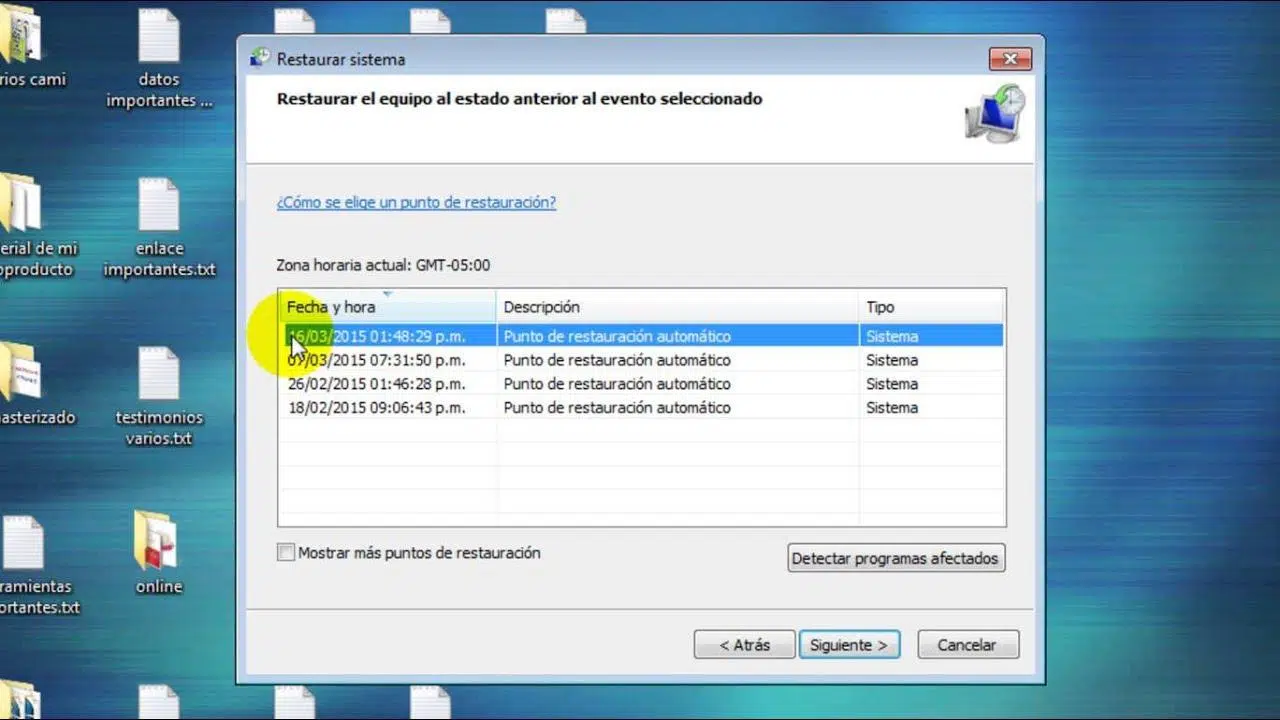
The assistant will ask if you want to use the recommended restore point (usually the most recent one) or choose a different restore point . If you suspect a specific change, it's usually more helpful to manually select a point from before that change.
In the list of restore points, you can check the box to "Show more restore points" to see older restore points. Additionally, the "Detect affected programs" option tells you which software will be installed or uninstalled when applying that restore point, which is very useful for avoiding surprises.
Once you've selected the correct location, review the information and confirm by clicking the Finish button. Your computer will restart, and Windows will automatically perform the restore . If everything goes well, you'll see a message indicating that the operation has been completed successfully.
Restore Windows to a previous point from safe mode
Your PC might not boot properly in normal mode, but you can still access Safe Mode, Windows' diagnostic mode that loads only the essentials . In this environment, you can also start System Restore.
Safe mode is very useful when a third-party driver, service, or program is causing crashes or blue screens , as it loads the bare minimum during startup to allow you to perform repair tasks.
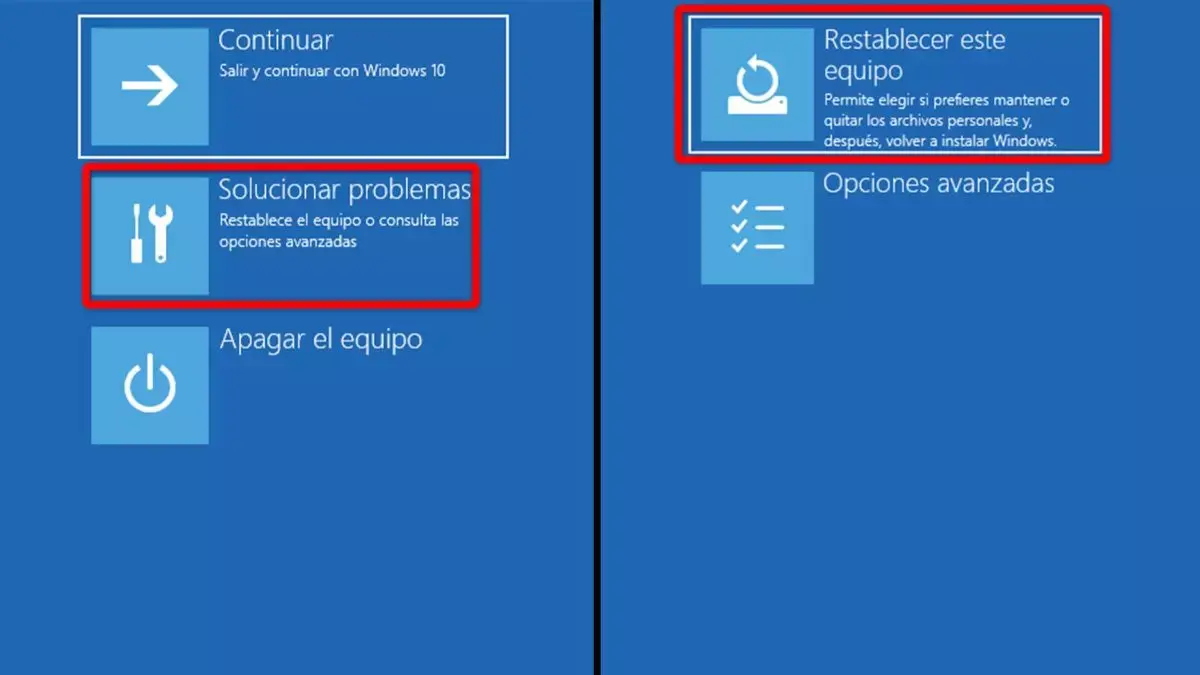
In Windows 10 and Windows 11, a common way to access Safe Mode is to restart your computer several times during startup (for example, by pressing the power button three times in a row to interrupt the boot process). This usually activates the Startup Repair screen, and from there you can access advanced options.
Within those options, by going to "Troubleshoot" and then "Startup Settings," you can restart again and choose to boot into Safe Mode . Once there, you can open the Control Panel, search for "Recovery," and from there, access the System Restore option.
The procedure within the wizard is virtually the same: you choose the restore point, review the affected programs, and confirm the operation . Once finished, the computer will restart in normal mode, attempting to boot into the restored state.
Use the Windows Recovery Environment (WinRE) and boot disks
If Windows won't boot even in safe mode (for example, if you see a black screen with a cursor ), you can still use the Windows Recovery Environment (WinRE) and installation or recovery media . These will give you access to advanced tools, including System Restore.
One option is to use a Windows installation DVD or USB drive . To do this, you must configure the BIOS or UEFI to make that media the primary boot device. This is usually done by entering the BIOS using keys such as DEL, F1, F2, F10, etc., depending on the manufacturer.
Once your computer boots from the disc or USB drive, you'll see the screen to choose your language and keyboard layout. Instead of continuing with "Install now," you'll need to click "Repair your computer ," usually in the bottom left corner.
Doing so will take you to the repair environment, where you can select your installed Windows system and click "Troubleshoot." In that menu, you'll find "Advanced options," and among them, "System Restore ." This will open the classic system restore window, and you can follow the wizard as in the previous methods.
This approach is similar in several versions: Windows 7, Windows 8/8.1, Windows 10 and Windows 11 all follow the same philosophy: boot from media, choose "Repair your computer", go to the recovery tools and enter System Restore.
Restore the system from the command prompt (CMD)
If the graphical recovery environment is giving you trouble, or if you prefer a more direct method, you can also launch System Restore from the command prompt using the rstrui.exe executable . This method is typically used within WinRE when booting from installation or recovery media.
The process is similar: boot from the USB or DVD, access "Repair your computer," and within "Troubleshoot" > "Advanced options," choose " Command Prompt " to open a console . Once there, simply type:
Type rstrui.exe and press Enter.
This should open the System Restore graphical interface even without having loaded the Windows desktop , allowing you to select the restore point on the drive where the system is installed.
After that, the wizard works the same as always: choose a location, confirm, and let the process complete . This method using Command Prompt is especially useful when other System Restore shortcuts fail or don't appear at all.
Special case: Upgrading from Windows 11 to Windows 10 without losing data
Some people have older computers on which Windows 11 has been installed using unofficial methods, for example, by bypassing requirements such as the TPM 2.0 chip . This can cause incompatibilities with certain programs or anti-cheat software (such as Riot Vanguard) that require specific hardware.
In these cases, it is common to want to return to Windows 10 while keeping personal files , especially if the computer is used for studies or work and there are many documents without backups.
There are two main approaches:
- Use the "Go back to the previous version of Windows" option if it is still available in the recovery settings. This option is usually time-limited after the upgrade. It allows you to return to Windows 10 while keeping your personal data..
- Perform a Windows 10 installation while keeping personal files, but This always implies making a backup of your important data beforehand.because any problems during installation could affect those files.
Regarding the license, on many computers the Windows 10/11 digital key is linked to the motherboard , so when you install Windows 10 and connect to the Internet, the system is usually activated automatically without needing to buy another key, provided the computer has had a valid license before.
What happens to your data and how to recover it if something goes wrong?
As we mentioned, System Restore is designed not to affect your personal documents . However, it is possible that certain files may appear to "disappear" if they were associated with a program that has been uninstalled or if they were located in special system-related locations.
Furthermore, any deep repair process carries some risk, however small. Therefore, it is highly recommended, whenever possible, to back up your data before performing a system restore or image restoration . This can be done on another internal drive, an external drive, or in the cloud.
If you've already restored your system and are missing some files, one option is to use specialized data recovery software . There are tools that can scan your disk for deleted or lost files, allowing you to preview them before recovering them.
These programs usually offer options such as quick and deep scans , filters by file type (documents, photos, videos, etc.) and a preview to ensure that the file is intact before saving it to another secure location.
The idea is that, if you know you're going to restore your computer to a previous date and you're afraid of losing some data, you can first run a recovery tool to save what you care about , and then proceed with the system restoration more calmly.
Restore Windows to older versions: XP, Vista, 7 and 8/8.1
Although Windows 10 or 11 are the most common operating systems today, many computers still run older versions like XP, Vista, 7, or 8/8.1 . System Restore is also available on these systems, although the access method varies slightly.
In Windows XP, for example, a common way to attempt repair was to boot into safe mode by pressing F8 just before Windows started and, if the system managed to load, launch the recovery utility from there.
In Vista and 7, in addition to safe mode, it is common to use the installation CD or DVD to boot from it, choose "Repair your computer" and access System Restore from the recovery tools, in a very similar way to the more modern versions.
In Windows 8 and 8.1 the process is practically the same: boot from the disk, select language, click on "Repair your computer", enter "Troubleshoot" and then "Advanced options" to finally find System Restore among the available tools.
In all these systems, the principle is the same: choose a restore point where the computer was working correctly , apply the changes, and check if the problem is gone. As always, personal files should not be deleted during this process.
If your PC starts behaving strangely after an installation, update, or configuration change, using restore points and the various ways to access System Restore (normal Windows, Safe Mode, WinRE, or CMD) is usually the fastest way to return to a stable state without losing your personal data . Combining this with good backups and, if necessary, file recovery tools will minimize any risk to your important information.