- IPv6 solves the IPv4 address shortage and enables advanced networking without relying on NAT.
- The key to a stable deployment is choosing the right type of IPv6 connection offered by the ISP.
- In networks with VLANs and /48 prefixes, segmentation in /64 facilitates self-configuration and control through ACLs.
- Clients and systems like Windows require reviewing the IPv4/IPv6 preference and adjusting it only when necessary.
Making the leap to IPv6 in an advanced network is no longer something to do "later": remote work, more devices, cloud services, and the IPv4 shortage mean it's a change you'll have to address sooner or later. The good news is that, with proper planning, you can deploy IPv6 in your corporate or advanced home network without going crazy and taking advantage of its real benefits in performance, security, and scalability.
In this article we're going to delve into the details : what IPv6 is, how it fits with IPv4 (dual stack, transition), how to configure it on typical routers (ASUS, Omada, UniFi, FRITZ!Box, etc.), how to divide a corporate /48 into VLANs, what options to choose in the IPv6 menus, how to control access with ACLs instead of NAT, and what special settings you should know on systems like Windows to make everything work as expected.
What is IPv6 and why should you enable it now?
IPv6 is the modern version of the IP protocol , designed to gradually replace IPv4 and, above all, to resolve the exhaustion of public IP addresses. While IPv4 uses 32-bit addresses (approximately 4.294 billion theoretical addresses), IPv6 uses 128 bits, resulting in an astronomical number of addresses, on the order of 340 sextillion.
In practice, this means you can assign a unique public IP address to virtually every device, virtual machine, container, or service, eliminating much of the hassle of juggling NAT, ports, and complex translations. Furthermore, IPv6 includes native improvements in autoconfiguration, network segmentation, and support for advanced services.
When you connect to a website , the domain name resolves to an IP address (v4 or v6) that identifies the destination on the network. With IPv4, you're used to seeing addresses like 192.168.1.1 or 10.0.0.1. With IPv6, the format is hexadecimal and is represented with blocks separated by colons, for example, 2001:db8:abcd:1::1.
Today, most operators are deploying IPv6 in dual-stack mode, meaning they provide the client with both IPv4 and IPv6 addresses simultaneously. The system and applications choose which protocol to use based on preference policies, typically prioritizing IPv6 when it is available and functional.
IPv6 connection types and transition mechanisms
Before changing any settings on your router , you need to know what type of IPv6 connection your Internet Service Provider (ISP) offers. You'll usually have to select this type in the WAN or Internet section of your router. If you don't know, ask your ISP, as this is crucial for the correct IPv6 configuration on your network.
Among the most common types of home and business routers you will find options such as:
- Nativo (sometimes called “Native” or simply “IPv6”): the operator routes an IPv6 prefix directly to your router, without special tunnels. This is the ideal case and the easiest to manage.
- Static IPv6The ISP assigns you a fixed block (for example, a /48 or /56) and you manually configure the address and prefix on the router's WAN interface.
- passthroughThe router acts as a "bridge" and allows the device behind it to directly obtain the IPv6 configuration (typical in some scenarios with automatic IP on WAN).
- Tunnels 6to4, 6in4 and 6rdTransition mechanisms that encapsulate IPv6 packets within IPv4 when the provider or intermediate infrastructure does not yet support native IPv6. 6rd, for example, is a "fast" stateless deployment variant similar to 6to4.
- Specific services such as FLET's IPv6: widely used in Japan, where some providers implement their own solutions that require specific configuration templates on the router.
In any case, the key point is to first configure the IPv4 WAN connection (automatic IP, PPPoE, static IP, etc.) and then select the corresponding IPv6 type. Many routers even automatically fill in some of the IPv6 parameters when they correctly detect the connection type.
Configuring IPv6 on a typical router (e.g., ASUS)
Let's take an ASUS router as an example , because its menus are quite representative of what you'll see in many other brands. The general flow is usually very similar: access the web interface, adjust the WAN settings, and then go to the specific IPv6 section within Advanced Settings.
Typical steps to activate IPv6 on this type of router would be:
- Connect a computer to the router via cable or WiFi and access the web interface, either through the LAN IP (for example 192.168.1.1) or a specific URL such as http://www.asusrouter.com.
- Sign in to the admin console with the device's username and password. If you've forgotten them, the only option is to restore the router to factory settings and configure it again.
- First, verify the IPv4 WAN connection type In the WAN > Internet Connection section, you'll see if you're using PPPoE, automatic IP (DHCP), static IP, etc.
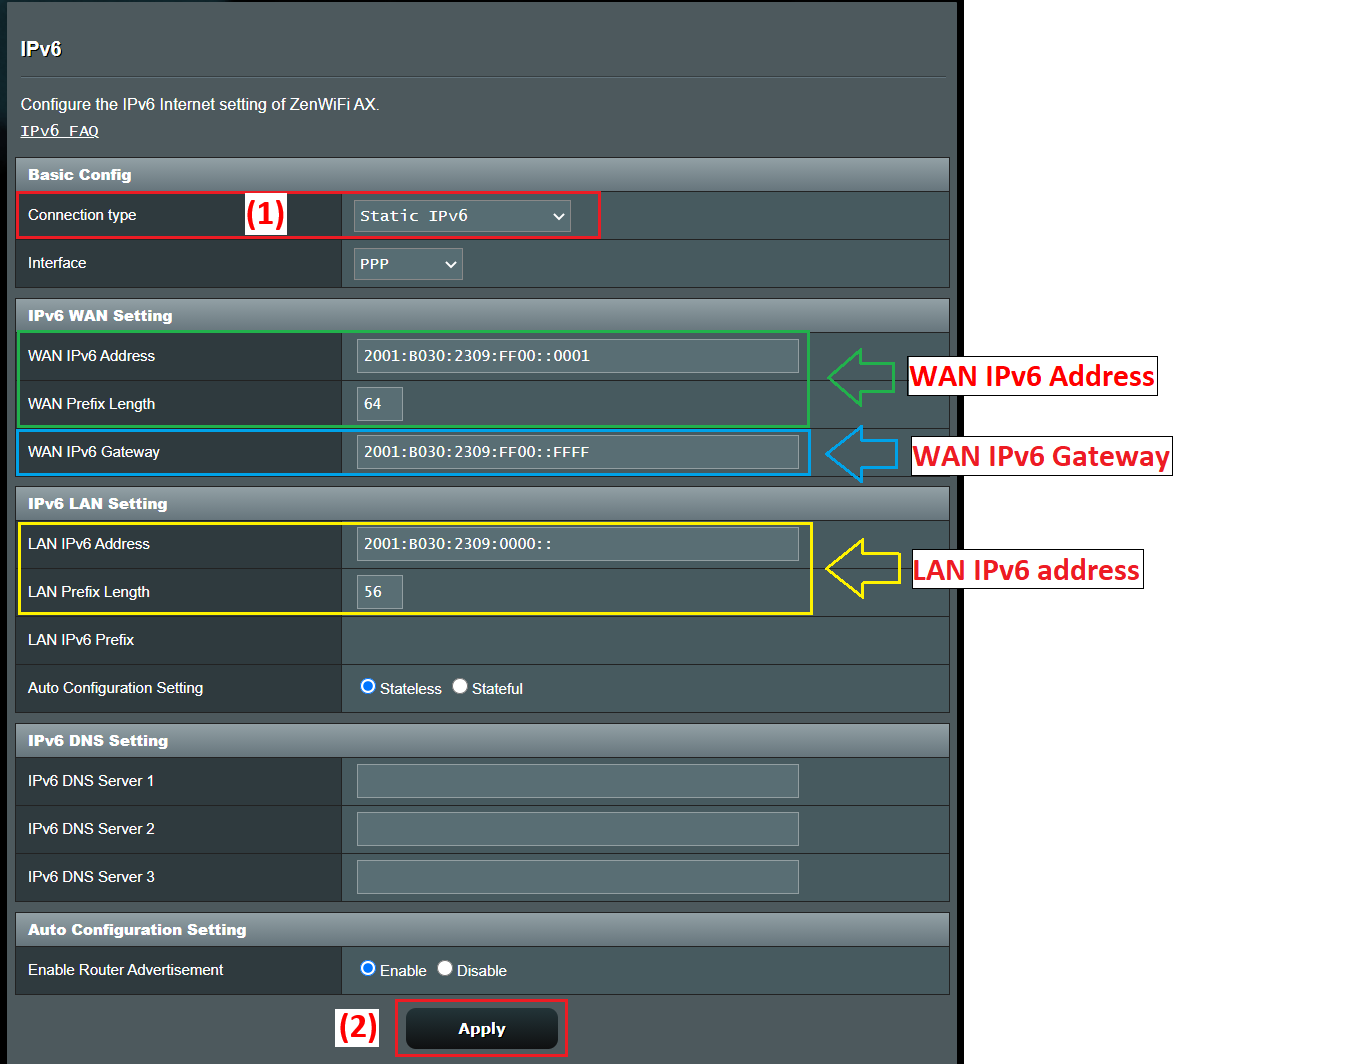
- Enter the IPv6 menu within the advanced settings and select the IPv6 Connection Type according to the above.
For example, a typical combination is usually:
- If the IPv4 WAN is in PPPoESelect IPv6 type NativoThe router will use the PPPoE session to obtain the IPv6 information from the operator.
- If the IPv4 WAN is Static IP, to choose Static IPv6 in the IPv6 section and manually fill in the address, prefix, gateway and DNS that your ISP gave you.
- If the IPv4 WAN is in Automatic IP (DHCP)Many guides recommend using passthrough so that the IPv6 configuration is passed directly to the device that requires it or is managed automatically.
After applying the changes , the router usually partially restarts the network service. A quick way to verify that you are receiving IPv6 parameters is to log back in and check the IPv6 LAN configuration section: if you see assigned addresses and prefixes, the IPv6 WAN portion is working.
To confirm actual connectivity , a recommended test is to visit a test page like test-ipv6.com, which analyzes whether your browser and provider correctly support the protocol and tells you if you are operating in dual stack, if there are DNS errors, or if you only have IPv4.
Deployment of IPv6 in advanced networks with VLANs and /48 prefixes
In more serious environments , such as offices with multiple VLANs and UniFi or Omada-type equipment, the ISP will usually provide a large static prefix, for example /48. From there, your job is to divide that block into /64 subnets (or others, if the platform supports it) that you will assign to each VLAN or logical segment.
Let's say your provider gives you a /48 address like 2001:b33f:f33d::/48, and on your router's WAN interface you use 2001:b33f:f33d::2, with your ISP's router being 2001:b33f:f33d::1. That WAN configuration is simply the outbound link. The important thing is how you distribute that /48 address on the LAN side.
In IPv6, it's very common to work with /64 on each Layer 2 link because it's the recommended size to allow for autoconfiguration (SLAAC) and other features. Starting with a /48, you have 2^(64-48) = 65.536 available /64 subnets; in other words, you have more than enough to comfortably assign blocks to each VLAN, guest Wi-Fi network, DMZ, etc.
In your router's LAN interface settings (for example, on a UniFi or Omada gateway), you'll see an "IPv6 address" or "IPv6 prefix" field and a dropdown menu with subnet mask lengths between /64 and /127. It's usually recommended to leave it at /64, unless you have a very specific situation.
The idea is something like this :
- VLAN 10 (corporate network): 2001:b33f:f33d:10::/64
- VLAN 20 (guests): 2001:b33f:f33d:20::/64
- VLAN 30 (servers): 2001:b33f:f33d:30::/64
- VLAN 40 (lab/IoT): 2001:b33f:f33d:40::/64
In each VLAN, the router will have a valid address within the /64 prefix, which will act as the gateway for clients; for example, 2001:b33f:f33d:10::1 for VLAN 10, 2001:b33f:f33d:20::1 for VLAN 20, and so on. The field that many devices label as “Gateway IP/Subnet” refers precisely to that router address along with the length of the prefix (/64).
As for clients , they will typically obtain a single global IPv6 address within the assigned /64 subnet, either through SLAAC, DHCPv6, or a combination of both (SLAAC for the IP address and DHCPv6 for additional parameters such as DNS). Entire subnets are not usually delegated to individual devices except in very specific contexts (for example, internal routers that distribute prefixes using DHCPv6-PD).
When dividing the address space among several VLANs , rather than worrying about consumption (you have plenty of prefixes), you are interested in making the scheme orderly and easy to understand: use VLAN numbers in the last 16 bits of the prefix, reserve consecutive ranges for internal services, separate guests, IoT and production with well differentiated blocks, etc.
Autoconfiguration, DAD, and advanced IPv6 parameters on interfaces
When you enable IPv6 on an interface (LAN, VLAN, tunnel, etc.), many systems allow you to adjust advanced parameters that are reasonably well-tuned by default. It's generally best not to touch them unless you have a very specific requirement in your network.
One of these parameters is the "hop limit ," which is the equivalent of TTL in IPv4: the maximum number of router hops a packet can take before being discarded. The most common default value is 64, which is usually more than sufficient even in large networks.
Another common setting is the number of DAD (Duplicate Address Detection) transmissions. IPv6 runs a process to check that an address is not duplicated on the network before using it. A typical value is 1, which reduces configuration time while maintaining minimal checking. Setting it to 0 disables duplicate address detection, which is generally not recommended except in highly controlled scenarios.
In most controllers and routers, you'll find these parameters within a dedicated IPv6 tab when editing the interface. The documentation usually advises leaving the default values unless you know exactly what you're changing and why.
Access control and security in IPv6: ACLs instead of NAT
A key difference from IPv4 is that IPv6 does not use NAT in the same way. Each device can have globally routable addresses directly from the internet, so the first line of security becomes the gateway's firewall/ACL instead of the side effect of NAT itself.
In Omada-type gateways , the IPv6 access control list (ACL) functionality is key. It allows the administrator to define rules that filter traffic based on source address, destination address, ports, or protocols, and decide whether to allow or deny each type of traffic.
By default, many Omada gateways already block access from external networks to internal networks when it comes to IPv6 traffic, precisely because there is no NAT to "hide" internal addresses. In other words, access from the internet to your LAN is completely blocked unless you explicitly create loopholes.
For typical IPv6 access control scenarios , you have several configuration patterns:
- Prevent access from the Internet to the internal networkIt is usually blocked by default, but you can review or further tighten the policy with additional ACLs in IPv6.
- Allow access to an internal server (for example, a web server in a server VLAN): an internal IPv6 address group (my_server) and an external client or range group (my_client) are defined, and a WAN-IN type ACL rule is created to allow that traffic.
- Restrict internet access for certain devices (for example, children's computers or IoT devices): an IPv6 group is created with those clients (children_pc) and another that represents the Internet, and a LAN->WAN ACL rule is added in Deny mode for that group.
The workflow in Omada can be summarized as follows: correctly configure the IPv6 WAN connection, enable and set the IPv6 mode on the LANs/VLANs, define IPv6 groups with the addresses or ranges you are interested in, and finally create gateway ACL rules where you choose traffic direction (IN, OUT, LAN->WAN), policy (Allow/Deny), protocols, and source/destination pairs based on those groups.
It is important to ensure that the gateway firmware is up to date, because the most modern IPv6 access control features may require recent versions of the system software.
Activating IPv6 in home and small office environments
In a home or small office setting , the IPv6 activation process is usually less intimidating than it seems. The key is that your ISP already offers IPv6 support on your line and that your router recognizes it correctly.
The general steps would be :
- Confirm with your supplier Confirm that your connection supports IPv6 and in what mode (dual stack, IPv6 only with NAT64, etc.). Also ask if you need to change your equipment or firmware.
- Verify that the router supports IPv6This is common in modern equipment such as FRITZ!Box, ASUS routers, TP-Link Archer (C, AX, etc.), Omada, UniFi, etc.
- Access the router's web interface (192.168.1.1, 192.168.0.1 or another, depending on the manufacturer) and look for the IPv6 section in the advanced options or in the network menu.
- Enable IPv6 and choose the connection type indicated by the ISP: DHCPv6, PPPoE with native IPv6, static IP, 6rd tunnel, etc.
- Apply the changes and restart if necessaryNext, check with a website like test-ipv6.com if your internet connection is already using IPv6.
In most modern operating systems (Windows 10/11, macOS, Linux, Android, iOS), IPv6 is enabled by default. In Windows, for example, simply go to the network adapter properties and make sure the "Internet Protocol Version 6 (TCP/IPv6)" box is checked.
Once the router correctly advertises the prefix and clients have IPv6 enabled, each device will automatically obtain its global and link-local address, without needing to touch anything on the device itself.
Windows' perspective: IPv4/IPv6 preference and partial deactivation
In Windows-managed environments , it is important to know that the system implements the address selection logic described in RFC 3484, maintaining a table of prefixes that decides which address to use when the same machine has several IPs (IPv4 and IPv6) associated with a DNS name.
By default, Windows tends to use IPv6 whenever a global unicast address is available and connectivity is correct, although it is still perfectly capable of working with IPv4 in parallel.
Some administrators choose to disable or restrict IPv6 to diagnose network problems, especially when issues related to name resolution or incomplete IPv6 configurations are suspected. Microsoft provides a centralized mechanism for monitoring IPv6 usage through the system registry.
The relevant registry key is:
HKEY_LOCAL_MACHINE\SYSTEM\CurrentControlSet\Services\Tcpip6\Parameters\DisabledComponents
This is a REG_DWORD value that can range from 0x00 (default behavior, IPv6 fully enabled) to 0xFF (effectively disabling IPv6 on most interfaces, although the system still uses it internally for its own tasks).
Some useful settings are :
- Prefer IPv4 over IPv6: value 0x20 (32 in decimal). Keeps IPv6 active but modifies prefix policies so that IPv4 is chosen when available. This is considered preferable to disabling IPv6 completely.
- Disable IPv6 on non-tunnel interfaces: value 0x10 (16 decimal), which affects native interfaces.
- Disable IPv6 on tunnel interfaces: value 0x01 (1 decimal), useful if transition technologies such as 6to4, ISATAP or Teredo are not desired.
- Turn off almost everywhere: 0xFF (255 decimal), which disables IPv6 in both tunnels and native interfaces, with the exception that the system still retains ::1 for loopback and internal uses.
To change this value from an administrative console, you can use a command like this:
reg add "HKEY_LOCAL_MACHINE\SYSTEM\CurrentControlSet\Services\Tcpip6\Parameters" /v DisabledComponents /t REG_DWORD /d <valor> /f
Windows uses a bitmask on this field to decide which components are disabled: tunnels, 6to4, ISATAP, Teredo, native interfaces, IPv4 preference, etc. Each bit is interpreted as true (1) or false (0) for the different functions, and specific combinations such as 0x20, 0x10, 0x01, or 0x11 correspond to common scenarios documented by Microsoft.
It's important to understand that this key doesn't change the status of the "Internet Protocol Version 6 (TCP/IPv6)" checkbox in the interface properties; that is, you can see the checkbox checked even if you have limited or disabled IPv6 at the registry level. This is the expected behavior.
If you want to disassociate IPv6 from a specific interface, you can:
- Remove the IPv6 check box in the network properties of the adapter.
- Use PowerShell with a command like:
Disable-NetAdapterBinding -Name "NombreDeMiAdaptador" -ComponentID ms_tcpip6
Additionally, Windows automatically enables technologies like 6to4 when the computer has public IPv4 addresses. If you don't want these tunnel interfaces created or IPv6 addresses automatically registered in DNS, you can disable them by setting DisabledComponents to 0x01 or using Group Policy settings that disable 6to4, ISATAP, and Teredo.
Router models and IPv6 support
IPv6 support has gradually expanded to virtually all mid-range and high-end home and small business routers. Brands like ASUS, AVM FRITZ!Box, TP-Link (Archer and Omada series), and other SD-WAN solutions typically include full IPv6 support in their latest firmware updates.
In the TP-Link Archer ecosystem, for example , there are many models aimed at different scenarios (AX57, C1200, C5400, AX55, C4, C5200, AX53, C5, AX10, C2, AX51, AX96, A2200, TL-WR1043N V5, C80, AXE95, C8, AX10000, C3150, C9, AX50, C6, C7, AX90, AX6000, C5400X, C25, C24, A20, A64, C60, C2600, A1200, C21, C20, C64, AX1800, AX206, C59, C58, AX4200, C3200, C900, A2, AX75, AX4400, C3000, AX73, C50, A10, A54, AX4800, C1900, C55, C54, A2300, TL-WR841N V14.20, AXE75, A6, A7, AX72, AXE5400V, AXE200 Omni, A5, GX90, A8, A9, AX68, C2300, AX5300, C1210, AX23, AX20, C4000, AX21, AX3000V, A3000, C2700, AXE300, AX1500, AX60, AX11000, AX3200, AX3000...).
In many of these models , IPv6 support or specific features (e.g., DHCPv6-PD, tunneling, IPv6 parental controls, advanced ACLs, etc.) have been improved with firmware updates. It's a good idea to check the manufacturer's download center, verify your device's hardware version, and read the datasheet or release notes to see what's been added recently.
Also keep in mind that the availability of certain products and features varies by region, so a specific model with certain IPv6 capabilities may not be available in your country or may not have exactly the same features as in another area.
Support, firmware, and functional testing
When working with IPv6, it is especially important to keep your equipment firmware updated: bugs in the DHCPv6 implementation, failures in RA (Router Advertisements), problems with 6rd/6to4 tunnels, or incompatibilities with ACLs can complicate your life considerably.
Manufacturers typically centralize downloads of drivers, firmware, utilities, and manuals in their support centers (for example, the ASUS Download Center or the FRITZ!Box support portal). Regularly checking the release notes will give you clues about improvements related to IPv6, security, and performance.
After any major configuration change (enabling IPv6, modifying prefixes, tweaking ACLs, changing the IPv4/IPv6 preference on Windows clients, etc.) it is advisable to perform a minimum battery of tests:
- Navigate to sites that only resolve to IPv6 or that prioritize IPv6.
- Use tools like test-ipv6.com to check connectivity, DNS, leaks, and transition.
- Test pings and traceroutes to both internal and external IPv6 addresses.
- Verify that the firewall/ACL rules act as expected on IPv6 traffic.
If something isn't working , a typical diagnostic plan includes checking the configured connection type, verifying that the LAN prefixes are correct, checking if clients are receiving valid addresses, updating firmware, and ultimately resetting the router to factory settings to rule out interfering legacy configurations.
Given this scenario, IPv6 ceases to be that "oddball" and becomes just another tool in your network resource box: properly configured, it gives you a much cleaner addressing scheme, simplifies some service publishing scenarios, and, well protected with ACLs and firewalls, doesn't necessarily pose an additional risk compared to IPv4, but rather the opposite thanks to its more modern design.
Table of Contents
- 1 What is IPv6 and why should you enable it now?
- 2 IPv6 connection types and transition mechanisms
- 3 Configuring IPv6 on a typical router (e.g., ASUS)
- 4 Deployment of IPv6 in advanced networks with VLANs and /48 prefixes
- 5 Autoconfiguration, DAD, and advanced IPv6 parameters on interfaces
- 6 Access control and security in IPv6: ACLs instead of NAT
- 7 Activating IPv6 in home and small office environments
- 8 Windows' perspective: IPv4/IPv6 preference and partial deactivation
- 9 Router models and IPv6 support
- 10 Support, firmware, and functional testing