- Delidding allows for the installation of Direct-Die cooling, reducing thermal barriers and significantly improving temperatures in high-power CPUs.
- Specific tools for modern sockets like LGA1851 facilitate a safer delidding process geared towards enthusiasts and overclockers.
- Custom liquid cooling offers higher performance, lower noise, and extensive customization options compared to pre-configured AIO solutions.
- Choosing between liquid metal and thermal paste, properly sizing radiators, and adjusting pump and fan curves are key to balancing performance, safety, and budget.
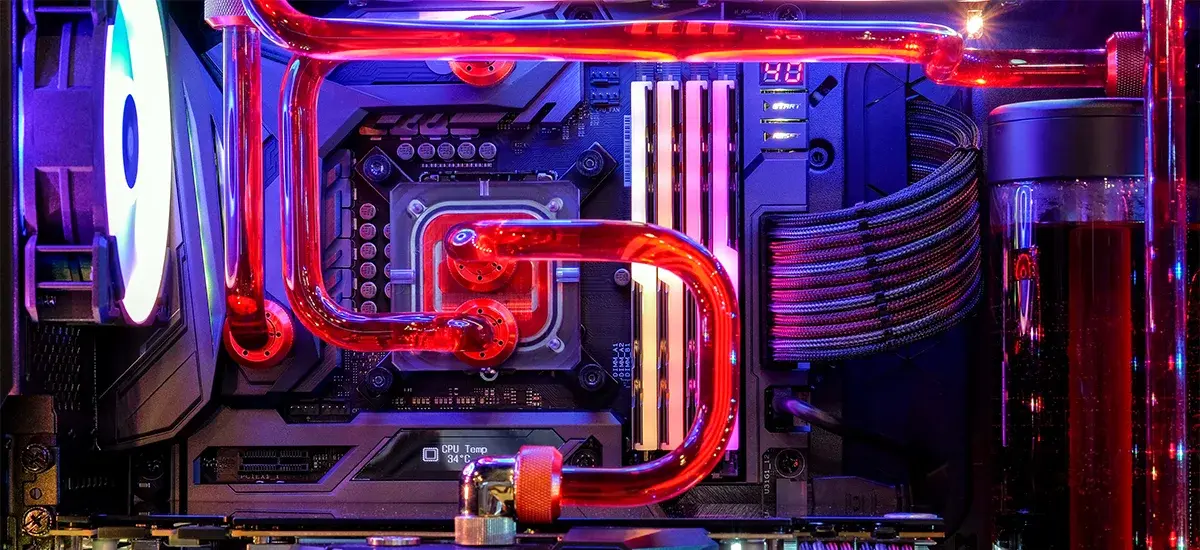
If you're thinking about building a custom liquid cooling system with delidding and a top-of-the-line processor, you're probably overwhelmed by the sheer number of tools, liquid metals, direct-die blocks, fan curves, and budgets. This world is addictive, but it also commands respect: we're talking about disassembling a processor worth hundreds of euros and assembling a water circuit around delicate hardware.
In the following lines we will break down in great detail everything related to delidding in modern CPUs and its combination with custom liquid cooling : what it is exactly, what you gain, what risks there are, how it fits with tools like Delid-Die-Mate for LGA1851 socket, what role liquid metal plays versus a "normal" thermal paste and how to plan a custom loop sensibly without spending your salary or your hardware in the attempt.
What is delidding and why is it combined with custom liquid cooling?
When we talk about delidding, we're referring to removing the IHS (integrated heatsink) from the processor—that is, the small metal plate you see on top of the actual chip. By removing it, we expose the silicon die and can cool the CPU much more directly, reducing intermediate thermal resistance.
The reason so many enthusiasts combine delidding with custom liquid cooling is simple: removing the IHS enables a "Direct-Die" mounting, where the cooling block (or a dedicated direct-cooling system) makes direct contact with the die itself. This results in much more efficient heat dissipation and significantly lower temperatures under load.
This approach makes particular sense in systems with custom liquid cooling geared towards maximum performance , because by reducing temperatures you not only gain stability, but also expand the margin for overclocking or to maintain higher turbo frequencies for longer without the CPU throttling performance due to thermal limits.
Specific tools: Delid-Die-Mate for Intel LGA1851 socket
To safely delidding modern Intel CPUs, especially those with recent sockets like LGA1851 and the Intel Core Ultra 200 series , it's usually best to use a specialized tool rather than improvising with DIY methods. This is where solutions like Delid-Die-Mate devices come in, designed to apply just the right amount of force, evenly distributed across the CPU socket.
A tool of this type for LGA1851 is specifically designed to remove the integrated heatsink (IHS) of compatible processors , facilitating a more controlled delidding process. Its main function is to allow you to install a Direct-Die cooling system with a water block or a dedicated cooler that sits directly on the chip once the IHS is removed.
In the case of the Intel Core Ultra 200 series, the unique feature is that the area between the IHS and the die is joined using indium solder . Unlike older generations where you could replace the internal thermal paste with a better one, here the delidding isn't about changing the compound, but rather about clearing the way for direct mounting of the cooling block onto the silicon.
With a well-designed Direct-Die cooler setup, advanced users typically report temperature reductions of around 10-15°C compared to standard configurations with an integrated heat spreader (IHS), provided that high-conductivity thermal compounds are used, such as certain liquid metals specifically designed for CPUs. This improvement is particularly noticeable under sustained loads, where the CPU tends to heat up continuously.
These delidding tools are clearly aimed at hardware enthusiasts, overclockers, and users looking to fine-tune the thermal performance of their systems. They allow for a much safer process than doing it manually, minimizing the risk of damage to the CPU's packaging or PCB, which is crucial when dealing with high-end processors.
Liquid metal versus traditional thermal paste after delidding
A very common question when delidding is whether it's worth using liquid metal in contact with the die or if it's better to stick with a high-end thermal paste to reduce risks. Many users initially buy liquid metal to help remove the solder or indium from the die after delidding, but then wonder if it's really advisable to also use it as a permanent heat transfer medium.
Liquid metal—for example, compounds like Thermal Grizzly Conductonaut or other galinstans —offers significantly higher thermal conductivity than traditional thermal pastes. This translates into a few extra degrees of temperature reduction, especially in Direct-Die configurations with CPUs that dissipate a lot of power. However, it's not all advantages.
One of the main drawbacks is that liquid metal is electrically conductive . If it spills or spreads beyond the intended area, it can cause short circuits, damage the socket, or even destroy the motherboard or CPU. Furthermore, some blocks or contact surfaces, if not made of compatible materials, may corrode over time due to a reaction with these compounds.
Conversely, a good, high-end, non-conductive thermal paste offers a very interesting balance between safety and performance . While you might lose a few degrees compared to liquid metal, in many cases the actual difference won't be dramatic, especially if the delidting and block contact are done correctly.
Many enthusiasts, after reading about others' experiences, conclude that liquid metal doesn't always justify the long-term risk, especially if the system will be running 24/7 or if you don't want to constantly monitor the compound's condition over time. In that case, opting for a quality thermal paste for the contact between the die and the water block might be the wisest choice, using liquid metal only as a temporary tool to facilitate cleaning solder or indium residue during delidding.
Custom liquid cooling: concept and advantages over AIO
When we talk about custom liquid cooling, we're referring to a system where you choose every component of the circuit yourself : CPU block, GPU block, radiators, pump, reservoir, fittings, tubing, coolant, etc. It's not like a factory-sealed AIO (All-In-One), but a modular system custom-designed for your setup.
This approach gives you a huge margin for customization. You can prioritize maximum thermal performance, minimal noise , or visual appearance , or find a balance between all these factors. For content creators and demanding gamers, being able to size the system according to the actual TDP of their CPU and GPU is a major advantage.
Another important point is that a custom liquid cooling system is usually much quieter than an equivalent air cooling system, provided the radiators are properly sized and the fan and pump curves are correctly configured. With a larger heat dissipation surface, the fans don't need to run at full speed constantly to keep temperatures under control.
It's also a very attractive solution from an aesthetic point of view: rigid or flexible tubing, colored liquids, RGB lighting , transparent acrylic blocks… the modding possibilities are almost endless. For many users, the assembly and design of the loop itself becomes a hobby.
However, this level of customization requires planning, patience, and some technical knowledge . It's not as simple as installing and using an AIO cooler; you have to consider liquid routing, compatibility, available case space, mounting points, regular maintenance, and so on. In PCs with unusual layouts or highly specialized cases, custom liquid cooling is often the only way to make good use of the space and achieve adequate cooling.
Key components of a custom liquid cooling system
A custom loop consists of several fundamental elements that you can choose separately to adapt them to your hardware and your building style . It's most common to start with the CPU block, but you can also integrate graphics cards, VRMs, chipsets, or even RAM if you can find compatible blocks.
The heart of the system is usually one or more radiators , responsible for dissipating the heat carried by the liquid into the air. The choice of size (120, 240, 360, 420 mm, thickness, fin density) will depend on both the overall TDP of your system and the physical space of your case. A huge radiator is useless if it doesn't fit or if it obstructs the installation of other components.
The pump and reservoir form the liquid circulation and storage system. You can find them integrated into a single unit (pump/reservoir combo) or sold separately. A good pump should provide sufficient flow and pressure for your system, but also operate quietly, especially in systems that will be running for many hours.
Regarding CPU and GPU water blocks , it's crucial to verify their compatibility with the socket and the specific graphics card model. In the case of the GPU, water blocks are usually specific to each PCB, so you should carefully review the manufacturer's list of supported models. This is where a custom liquid cooling system often demonstrates its full potential, as it allows you to cool the GPU, memory, and VRM.
The rest of the cooling system is completed by tubing (flexible or hard tubing), fittings, elbows, caps, and the coolant itself . Rigid tubing offers a spectacular finish but is more difficult to work with; flexible tubing is more forgiving and facilitates future modifications. You can also find specific tools for cutting, bending, or shaping rigid tubing, as well as kits and sets that combine various components to simplify initial assembly.
Compatibility, performance and budget: three basic pillars
Before you rush out and buy parts on impulse, it's a good idea to check compatibility, performance requirements, and your budget . Ignoring any of these points often leads to problems during assembly or results that fall short of expectations.
Compatibility is key: CPU and GPU blocks, radiators, and cases must physically fit and be compatible with your hardware. A block that doesn't match your processor socket or a radiator that doesn't fit in the top or front of the case can ruin your project. That's why it's advisable to consult manufacturer guides, case schematics, and, if necessary, other users' experiences.
Regarding performance, it's important to estimate the combined TDP of all the components you'll be cooling . Cooling just a mid-range CPU is not the same as cooling a top-of-the-line CPU along with a high-power GPU. The radiator sizing and airflow must be adjusted to this thermal load to keep temperatures reasonable without the fans constantly running at 100%.
Budget also plays a crucial role, because a high-quality custom liquid cooling system isn't cheap . Blocks, radiators, pumps, reservoirs, fittings, and tubing from reputable manufacturers can represent a significant investment. This is where strategies like taking advantage of sales, using refurbished products from specialized stores, or building the system in phases —starting, for example, with just the CPU and later adding the GPU—come into play.
Many specialist stores also offer personalized advice to help you select components. This is especially useful if you're unsure how many radiators you need, which pump best suits your loop size, or which block is compatible with your specific graphics card.
Direct-Die Mounting and System Fine-Tuning
Once you decide to combine delidding with custom liquid cooling, that's when Direct-Die mounting and all the fine-tuning of pump and fan curves come into play . This is where you can squeeze out extra degrees of temperature and, above all, where you'll see a real difference in noise and daily system performance.
A common piece of advice when you're starting out is not to get too hung up on the final build from day one. You can begin by mounting a radiator with the fans in a "sandwich" (push-pull) configuration if space allows, experiment with different combinations of curves and temperatures, and, above all, familiarize yourself with how your system responds to light and heavy loads.
For the pump, a curve is generally recommended where the flow rate gradually increases from around 50-60°C CPU temperature to its maximum. This way, when the processor really starts to heat up, the liquid flow will increase, improving heat dissipation, all without constantly running the pump at full speed.
Regarding radiator fans , a practical strategy is to link them to the water temperature rather than the instantaneous CPU temperature . Adjusting them from a minimum to a maximum within a range of about 25-30°C of the liquid temperature usually provides smooth and stable performance, avoiding sudden increases and decreases in RPM that can be annoying when working or gaming.
Another small quality-of-life improvement is better cable management. If you find that fan cables are too short or make a clean build difficult, using PWM extensions to route all the connections to the back of the case helps a lot. This not only improves aesthetics but also makes maintenance easier and allows you to replace components without having to disassemble half your system.
If you have ambitious projects in mind—like custom towers, metal structures fabricated by a blacksmith, or modified bench tables—it might be a good idea to start with a more conventional setup to learn how custom liquid cooling behaves before committing to something completely bespoke. The clearer your understanding of what you want and how your hardware works, the more refined your final design will be.
Ultimately, this entire ecosystem of delidding, Direct-Die, and custom liquid cooling revolves around the same idea: getting the most out of your hardware while keeping temperatures under control, reducing noise, and customizing your system to your liking. With good planning, the right choice between liquid metal or thermal paste, and careful pump and fan configuration, you can achieve a very powerful, quiet system with an aesthetic that sets it apart from standard solutions.

Table of Contents
- 1 What is delidding and why is it combined with custom liquid cooling?
- 2 Specific tools: Delid-Die-Mate for Intel LGA1851 socket
- 3 Liquid metal versus traditional thermal paste after delidding
- 4 Custom liquid cooling: concept and advantages over AIO
- 5 Key components of a custom liquid cooling system
- 6 Compatibility, performance and budget: three basic pillars
- 7 Direct-Die Mounting and System Fine-Tuning