- Nested virtualization allows hypervisors and VMs to run inside other VMs, maximizing hardware utilization and facilitating complex labs and tests.
- It is essential to have compatible processors (Intel VT-x or AMD-V/SEV), updated versions of Windows, and Hyper-V installed on the host before enabling nesting.
- Network and MAC address spoofing must be carefully configured to ensure stable connectivity for nested VMs, especially in IoT Edge environments and scenarios with VMware ESXi or Azure.
- Multi-layered backups and resource monitoring are key to maintaining secure, recoverable, and controlled-performance nested environments.
Nested virtualization on modern hardware has become an almost indispensable tool for IT teams, developers, and trainers who need to set up complex labs, test environments, or security scenarios without filling the data center with physical servers. Simply put, it allows you to run virtual machines inside other virtual machines, maintaining acceptable performance and fine-tuning resource management.
Beyond the typical "putting one VM inside another," nested virtualization opens the door to flexible DevOps pipelines, realistic training environments, isolated security testing, and IoT Edge deployments across various platforms, from on-premises Hyper-V to virtual machines on Azure or VMware ESXi. However, for everything to work as expected, the hardware and hypervisor configuration must meet very specific requirements.
What exactly is nested virtualization and why does it matter?
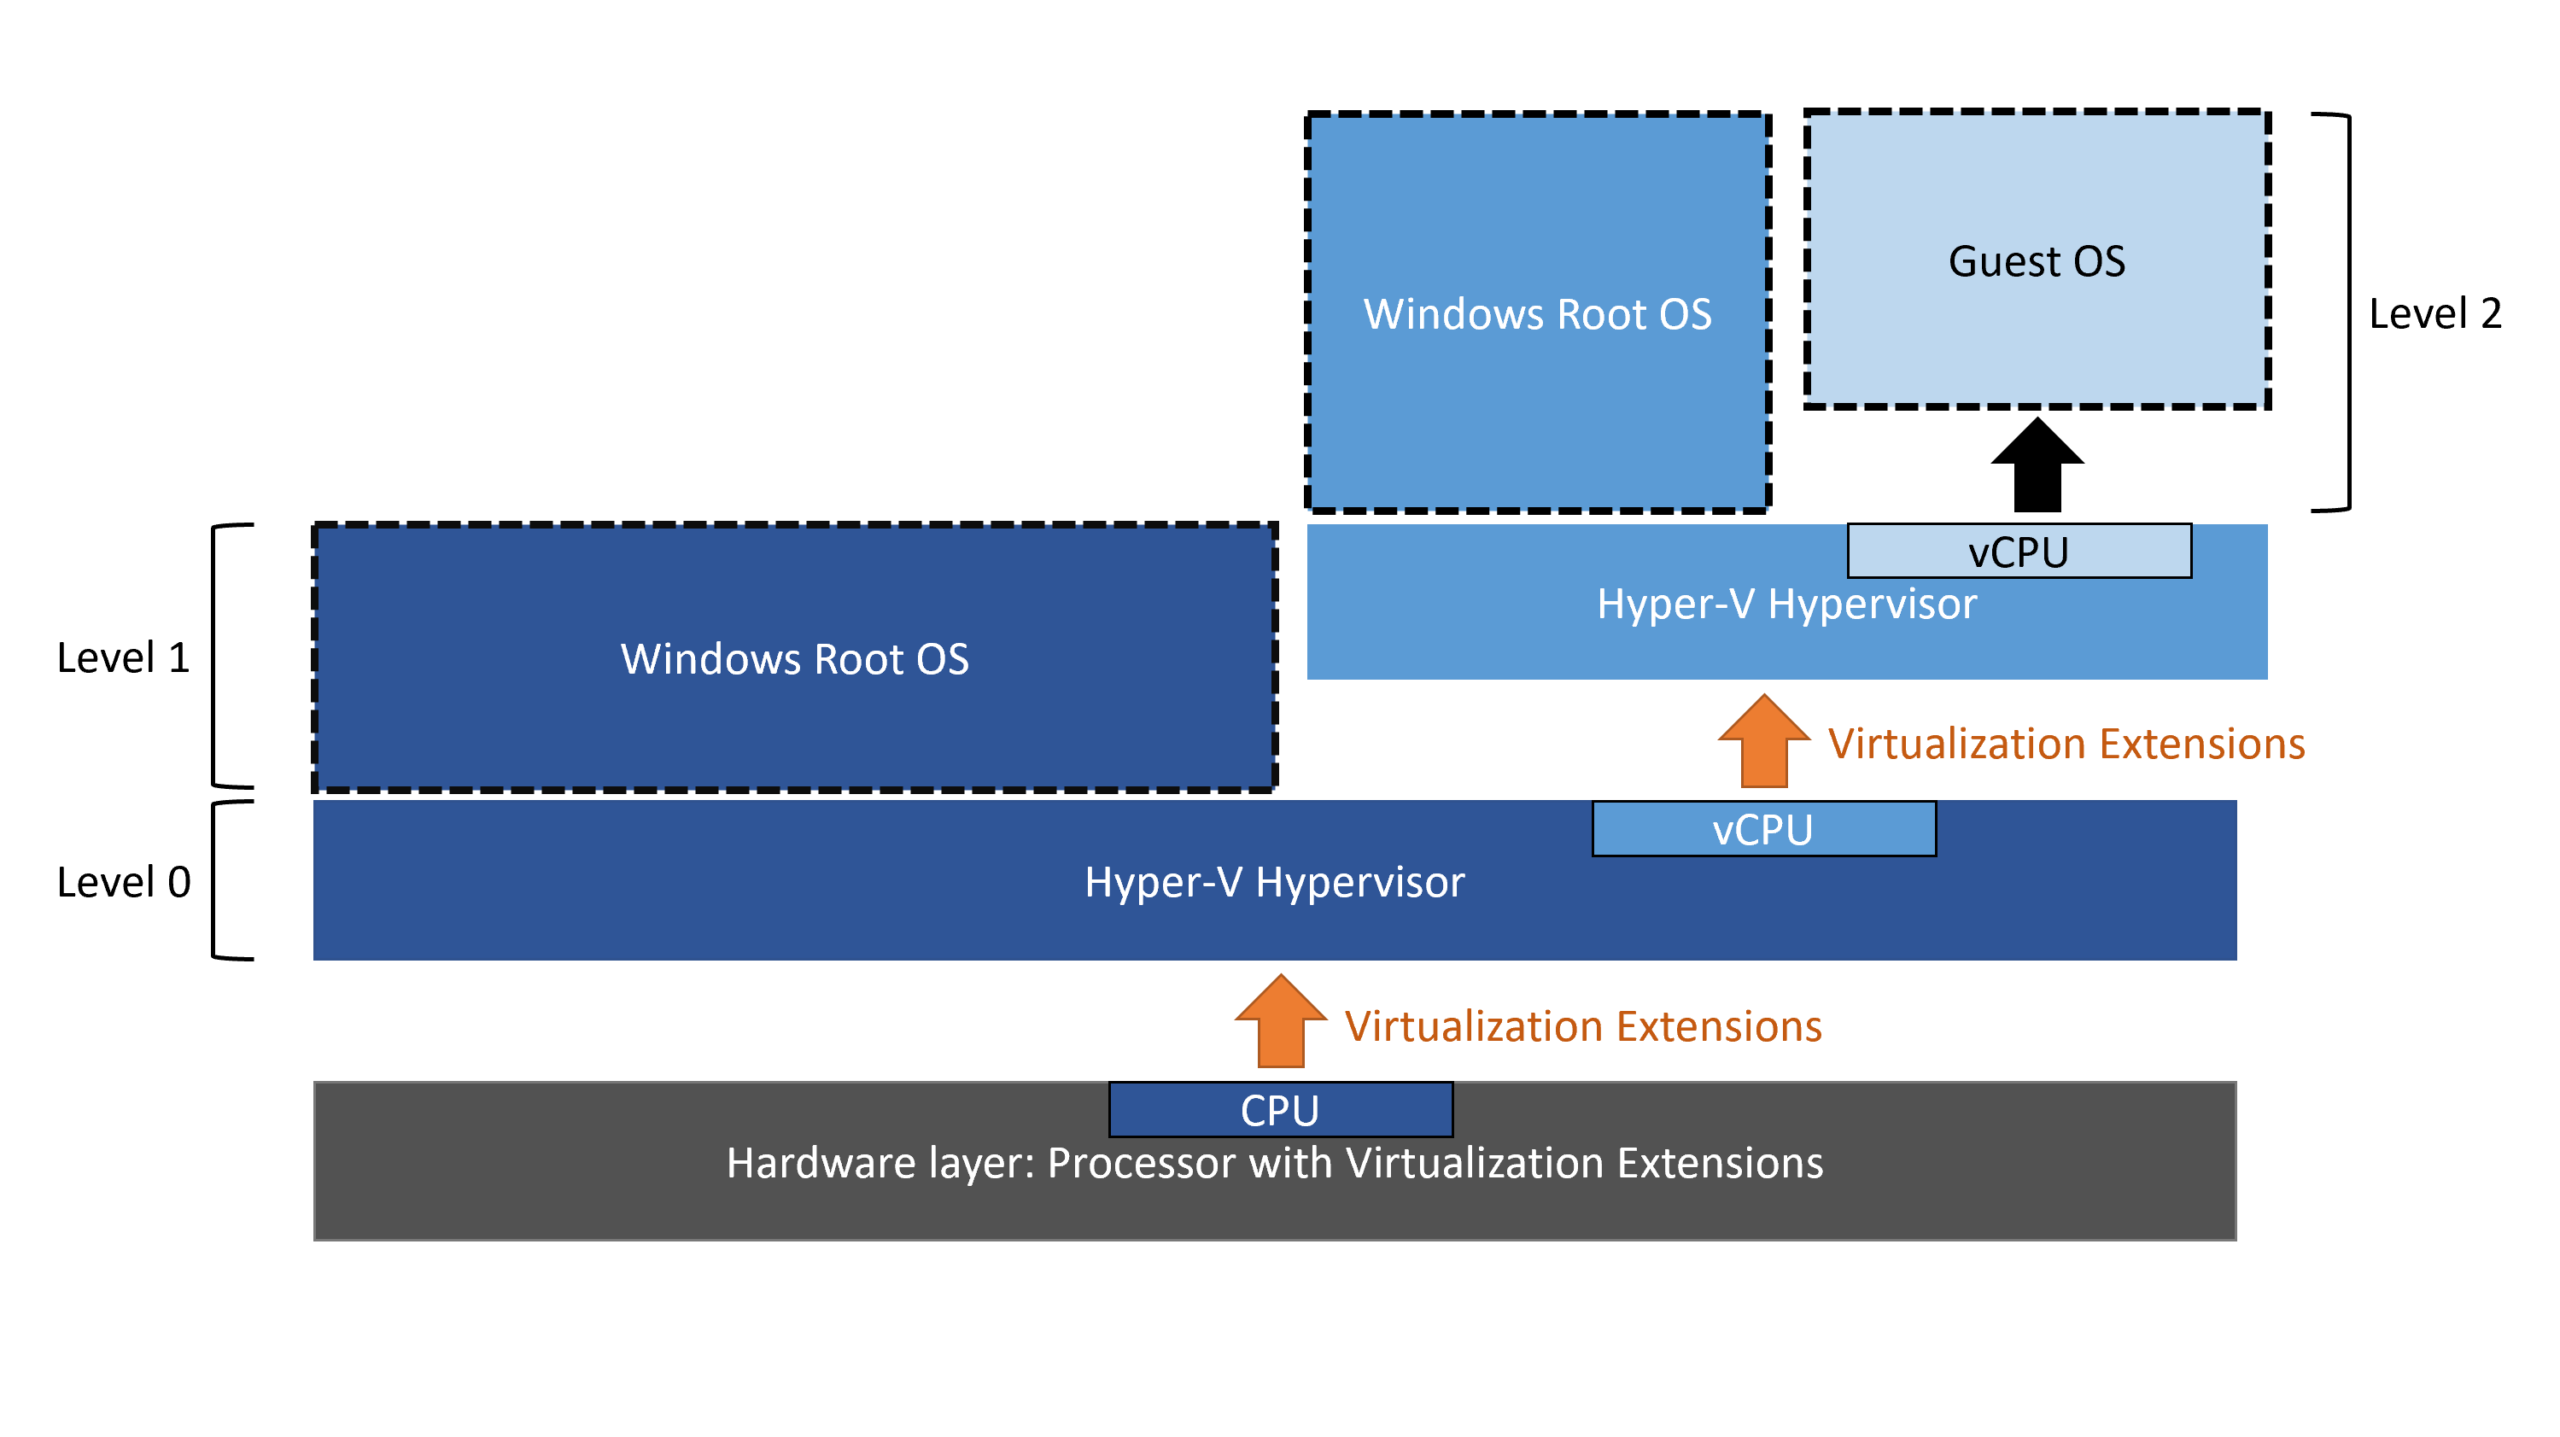
Nested virtualization refers to the ability of a virtual machine to act as a virtualization host for other internal virtual machines. In other words, there's a top-level hypervisor on the physical hardware (for example, Hyper-V in Windows Server or Azure Local), and within one of its VMs, we install Hyper-V or another compatible hypervisor to create more VMs.
In the case of Hyper-V, nested virtualization allows the Hyper-V role to be installed within a guest virtual machine that, in turn, runs on a physical host with Hyper-V. This "intermediate" VM exposes the processor's virtualization extensions to the internal VMs, which behave as if they were closer to the hardware, even though there are actually several layers underneath.
This functionality initially appeared in Windows Server 2016 and Windows 10 for Intel processors , and support has since expanded to newer versions of Windows Server, Windows 11, and AMD processors. Today, it's a mature feature that Microsoft integrates into its official documentation and that third-party solutions also utilize.
The practical value is clear: with nested virtualization, we can replicate production environments, create entire clusters, test risky configurations , or simulate multi-layered networks without investing in new racks or reserving data center space. For many companies, the cost savings and agility it provides more than compensate for the slight performance penalty.
Common use cases for nested virtualization
One of the most popular scenarios is setting up complex test labs . Development and QA teams can build multi-tiered application stacks (databases, middle services, frontends) entirely within a single main virtual machine, and within that host all the internal VMs needed to replicate a production environment.
It's also very useful in technical training and development environments . Instructors can set up a host VM where each student creates their own guest virtual machines, configures networks, tests server roles, or deploys containers, without ever touching the company's "real" infrastructure. Everything is contained within an easily disposable sandbox.
Another typical use is the evaluation and testing of new software versions . Instead of changing sensitive configurations directly on the physical host, administrators can replicate the scenario on a nested virtualized VM and validate patches, new releases, or security changes before deploying to production.
Nested virtualization also plays a key role in enabling advanced security features such as virtualization-based security (VBS) or specific isolations that rely on hypervisor functions at different levels. This allows for hardening certain environments without requiring additional hardware.
In the IoT field, nested virtualization is key for Azure IoT Edge for Linux on Windows scenarios , where it is necessary to combine Windows, Linux containers and hypervisor capabilities on different virtualization layers, both locally and on third-party platforms such as VMware ESXi or virtual machines in Azure.
Hardware and software requirements for nested virtualization
For all of this to work correctly, the first filter is compatible hardware and minimum operating system versions . In Azure On-premises environments, for example, version 2411.3 or later is required, along with virtual machines whose configuration version is 10.0 or higher, thus ensuring support for the necessary virtualization extensions.
At the processor level, if you're working with Intel, it's essential to have Intel VT-x virtualization technology enabled in the BIOS/UEFI. For AMD architectures, AMD-V support is required, and for advanced scenarios, Secure Encrypted Virtualization (SEV) technology must be enabled, which adds encryption to VMs and improves isolation and low-level security.
The host operating system must be a modern version of Windows Server or Windows 10/11 , properly updated with the latest patches. Hyper-V must be installed on the physical machine before attempting to enable nesting; it is not a feature that comes standard simply by having a compatible CPU.
Another key point is the state of the virtual machines. To modify processor parameters and expose virtualization extensions, the VM acting as the nested host must be completely powered off , not paused or in a saved state. Only then does Hyper-V allow you to change advanced virtual processor options.
Finally, network connectivity must be carefully planned. Nested VMs may require external access or access to other layers, so it's advisable to define from the outset whether internal switches, NAT, MAC address spoofing , or other virtual networking techniques will be used to avoid communication and filtering problems.
Enable nested virtualization in Hyper-V using PowerShell
The most direct and granular way to enable nested virtualization in Hyper-V is to use PowerShell cmdlets . This method works on both Windows Server and compatible client editions and allows you to automate the configuration across multiple hosts or VMs consistently.
The first step is to make sure that the virtual machine where we want to install Hyper-V as a guest is turned off from Hyper-V Manager (Shut Down option) or using the appropriate command in PowerShell, for example Stop-VM -Name 'NombreVM'If it remains suspended or in a saved state, the processor changes will not be applied correctly.
With the VM stopped, you must expose the processor virtualization extensions to the guest operating system using the Set-VMProcessor cmdlet , setting the ExposeVirtualizationExtensions option to true. This setting allows the system, from within the VM, to see the functions necessary to install hypervisor roles.
To verify that the operation was applied correctly, we can use Get-VMProcessor combined with Select on the ExposeVirtualizationExtensions field. This checks if the value is set to true in the virtual processor configuration of the target VM and prevents starting a partially configured environment.
If at any point it becomes necessary to revert the configuration—for example, during a diagnostic task or because nested VMs are no longer required—simply repeat the same processor cmdlet but change the value to false, which again disables the exposure of virtualization extensions to the guest VM.
Once the virtual processor is configured, the machine is powered on using Start-VM or from the Hyper-V Manager . From within the guest operating system, the complete Hyper-V role is then installed using the usual methods: Server Manager (Add Roles and Features), DISM, PowerShell, etc. From that point on, the VM behaves as an additional Hyper-V host from the administrator's perspective.
Network configuration and MAC spoofing in nested environments
With the processor part complete, the next step is network connectivity for the nested virtual machines . If we want the internal VMs to communicate with other networks, the internet, or higher-layer computers, it's essential to adjust certain parameters in the virtual adapter of the intermediate VM.
In Hyper-V, a common practice is to enable MAC address spoofing on the network adapter of the VM acting as the nested host. This feature allows internal VMs to send traffic using their own MAC addresses through the same adapter, bypassing blocking or filtering on the physical host's virtual switch.
This adjustment can be made from PowerShell using the Set-VMNetworkAdapter cmdlet with the MacAddressSpoofing parameter set to On, applied to the corresponding network adapter of the VM. This ensures that traffic from deeper VMs is not dropped by the top-level hypervisor.
For more advanced configurations, it's advisable to pre-design the topology of virtual switches and NAT instances at each layer. For example, we can combine internal switches to isolate labs, routing rules or firewalls between layers, and NAT on the intermediate host to provide internet access to multiple nested VMs without directly exposing them.
When working with multiple virtualization layers, connectivity issues are often related to disabled MAC spoofing, improperly chained NAT rules, or overly restrictive firewalls . Reviewing these points and restarting network adapters or services at each layer usually resolves most connectivity problems in nested environments.
Using the graphical interface for related tasks
Although the strict activation of nested virtualization is completely controlled from PowerShell, in practice many related tasks are more convenient through the Hyper-V Manager graphical interface , especially if we manage several hosts or want to review the configuration visually.
A typical workflow involves opening Hyper-V Manager, locating the target virtual machine , and ensuring it is powered off using the Shut Down option. This complements the use of PowerShell and prevents accidentally starting a VM that doesn't yet have all its parameters correctly configured.
Once the necessary cmdlets to expose the virtualization extensions have been executed, we can return to the graphical environment and open the VM configuration window . From there, it's easy to review and modify the network adapter properties, the number of virtual processors allocated, or the memory available to the nested host VM.
The option to enable MAC address spoofing is located in the network adapter's advanced settings . Enabling it through the graphical interface is quick and transparent for administrators who prefer a visual approach or who haven't memorized all the cmdlet parameters.
Once this configuration is complete, daily environment management can be done interchangeably from the Hyper-V console on the physical host or within the nested VM , using standard tools to create new VMs, configure switches, add roles, or take snapshots according to the needs of each lab.
Nested virtualization in Azure On-Premise and IoT Edge scenarios
In Azure On-Premise environments, nested virtualization relies on the same principles, but adds specific version requirements and support for advanced features such as AMD SEV or security extensions . A minimum system version (2411.3 or higher) is required, and VMs must use a compatible configuration version (10.0 or later).
When working with Azure IoT Edge for Linux on Windows, there are three supported nested virtualization deployment options . Each addresses different infrastructure needs and the level of control the organization wishes to maintain over the underlying environment and hypervisor.
The first option involves deploying IoT Edge on a Windows virtual machine on a local host with Hyper-V . This is the most straightforward approach: nested virtualization is enabled on that Windows VM, and then Azure IoT Edge for Linux is installed and configured on Windows according to Microsoft's specific documentation.
In this case, it is crucial to ensure that the Hyper-V role is correctly installed on the local host (Windows Server or Azure Local) . Without Hyper-V active on the host, the guest VM will not be able to act as a nested hypervisor or expose the functions required for IoT Edge in an additional layer.
These types of deployments are very useful when you need to integrate IoT devices, Linux containers, and Azure services within existing Windows infrastructures, maintaining a reasonable balance between flexibility, performance, and ease of management.
Nested virtualization with VMware ESXi and Azure IoT Edge
Another interesting scenario arises when we want to run Azure IoT Edge for Linux on Windows within a Windows virtual machine hosted on VMware ESXi . In this context, nested virtualization relies on the capabilities of the VMware hypervisor rather than Hyper-V directly on the hardware.
VMware ESXi versions 6.7 and 7.0 include explicit support for hardware-assisted virtualization in guests , enabling the nesting necessary for a Windows VM to become a Hyper-V host. VMware documents this feature in its knowledge base, detailing requirements and potential performance considerations.
The general procedure involves first creating a Windows VM on the ESXi host , following VMware's standard recommendations for processors, memory, storage, and network adapters. Once created, the VM is shut down to allow for modification of its advanced CPU settings.
From the ESXi or vSphere Client interface, select the Windows VM, go to Edit settings , and within the CPU settings section, locate the hardware virtualization section. There, enable the " Expose hardware-assisted virtualization to the guest operating system" option , which allows Windows to see the VT-x/AMD-V extensions even though it is running within ESXi.
After saving the changes and restarting the VM, proceed to install the Hyper-V hypervisor on Windows , either on a client edition (Windows 10/11) or on Windows Server, making sure to include the management tools and any additional components required for the containers or services that will be used with IoT Edge.
Nested virtualization in Azure virtual machines
When we take the scenario up a level and work directly with virtual machines in Azure as a nested virtualization host , platform peculiarities come into play, especially with regard to the virtual switches and the default network used by Azure VMs.
Azure IoT Edge for Linux on Windows is not considered natively supported on any Azure VM running a server SKU unless a specific script is run to enable a suitable virtual switch. This script opens a default switch that allows the IoT Edge environment to work correctly with the additional virtualization layer.
Microsoft's official documentation describes the steps to create and configure a virtual switch for Linux on Windows in the context of Azure, thus aligning the network requirements of containers and Edge services with the characteristics of the cloud network infrastructure.
In these types of deployments, it is particularly important to review the VM SKU, storage type, and CPU and RAM quotas , as nested virtualization adds its own overhead and internal VMs can consume resources intensively if the entire set is not properly sized.
Despite these complexities, the benefit is significant: an Azure VM can be used as a testing, development, or pre-production platform for IoT Edge solutions under the same conditions that will later be replicated on physical edge devices or industrial gateways deployed in the field.
Backing up nested Hyper-V VMs with specialized solutions
One aspect that is often overlooked when designing nested virtualization environments is the backup and disaster recovery strategy . This is where enterprise-level backup solutions come into play, capable of properly managing Hyper-V environments with multiple virtualization layers and multiple platforms running in parallel.
Among these solutions are tools like Vinchin Backup & Recovery , which supports more than fifteen different virtualization platforms, including VMware, Proxmox, oVirt, OLVM, RHV, XCP-ng, XenServer, OpenStack, ZStack, and, of course, Hyper-V. This type of software is designed for heterogeneous infrastructures where hypervisors from various manufacturers coexist.
Features such as perpetual incremental backup, data deduplication and compression , and granular restores significantly reduce storage consumption and the time required to recover individual machines, specific files, or even specific objects from critical applications.
In addition, scheduled backup policies and archiving options to tape or the cloud help tailor the backup strategy to the regulatory or internal requirements of each organization, maintaining long retention periods without driving up storage costs in high-performance arrays.
The web-based management console greatly simplifies the protection of Hyper-V environments with nested VMs: you select the VMs to protect, choose the backup repository, define the execution strategy (time windows, backup type, retention), and launch the job. Many of these solutions offer comprehensive trial periods lasting several weeks to evaluate their performance and integration with existing infrastructure.
Limitations and best practices in nested environments
Although the possibilities of nested virtualization are extensive, there are also technical limitations imposed by the design of hypervisors themselves that should be understood from the outset to avoid surprises in production or high-availability scenarios.
A clear example is the live migration of VMs using nested virtualization . Currently, it's not possible to perform a live migration of a primary host while its VMs contain guests that depend on active nesting. Microsoft documents this restriction, and the general recommendation is to plan updates or host moves with controlled shutdowns in these environments.
Monitoring resource consumption across multiple layers requires a combined strategy. It's advisable to use Hyper-V Manager, performance counters, and cmdlets like Get-VM on the top-level host, and simultaneously use similar tools within the nested host to gain a clear view of how the load is distributed across CPU, memory, network, and storage.
When an internal VM suddenly loses network connectivity, it's usually a symptom of firewall rule changes, NAT issues, or MAC spoofing settings being disabled on one of the involved adapters. Checking all levels, verifying the configuration, and restarting the affected network services usually resolves most of these outages.
As a general best practice, before deploying nested virtualization, it's advisable to clearly define the environment's objective, the number of layers, the types of workloads to be run, and the backup policy. This initial design will determine whether the lab or test environment is sustainable in the long term and doesn't become a tangled mess that's difficult to maintain.
In short, nested virtualization of Hyper-V and other platforms allows you to get much more out of existing hardware and set up laboratory, testing, security or IoT Edge scenarios with enormous flexibility, as long as the CPU requirements, system version and network configuration are respected, and all of this is accompanied by a good monitoring and backup strategy.

Table of Contents
- 1 What exactly is nested virtualization and why does it matter?
- 2 Common use cases for nested virtualization
- 3 Hardware and software requirements for nested virtualization
- 4 Enable nested virtualization in Hyper-V using PowerShell
- 5 Network configuration and MAC spoofing in nested environments
- 6 Using the graphical interface for related tasks
- 7 Nested virtualization in Azure On-Premise and IoT Edge scenarios
- 8 Nested virtualization with VMware ESXi and Azure IoT Edge
- 9 Nested virtualization in Azure virtual machines
- 10 Backing up nested Hyper-V VMs with specialized solutions
- 11 Limitations and best practices in nested environments