- Mastering Windows Disk Management allows you to create, delete, extend, shrink, and format partitions without always resorting to third-party programs.
- Well-organized partitions improve maintenance, data security, performance, and make it easier to install multiple operating systems.
- Along with the native Windows tool, there are very powerful free partition managers (EaseUS, Macrorit, Gparted and others) that expand the advanced functions.
- To avoid surprises, it is key to make backups before touching partitions and to know the limitations of each tool on MBR, GPT and dynamic disks.
Properly managing storage drives is one of those tasks we tend to put off until we get the typical warning about insufficient space on the C: drive or a problem with a partition . At that point, knowing which files are taking up space and understanding how disk management works in Windows ceases to be optional and becomes almost mandatory.
The good news is that Windows includes a fairly capable utility for organizing disks and partitions, and there are also free third-party alternatives that further expand and simplify these tasks. Throughout this article, you'll see all the options you have for creating, shrinking, extending, formatting, and managing partitions , both with built-in system tools and with specialized programs.
What is disk management in Windows and what is it used for?
In Windows, the disk management function is currently divided between the classic Disk Management module (diskmgmt.msc) and the newer options integrated into the Settings app, especially in the latest versions of Windows 10 and Windows 11.
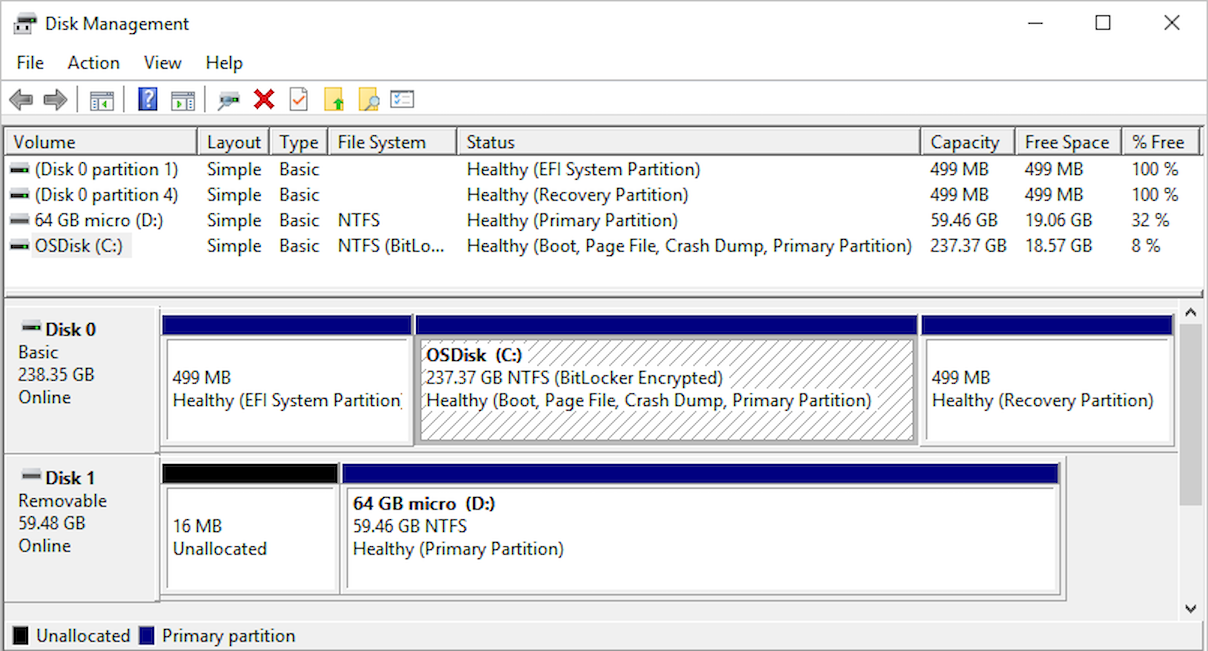
The Disk Management utility is a system tool that allows you to perform advanced operations on hard drives, SSDs, and other storage devices. With it, you can see all physical disks, their partitions, and allocated or free space at a glance , as well as perform actions on each volume.
In the Disk Management window, you'll find a top section with a list of volumes (C:, D:, etc.) and a bottom panel that displays each physical disk (Disk 0, Disk 1, etc.) with its partitions and unallocated space. From there, you can create, delete, shrink, extend, and format partitions, as well as change drive letters.
It's important to understand that to create a new partition, there must be unallocated space on the disk. If all the space is already occupied by partitions, you'll first have to shrink one of them or delete one to free up space, which you can then convert into a new volume.
Typical partitions on a Windows PC
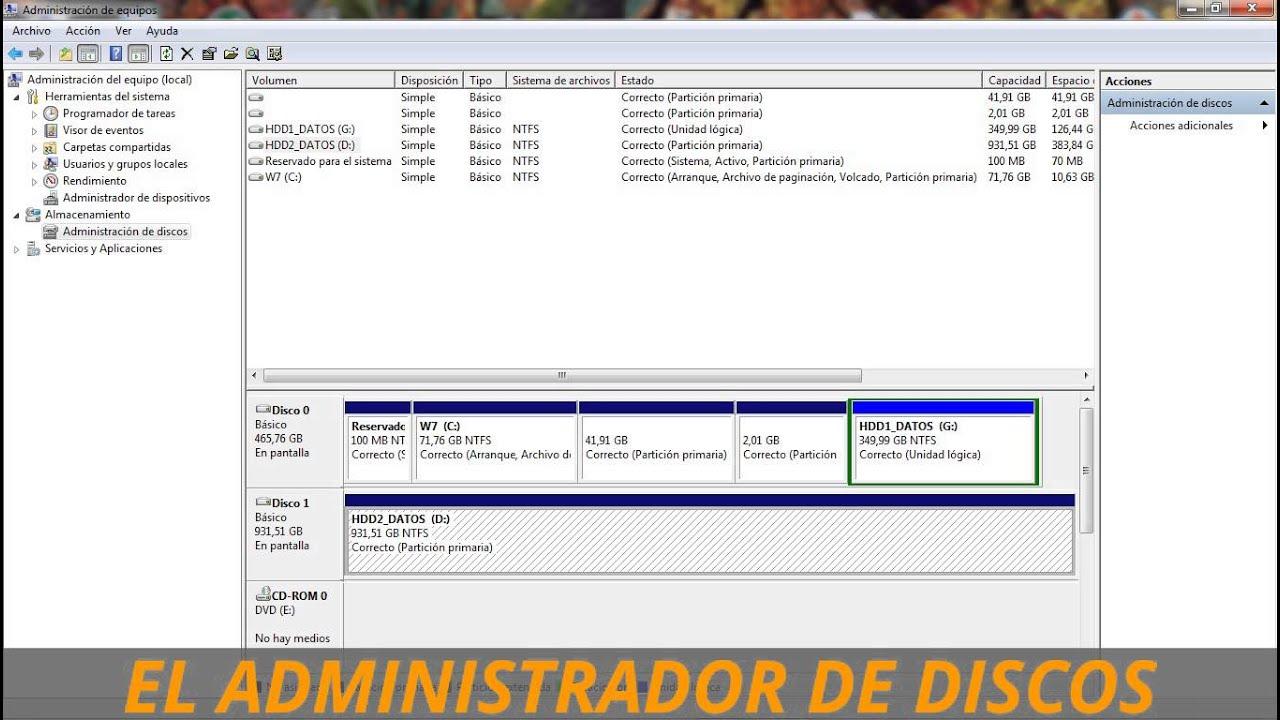
When you buy a computer with Windows pre-installed, you will most often find a single physical disk (usually Disk 0 ) with several partitions already created by the manufacturer and by the operating system itself.
In modern computers with UEFI firmware, it is common to see at least these three main partitions on the system drive, which is almost always displayed to the user as Local Disk (C:) :
| Hyphenation | Principal function |
|---|---|
| Local disk (C :) | It houses the Windows installation, programs, and many of your user files.It's the partition you see and use daily. |
| EFI System | It is a small partition, without a drive letter, that contains the files necessary for the team start in UEFI systems. |
| Recovery | It stores tools and data that allow you to start Windows repair and restoration environments when something goes wrong. |
In addition to these, there may be other hidden partitions created by the manufacturer to restore the computer to its factory settings or for additional functions. Although you can see them in Disk Management, it's not a good idea to delete them lightly if you're not entirely sure what you're doing.
On the other hand, if you buy an SSD or a "raw" hard drive, it will usually arrive without partitions. In that case, you'll have to initialize the drive and create the partitions from scratch, either during Windows installation or from Disk Management once you're in the system. Before starting, it's helpful to understand the differences between internal and external hard drives and how to approach partitioning depending on the type of drive.
Why create multiple partitions on your disks
Many users are perfectly happy with a single C: partition occupying the entire disk, but using partitions has clear advantages. Properly dividing the space into several logical drives helps to better organize data, improves maintenance, and protects against certain failures.
A typically recommended strategy is to use at least two partitions : one for the operating system and applications (C:) and another for your documents, photos, backups, and so on (for example, D:). From there, you can make the structure as complex as you need.
These are some compelling reasons to work with multiple partitions:
1. Install multiple operating systems
If you want to run more than one operating system (for example, multiple versions of Windows or installing Linux alongside Windows ), you'll need separate partitions for each system . These additional partitions also serve as a common area for sharing files between them if you use compatible file systems.
2. Protect your data when Windows crashes
If the operating system crashes, the boot process becomes corrupted, or malware takes hold, having your documents on a partition other than C: significantly reduces the risk of data loss. You can format only the system partition and reinstall Windows, leaving the data partition untouched.
3. Better maintenance and some extra performance
On high-capacity mechanical hard drives, dividing the space into smaller partitions reduces the movement of the read/write heads and, while the impact isn't dramatic, can slightly improve access times and defragmentation . On SSDs, the effect is less pronounced, but it still helps with organization and some maintenance tasks.
4. More convenient organization
Separating the system, applications, and data into different partitions makes locating and managing files much easier. Typical setups might be C: for the system and programs, D: for games, and E: for backups and personal files . When you look at File Explorer, the organization is much clearer.
How to open Disk Management in Windows
Windows offers several ways to access the Disk Management tool. Depending on the version you're using, some shortcuts may change slightly, but the idea is the same: launch the Disk Management console (diskmgmt.msc).
The most practical methods in Windows 10 and Windows 11 are:
- Right click on the Start button (or press Windows + X) and choose Disk management.
- Pulsar Windows + R, to write diskmgmt.msc and press Enter.
- Use the search bar on the taskbar and type disk management o create and format hard drive partitionsand open the corresponding result.
In Windows 7, the classic way is to go to the Control Panel: Start > Control Panel > Administrative Tools > Computer Management > Disk Management , or you can also use the diskmgmt.msc command from the Run window.
Disk management from the Settings app (Windows 10 and 11)
In the latest versions of Windows 10 and Windows 11, Microsoft has been increasingly moving settings to the Settings app , leaving the old Control Panel somewhat relegated. This trend also affects storage management.
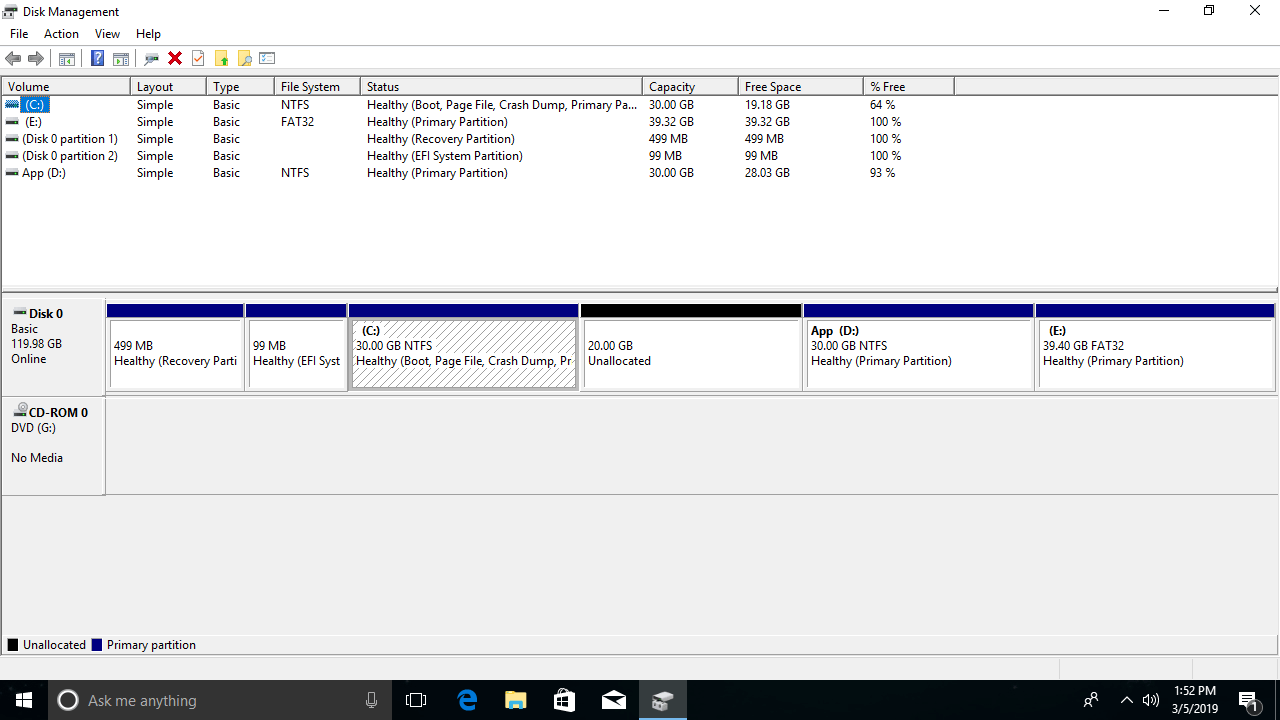
Today, you can access certain disk and volume management options directly from Settings, without opening the classic console. Specifically, you'll find a section called Manage disks and volumes where you can view and manage drives in a more modern way.
To get there, in Windows 10/11 you can do the following:
- OPEN Configuration (Windows + I).
- Enter section System.
- Ir a Storage in the side menu.
- Click on Manage disks and volumes.
You can also use the search box within Settings and type "disks" to find this section directly. This panel doesn't completely replace Disk Management, but it does offer access to basic operations on hard drives and partitions from a more unified environment.
Basic operations with Disk Manager
Once you open the tool, you'll see all the disks and their partitions with different colors and labels. From there, you'll be able to perform virtually all the usual operations on the storage drives connected to your computer.
Before touching anything, always keep two things in mind: you cannot delete the active partition where Windows is installed while the system is in use , and any destructive action (deleting volumes, formatting, etc.) can cause you to lose data if you don't have a backup.
These are the most common tasks performed with Disk Management:
Create a new partition (new simple volume)
If you have unallocated space on a disk, you can convert it into a new partition by following a very simple wizard. The standard workflow would be:
- On the lower panel, locate the disk with unallocated space where you want to create the partition.
- Right-click on that unallocated space and choose New Simple Volume.
- In the wizard, indicate the volume size in MB (you can use all the available space if you wish).
- Select one drive letter for that partition (it's best to choose high letters like F:, G:, H: to avoid conflicts with external drives).
- Choose File System (usually NTFS), the default allocation unit size, and a name (label) for the drive.
- Select the option to quick format to speed up the process and finish the wizard.
When finished, Windows will mount the new partition and you will see it in File Explorer as a new drive ready to use.
Reduce the size of a partition
When you don't have unallocated space and want to create a new partition, the typical move is to reduce the size of an existing partition to free up space.
The procedure is the next:
- Right-click on the partition you want to shrink (for example, D:) and choose Dicrease the volume.
- Windows analyzes how much free space is actually available and shows you the maximum amount you can "remove" without putting your data at risk.
- In the countryside Size of space you want to reduce, in MB, you enter the amount you want to free up to create the new partition.
- You confirm the operation and, after a few seconds, you'll see that next to that partition appears an area of unallocated space which you can use to create a new volume.
This process does not erase data, but any operation of this type always carries some risk if there are power errors, sudden cuts or previous problems with the disk, so it is highly recommended to back up important data beforehand.
Extend a partition with contiguous space
The reverse operation is to extend a volume to also occupy the adjacent unallocated space. This is what you would do, for example, when you want to increase the size of C: at the expense of another partition that you deleted right next to it.
The steps are:
- Delete (always after copying the data) an adjacent partition so that its space remains as not assigned.
- Right-click on the partition you want to grow (the one next to the gap) and select Extend volume.
- Follow the wizard, indicating how many MB of that unallocated space you want to add to the volume.
- Confirm so that Windows modifies the partition table and extends the volume.
Once the wizard is complete, you will see that the size of that partition has increased and you will have more space available on the same drive letter.
Delete a partition and free up its space
If you no longer need a specific partition, you can delete it and leave its space marked as unallocated, ready to create another one or to add it to an existing volume.
For that:
- Right-click on the volume to be deleted and choose Delete volume.
- Confirm in the dialog box that warns that all data will be erased of that partition.
Once the operation is complete, you'll see the space as "Unallocated." From there, you can use it to create a new partition or extend an existing one, as we just saw.
Format an existing partition
Formatting is essentially preparing a partition by erasing its contents and recreating the file system structure. It's useful when you want to "clean" a drive, change its file system, or correct certain logical problems.
The steps are very simple:
- Right-click on the partition and select Format.
- Choose file system (NTFS for almost all cases in Windows), allocation unit size and label (name).
- Decide whether to do it quick format or full (the quick one is sufficient in most situations).
- Confirm knowing that everything inside will be lost.
Change drive letters and volume names
To adjust the order or avoid conflicts with removable drives, Windows allows you to change the drive letter and label (name) of a partition, with the exception of the system drive C:, which cannot be modified here.
To change the drive letter:
- Right-click on the partition and choose Change drive letter and paths.
- Click on Change, select a different letter from the list and accept.
To rename the volume, simply type a new drive name in File Explorer or the formatting dialog box. This can be very useful when you have many partitions and want to identify them at a glance.
Advanced Disk Management features
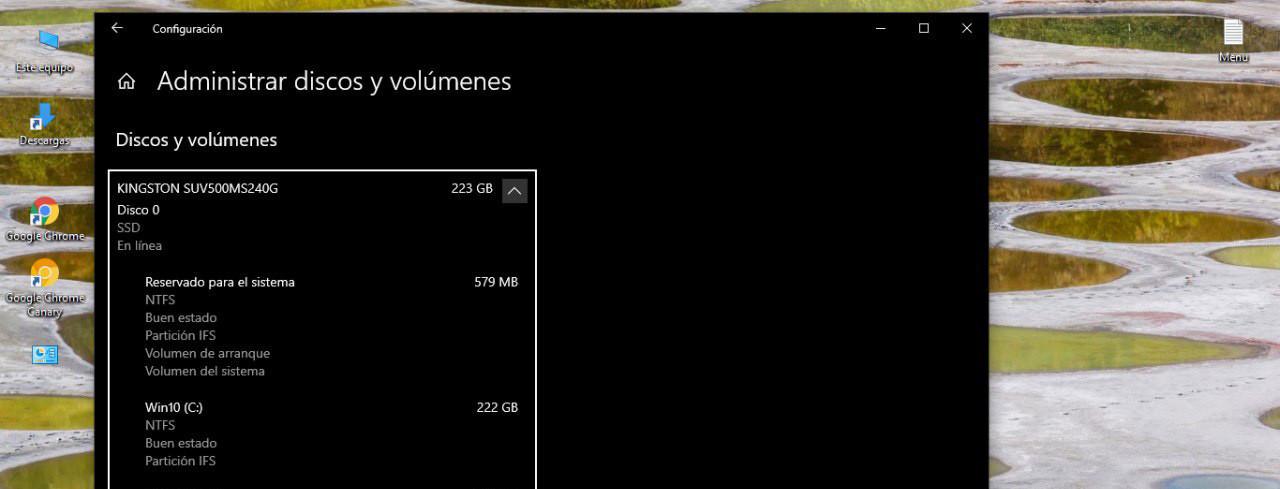
In addition to basic operations, the Windows tool offers several advanced functions that you may not use daily, but which are useful to know for certain situations.
Among the most important ones, we can highlight the following:
- Initialize new disksWhen you first connect an internal HDD or SSD, it may not appear in File Explorer. You will need to initialize it as MBR or GPT from Disk Management to create partitions.
- Convert between basic and dynamic disksDynamic disks allow special configurations (distributed, mirrored volumes, etc.), although they are used less today than before and have incompatibilities with certain environments.
- Change partition style MBR/GPTIt is possible to convert some empty MBR disks to GPT and vice versa. For disks containing data, extreme caution is advised, as the built-in options usually require deleting content, unless you use specific tools or more recent versions of Windows with lossless conversion wizards.
- Mark partitions as activeIn BIOS/MBR systems, the active partition is where the system boots from. In UEFI systems, this is less important, but the option still exists.
- Create and attach virtual hard disks (VHD/VHDX)From this console you can also create VHD files and mount them as drives, which is very useful for testing, backups, or virtualized environments.
These are powerful functions that, if you're inexperienced, are best left untouched without proper training. A misstep here could leave you with a boot failure or an inaccessible disk. Even so, once mastered, they prove very useful for more advanced system administration scenarios.
Third-party tools for managing disks in Windows
Although Windows' built-in utility covers many needs, there are cases where it proves limited or simply user-unfriendly. For these scenarios, various free partition managers that work with hard drives, SSDs, and other storage media have gained considerable popularity.
These solutions typically offer clearer interfaces, more guided wizards, and additional operations such as disk cloning, system migrations, and advanced format conversions. Let's review the most notable ones.
1. EaseUS Partition Master Free
EaseUS Partition Master is one of the most popular partitioning tools for Windows. The free edition supports Windows 11/10/8/7 and includes all the essential partition management features needed for everyday use. It can also help you clone Windows to a new SSD during migration processes (depending on the version).
With the free version you can:
- Resize, move, create, delete, format, and check partitions.
- Align partitions on 4K disks.
- Clone partitions or entire disks (depending on the version).
- Previewing changes before applying them is very convenient and reduces errors.
According to the manufacturer, all these operations are performed with special care to avoid data loss, although of course it's always advisable to have a backup . Some advanced features, such as converting MBR disks to GPT without erasing data or converting between basic and dynamic disks, are reserved for the paid editions.
2. Windows Disk Management
Although we have already discussed it in detail, it is worth remembering that the built-in Windows tool is, in itself, a completely free partition manager without the need to install anything additional.
Among its main functions are:
- Initialize newly installed HDD or SSD.
- Change drive letters and paths.
- Mark partitions as active (in BIOS/MBR settings).
- Convert basic disks to dynamic disks.
- Convert some empty MBR disks to GPT and vice versa.
- Create, delete, extend, and shrink simple volumes.
Its main advantage is that it comes pre-installed with the system and doesn't add any extra layers. Its biggest drawback is that the interface is somewhat clunky and it lacks shortcuts for tasks like disk cloning, system migration, or unrestricted advanced management.
3. Macrorit Disk Partition Expert
Macrorit Disk Partition Expert stands out for its clean interface and portable version that you can use without installation, ideal for carrying on a USB drive. It's a good option if you work with large disks and want to know how to configure a 4TB drive in Windows 11.
With it you will be able to:
- Create, delete, and format partitions.
- Extend and reduce volumes.
- Manage MBR and GPT disks up to 16 TB.
- Migrate operating systems and adjust partitions.
However, the free version does not support dynamic discs, and certain additional features are reserved for the commercial version.
4. Paragon Partition Manager Free
Paragon Partition Manager has been on the market for many years and has gained a reputation for being robust and reliable . The free version allows you to perform basic partitioning strategies and offers some extra backup and restore options.
Its strengths include:
- Relatively simple interface.
- Ability to convert NTFS volumes to HFS+ without reformatting.
- Basic backup tools.
In contrast, many of the advanced features (disk cleaning, detailed data migration, etc.) are reserved for the paid edition, and registration is required to obtain a serial number , even in the free version.
5.GParted
GParted is a classic in the Linux world that can also be used to manage disks on Windows computers. It doesn't run as a program within the system, but rather as a bootable environment from a USB drive; that is, you boot the PC from the USB drive with GParted and work on the disks independently of the installed operating system.
Its advantages are clear:
- It does not require a running operating system.
- It does not usually require additional restarts to apply changes (because you are already "outside" the system).
- It allows very powerful and flexible operations on partitions and file systems.
However, all that glitters is not gold: it takes longer to boot, you have to know how to create the bootable USB drive, it doesn't work with dynamic disks , and its interface is quite spartan and designed for experienced users.
6. Cute Partition Manager
This utility also boots from an external device and offers a purely text-based interface. Everything is controlled with the keyboard, without a mouse or modern graphical elements.
It allows:
- Create, delete, and manage partitions.
- Change the file system of each volume.
- To work without needing to have a pre-installed operating system.
It's geared more towards advanced users, as it requires you to enter exact partition sizes and lacks any protections or graphical wizards to prevent errors. On the other hand, its download size is minuscule.
7. Active Partition Manager
Active Partition Manager is a free tool for Windows that allows you to manage storage devices and logical partitions without needing to restart your computer for many tasks.
Among its capabilities are:
- Create, delete, format, and name partitions.
- Perform most common partitioning operations.
- Restore certain changes from internal backups.
However, it does not support partition cloning and can sometimes cause problems when trying to extend the system partition in specific configurations.
8. Acronis Disk Director
Acronis Disk Director is a classic paid program focused on users who want something simple yet powerful. It offers a trial period and then requires a license, but in return, it provides disk cloning, volume recovery, and advanced management capabilities.
Its strengths include:
- Very accessible interface for non-expert users.
- Cloning disks to replacement drives in just a few clicks.
- Compatibility with native 4K discs and complex scenarios.
The downside is obvious: it's not free beyond the trial period , and for occasional use, free alternatives or the Windows tool itself might suffice.
Safety and Troubleshooting Tips
Partition management is not a game. Although current tools are quite secure, any power failure, previous disk error, or user oversight can result in data loss.
Before diving in, it's advisable to follow some basic guidelines:
- Always back up your dataBefore touching partitions (especially before deleting, shrinking or converting formats), save everything you don't want to lose to another disk or the cloud.
- Check the disk statusIf you suspect a disk has bad sectors or errors, check it with tools like CHKDSK or manufacturer utilities before resizing partitions.
- Do not interrupt the processDo not turn off the PC or disconnect the drive while partitioning or formatting changes are being made.
- Beware of MBR, GPT and dynamic disksMake sure you understand what type of disk and partition table you have before converting anything. Mixing tools without researching can cause problems.
If a Disk Management operation fails or something doesn't go as expected, it's best to stop and review the official Microsoft documentation or the documentation for the third-party program you're using. Often, the solution involves using a different tool specifically designed for the task (for example, an external partition manager) or performing the operation by booting from an alternative environment so that Windows doesn't lock the partition.
Proper disk management in Windows not only prevents unpleasant surprises when the system runs out of space or a partition becomes corrupted, but it also helps keep your computer organized, protects your data, and allows you to get the most out of both hard drives and SSDs. By understanding what each tool does and taking basic precautions, you can easily reorganize partitions, create new ones, expand your C: drive when it becomes too small, and generally have much more control over your PC's storage, managing it according to your own preferences.
