- Checking physical connections, volume, and output devices prevents many seemingly complex sound failures.
- Updating, reinstalling, or rolling back audio drivers usually resolves most errors after Windows changes or updates.
- Troubleshooters, audio services, and advanced settings (enhancements, formats, codecs) allow you to fine-tune and correct persistent issues.
- When nothing else works, it's advisable to check the hardware, restore the system, or seek professional support to avoid further damage.
When your computer suddenly decides it won't play a single sound , it's incredibly frustrating: you can't hear videos, meetings, games, or music. The good news is that, in most cases, the problem can be fixed at home with a little know-how.
This guide provides a detailed and clear explanation of everything you can do to troubleshoot audio problems on a Windows PC : from the basics (cables, volume, output device) to advanced driver settings, audio services, BIOS, codecs, Dolby Atmos, and system restore. The goal is to ensure you explore every possible avenue before giving up.
Common causes of PC losing sound
Before we get into the steps, it's important to understand that audio problems are usually due to a combination of incorrect settings, problematic drivers, or physical faults in cables and devices.
It's quite common for everything to work fine until a Windows update, a new driver, or a program that affects the sound settings is installed . In other cases, the cause is as simple as forgotten headphones plugged in or a speaker turned off.
There are also more troublesome situations where a high-definition audio codec, a network driver, or an audio enhancement from the sound card itself cause conflicts and leave the system mute or with constant interruptions.
Finally, it should not be forgotten that if, after trying desperately with drivers and adjustments, the problem persists, the cause may be a hardware failure in the speakers, headphones, sound card, or motherboard.
Basic checks: cables, volume, and output device
The first thing to do is rule out the obvious: many audio problems can be fixed by checking connections, volume levels, and which device is selected as the output.
Check the speaker wiring and power supply.
Make sure the speakers are properly connected to the PC and to a power source (if they require external power) or to the appropriate USB port. Check that the speaker's power switch is in the correct position and that the power indicator, if present, is illuminated.
If you're using a desktop computer, check that the cable running from the rear or front audio output to the speaker isn't loose or partially disconnected. Even a slight movement can cause the connection to fail and the sound to disappear.
Disconnect the headphones and try again.
Often the device "thinks" it should send sound to connected headphones , even if you're not using them or there's a bad connection, and that's why the speakers don't emit anything.
- Wired Headphones: Disconnect them from the 3,5 mm jack (AUX) or the USB port.
- Bluetooth Headphones: enters Settings > Bluetooth & devicesLocate them and click on Disconnector simply turn off Bluetooth to test.
When no headphones are active, Windows usually automatically reverts to using the built-in speakers or connected external speakers.
Check that each cable is properly inserted and in the correct connector
A cable that's only partially plugged in can cause dropouts, noise, or no sound at all . Unplug the audio cable from both the PC and the speaker or headphones, and then firmly plug it back in at both ends.
If your computer has multiple ports, try a different USB port or jack . Desktop computers typically have front and rear connectors; if one fails, try the other to rule out a problem with the port itself.
Also check that the jack is on the audio output (usually green or with a headphone icon) and not on the microphone input (often pink and with a microphone icon), because in that case you won't hear anything.
Adjust the volume and check that nothing is muted.
Sometimes the problem is as simple as the system or application volume being at its lowest or muted, while the speakers seem to be working fine.
- Click on the speaker icon from the taskbar and move the volume bar to the right.
- Right-click on that icon and enter Open volume mixer to check that neither the system nor the application is muted.
Don't forget to check the physical volume controls on your speakers or headphones: if they have a wheel or buttons, turn up the level a little and make sure they don't have a mute button activated.
Verify that the correct output device is selected
When you have several devices connected (monitor with speakers, USB headphones, Bluetooth, soundbar…), Windows sometimes chooses one as the output that is not the one you are using.
- Right-click on the speaker icon and select sound settings.
- In the section Departure fromChoose the device you want to listen to the audio on and select Set as default if necessary.
- Use the button test (if available) to play a tone and confirm that it can be heard.
If you connect something via USB or HDMI (for example, a soundbar or a monitor with speakers), make sure to set it as the default device if you want all audio to come out through it.
If you see other devices that you don't use and are set as default, you can change the default value so that Windows doesn't get confused by sending the sound elsewhere.
Use the Windows Audio Troubleshooter
If basic troubleshooting doesn't fix anything, it's time to use the system's built-in tools. Windows includes a sound troubleshooter that automatically detects and corrects common problems.
Troubleshooter from the "Get Help" app (Windows 11 and later)
Microsoft is migrating classic troubleshooters to the Get Help platform , which offers a more guided and modern experience.
- Balance Windows key + S and writes Get help. Open it.
- In the app's search bar, type Fix sound problems and press Enter.
- Follow the on-screen steps for the assistant Analyze input and output devices, controllers, and configuration.
Audio troubleshooter from Windows settings
You can also access the troubleshooter from the system settings, which is useful if you prefer to do everything from the settings panel.
- In recent Windows 11, go to Start > Settings > System > Troubleshoot > Other troubleshooters and play the audio one.
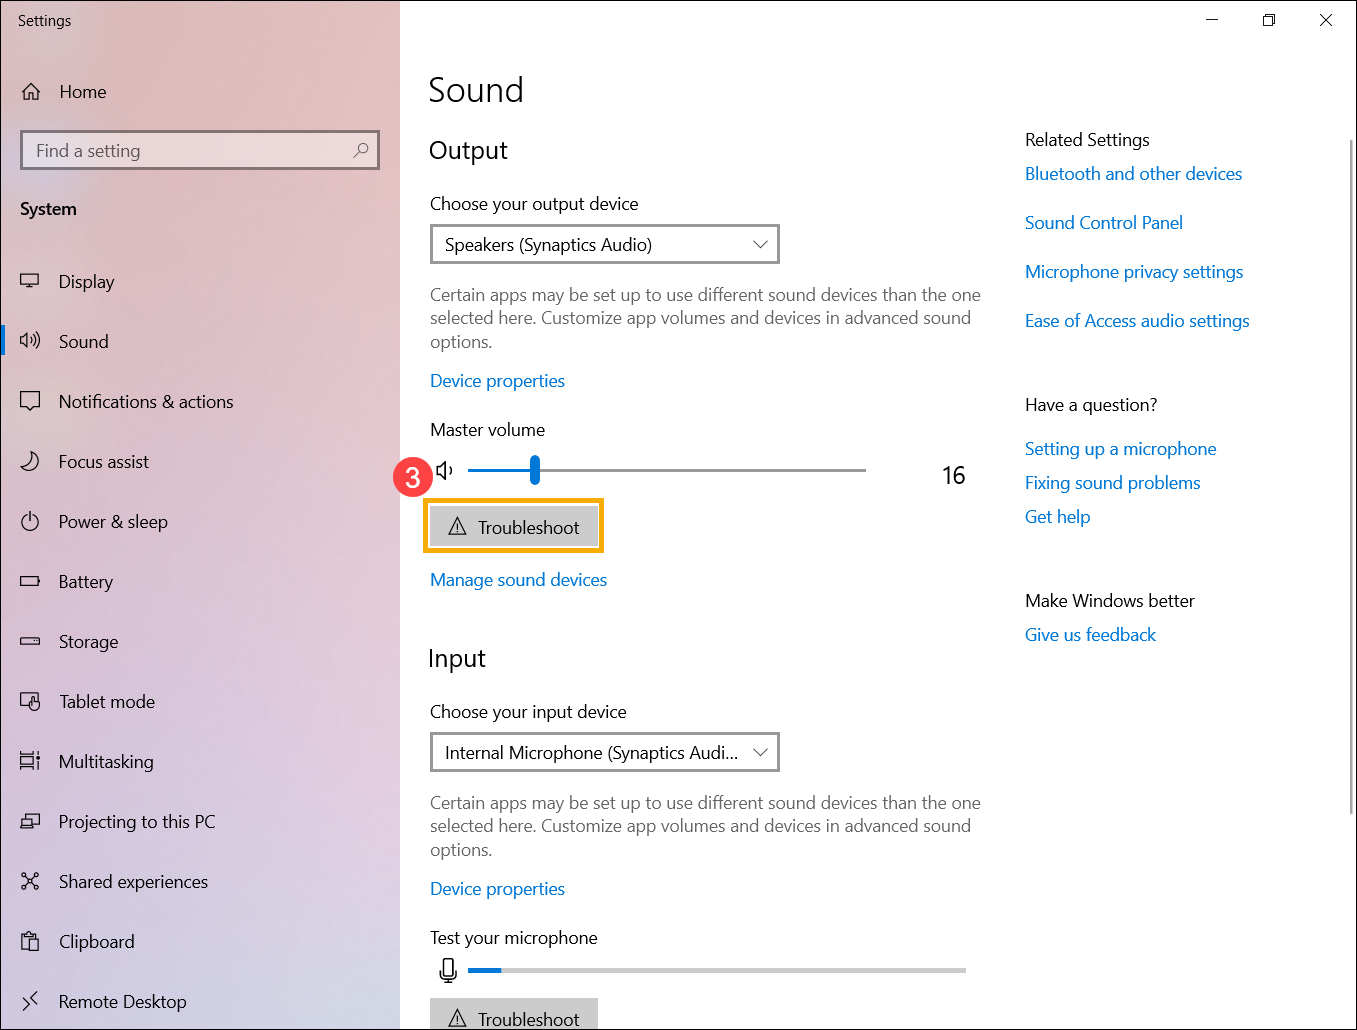
- In some versions (for example, Windows 11 22H2 or certain builds of Windows 10), it enters Start > Settings > System > Sound, go down to Advanced and click on Solve problems on the output device.
The troubleshooter attempts to apply typical fixes, such as readjusting audio services, changing the default device, or modifying format parameters . If it finds anything unusual, it will show you what it has done or what it recommends.
Update Windows and check for interfering applications
Another important area concerns the system and apps: many problems arise because a program hijacks the audio or an update leaves a driver incomplete.
Complete all Windows updates
System updates don't just add new features: they include compatibility patches, drivers, and audio fixes that can resolve rare errors.
- Opens Configuration and enters Windows Update.
- Balance Search for updates And, if available, click on Download and install.
- If Windows prompts you, press Restart now so that they are fully applied.
If you had pending updates, completing the process usually resolves audio problems without requiring any further action.
Close applications that may monopolize the audio.
Programs like Zoom, Teams, Discord, music players, streaming apps, or games can take exclusive control of the audio device and leave others without sound.
- Open the Task Manager with Ctrl + Shift + Esc.
- In the ProcessesLocate apps that use audio, select them, and press Finish homework.
- For each app you regularly use, check its internal audio settings and check that you have selected the correct devices.
If the sound returns when you close this type of application, you know the conflict originated there and you'll have to adjust its settings or prevent it from taking exclusive control of the device.
Restart your PC, audio services, and speakers.
Sometimes the best thing you can do with Windows is give it a break. A complete system restart, including sound services and audio hardware, fixes temporary errors and internal crashes.
Restart the computer
It may seem like the typical "turn it off and on" solution, but restarting Windows forces the audio drivers to reload, apply pending updates, and clear errors from memory.
In Windows 10 and 11, click Start , then click the Power icon , and choose Restart . Before doing so, save everything you have open to avoid losing your work.
Restart Windows audio services
Sound in Windows depends on several services that, if they fail or freeze, cause total silence, interruptions, or unresponsive devices.
- In the search bar, type services and open the tool Services.
- Search and, one by one, select:
- Windows Audio
- Windows Audio End Compiler (or Windows Audio Connection Point Generator)
- Remote Procedure Call (RPC)
- In each one, right-click and press Restart, accepting when he asks you.
When finished, test the sound again. If any of these services were stuck, the audio should come back to life.
Turn your speakers or headphones off and on again.
Audio devices themselves have their own little internal "brain" and sometimes freeze up. Completely turning off speakers or headphones can make all the difference.
If they're speakers with a power button, turn them off. If they're USB-powered, unplug them from the port. If they use a charger, unplug them from the power outlet. Wait 10-15 seconds, then plug them back in and turn them on. Then check that Windows recognizes them correctly.
Properly configure output devices, enhancements, and formats
When the hardware seems to be working properly and the services are functioning, it's time to check finer settings: default device, audio enhancements, sound format, and internal app volume.
Choose and test the correct output device
If you have multiple devices, it's a good idea to check their settings from the classic sound window.
- Right-click on the speaker icon and select More sound options (o Sounds (from Control Panel > Hardware and Sound > Sound).
- In the Reproduction You'll see the list of speakers, headphones, HDMI, etc.
- Select the device you actually use and press Predetermine.
- Use the button Try to play a quick tone and verify that it is heard where it should be.
If you connect something via USB or HDMI (for example, a soundbar or a monitor with speakers), make sure to set it as the default device if you want all audio to come out through it.
Activate or deactivate mute and volume on the mixer
In addition to the main volume, each application can have its own independent volume level in the mixer . That's where many people get confused.
Right-click the speaker icon and select Open Volume Mixer . Check that:
- El output device that you use is not on silent.
- The application where you don't hear anything (browser, player, game, etc.) has at an appropriate volume and not muted.
If you see any crossed-out speaker icons, turn them back on. While you're at it, turn the volume up a bit to make sure it's not stuck at a near-inaudible level.
Disable audio enhancements that may cause problems
Many manufacturers include "enhancements" or sound effects (equalization, expansion, virtualization, etc.) which, if configured incorrectly or conflict with other components, can cause cuts, distortion, or even silence.
- Open the Control panel from the taskbar search.
- Go to Hardware and sound > Sound.
- In the Reproduction, right-click on your default device and enters Properties.
- In the Advanced o Improvements (according to this version), it demarcates Enable audio enhancements o Enable sound effects.
- Balance Apply and try the audio again.
If you have several possible default devices, repeat this process on each one until you find the combination that doesn't cause problems.
Try different audio formats in the device properties
If the device has sound in some situations but not in others (for example, some videos have sound and others do not, or certain apps fail), there may be an audio format conflict between the device and the player.
- Open again Control Panel > Hardware and Sound > Sound.
- En Reproduction, select your device and press Properties.
- Go to the tab Advanced.
- En Default formatTry different combinations (e.g., 16 bits, 44100 Hz; 24 bits, 48000 Hz, etc.).
- After each change, press Try and check if the audio behaves stably again.
If you use audio files in unusual formats, or work with high quality, keep in mind that not all devices support all rates and depths , so sometimes it's best to revert to more standard values.
Convert problematic audio files to other formats
When the problem seems to be in certain specific files (and not in the entire system), those audio files may be in a format or codec that is not very compatible with your player.
In those cases, it's a good idea to try converting them to more common formats like MP3, AAC/M4A, FLAC, WAV, or OGG using an audio converter (for example, MediaHuman Audio Converter or a similar one):
- Install the converter of your choice and open it.
- Drag the audio file or add it using the corresponding button.
- Choose a highly compatible output format (for example, MP3).
- Press on Convert and save the new file.
- Play the converted file to see if the problem disappears.
If the converted file plays without errors, it is quite likely that the problem was in the original format or the codec used.
Install, update, uninstall, or roll back audio drivers
Audio drivers are the key component that allows Windows to communicate with your sound card, USB speakers, Bluetooth headphones, etc. If they are outdated, corrupted, or incorrectly installed , sound problems are almost guaranteed.
Update the audio driver automatically from Device Manager
A reasonable first attempt is to let Windows search for newer driver versions for your device.
- In the search bar, type device administrator and open it.
- Unfolds Sound, video, and gaming device controllers.
- Right click on your sound card or audio device (speakers, headphones, etc.) and select Update Driver.
- Choose Search for drivers automatically and follow the instructions.
If Windows doesn't find anything new, you can always go to the website of the motherboard, laptop, or sound card manufacturer , download the latest available driver, and then use the " Browse my PC for drivers" option to install it.
Uninstall the audio driver and let Windows reinstall it
When the driver appears to be corrupt, it is helpful to delete it completely and let the system reinstall it from scratch.
- Open the Device administrator.
- Go to Sound, video, and gaming device controllers and locate your audio device.
- Right click and press Uninstall device.
- Check the box Remove the driver software for this device (or similar) if it appears.
- Click on uninstall And when finished, restart your PC.
After restarting, Windows will attempt to recognize the hardware and automatically reinstall a compatible driver . If it doesn't, repeat the update process, but specify the folder where you saved the driver downloaded from the manufacturer.
Force the use of the generic Windows audio driver
In some cases, the problem isn't a missing driver, but rather that the manufacturer's specific driver is causing issues. In those cases, it's worth trying the generic Windows audio driver.
- On Device administratorgo to Sound, video, and gaming device controllers.
- Right-click on your sound card and choose Update Driver.
- Choose Search for drivers on my computer.
- Press on Allow me to choose from a list of available drivers on my computer.
- Choose generic high-definition audio device (or equivalent) and press Next to install it.
If the audio works again with the generic driver, it's clear that the manufacturer's driver was causing the problem.
Revert the audio driver after a problematic update
It's quite common for sound to start malfunctioning after an update (whether Windows or a driver). If it was working fine before, the best course of action is to revert to the previous driver.
- Open the Device administrator.
- En Sound, video, and gaming device controllersRight-click on your audio device and enter Properties.
- Go to the tab Controller.
- If the button Revert to the previous controller It's active, tap there.
- Follow the instructions and confirm with Yes when I ask.
Once finished, restart your computer and test again. If the problem started right after the update, it's quite likely that reverting the driver will fix it immediately.
Special cases: High Definition Audio Codec (IDT, Realtek) and Realtek WiFi Drivers
Some systems come with a specific high-definition audio codec (e.g., IDT) or Realtek network drivers that end up interfering with the audio.
To check if you have an HD codec that's causing problems:
- Open the Device administrator.
- Unfolds Sound, video and game controllers.
- Look for an entry that refers to IDT high definition audio codec or similar.
- If it appears, right-click, choose Update Driver, then Examine the equipment & AFTER Choose from a list of available drivers.
- Select the appropriate driver from the list and press Next to reinstall it.
With Realtek WLAN drivers , there are cases where uninstalling and reinstalling the latest version from the official website resolves audio conflicts. The process would be:
- Download the latest version of the WiFi drivers for your model from Realtek.
- On Device administrator, go to Network adaptersLocate the Realtek wireless adapter and uninstall it.
- Run the downloaded installer and follow the steps.
These are more specific solutions, but in equipment with these components they have made it possible to recover audio when nothing else seemed to work.
Advanced sound effects: Dolby Atmos, Windows Sonic and normalization
Beyond simply making the sound work, many users want to take advantage of technologies like Dolby Atmos or Windows Sonic , or maintain a more consistent volume across applications.
Activate spatial sound (Windows Sonic or Dolby Atmos)
Windows 10 and 11 allow the use of spatial sound technologies that enhance the feeling of immersion, especially in games and movies.
- Windows Sonic for Headphones: It is activated by right-clicking on the volume icon, entering Spatial sound and choosing Windows Sonic for Headphones.
- Dolby Atmos for headphones or home theater: requires the app DolbyAccess from the Microsoft Store. It allows you to use Atmos with stereo headphones (paid license after trial period) or with compatible home theater systems.
If the audio only fails when you activate these options, try temporarily disabling spatial sound and see if the problem disappears, to confirm that the source is in the advanced processing and not in the base system.
Normalize the volume between applications
Windows offers a feature to make the sound of different apps more uniform, preventing one application from playing at full volume while another is barely audible.
- Opens Control Panel > Hardware and Sound > Sound.
- In the Reproduction, select your device and press Properties.
- Go to the tab Enhancements (or Upgrades) if available.
- Check the box Loudness Equalization (Volume normalization).
- Save with Apply y Accept.
Not all sound cards or digital connections support this feature, but when it is available it helps to make the perceived volume level more consistent between programs.
Persistent problems after system updates and restoration
If sound problems appear right after installing a Windows update (something quite common in Windows 10), you have several options before giving up.
Check if a specific update is causing the failure
Microsoft has acknowledged errors in certain builds, such as update KB5015878 , which on some computers caused loss of audio or crashes with certain ports or applications.
If you don't usually update often, it's worth going to Settings > Update & Security > Windows Update , reviewing your installed update history, and considering the following:
- Update back to a latest version where the problem is fixed.
- Or, if the problem appears right after a specific update, uninstall it or restore the system to a previous point.
Restore Windows from a system restore point
Windows creates automatic restore points, for example, when installing certain updates. If the audio was working before and then stopped, you can try to revert to the previous state using one of those restore points.
The basic process involves opening Windows recovery options, choosing System Restore , selecting a restore point where you remember everything working correctly, and following the wizard. After restarting, your system will revert to the settings and drivers it had at that point, which usually eliminates errors introduced by recent updates.
Update the BIOS/UEFI if there are compatibility issues.
In rare cases, the origin of audio failures lies in the motherboard firmware itself (BIOS/UEFI) , which may have compatibility bugs with certain sound chips.
- Balance Windows + R, writes msinfo32 and press Enter.
- In the system information window, locate BIOS version/date and write it down.
- Go to the official website of your motherboard or laptop manufacturer and check if there is one. a newer version of the BIOS for your model.
- If it exists, follow the update instructions manufacturer.
When to suspect a hardware problem and what to do if nothing works
If you've tried everything above—cables, volume, devices, troubleshooters, services, drivers, restores—and the PC still isn't producing sound, it's very likely that you're dealing with a hardware failure.
Try using other speakers or headphones and other ports.
To rule out a problem with the device rather than the computer, connect other speakers or headphones to the same device. If the new device works fine, the problem is clear: the original speakers or headphones are damaged or incorrectly configured.
Try the reverse test: connect your current speakers or headphones to another computer, mobile phone, or tablet . If they still don't sound good, don't overthink it; it's time to consider replacing or repairing them.
Format and reinstall the operating system as a last resort
When you're almost certain the problem is with drivers, settings, and software conflicts , and none of the above solutions have worked, formatting your computer and reinstalling Windows from scratch can be a reasonable way out.
Before doing so, make a full backup of your important files and decide whether you're going to install the same version of Windows or a newer one. Once the system is reinstalled, test the audio before installing too many programs: if it still doesn't work on a freshly installed system, the problem is most likely hardware-related (sound card, motherboard, etc.).
Contact a technician or the manufacturer's support
If you're not comfortable tinkering with BIOS, complex drivers, or suspect a hardware failure, the wisest course of action is to contact a qualified technician or the manufacturer's official service center (Dell, HP, Lenovo, etc.). They have specialized diagnostic tools and access to firmware, drivers, and replacement parts, which speeds up the process.
Although it involves a cost, you'll often save yourself hours of testing and the risk of damaging your equipment more than it was by tinkering with things you shouldn't. Also, if your PC or laptop is under warranty, take advantage of that before opening anything yourself.
Mastering all these steps—from checking a simple loose cable to adjusting Windows audio codecs, drivers, and services—gives you a complete plan to restore your PC's sound without always relying on third parties; and, when there's nothing left to try and everything points to the hardware, you know when to stop, seek professional help, or consider repairing or replacing the affected components.
