- Overclocking increases the CPU and GPU frequency for better performance, but it also increases heat, power consumption, and hardware wear.
- Safe overclocking requires gradual changes, good cooling, continuous stress testing, and knowing the limits of your processor or graphics card.
- Automatic overclocking tools are simpler and more conservative, while manual adjustment allows for more power but with greater risks.
- Optimizing software, cooling, and system configuration can reduce the need for overclocking or complement its benefits.
If you're into PC gaming or enjoy tinkering with hardware, sooner or later you'll wonder how to squeeze out a few extra FPS without spending money. That's where CPU and GPU overclocking techniques come in , a way to push your system beyond what the manufacturer defines as "normal."
Now, it's important to understand from the outset that this isn't some kind of black magic that transforms an old PC into a cutting-edge powerhouse. Overclocking offers real but modest improvements , carries risks, can shorten the lifespan of components, and, if done incorrectly, can lead to blue screens or system crashes. Therefore, let's take a closer look, step by step, and provide all the necessary context to help you decide if it's truly right for you.
What exactly is CPU and GPU overclocking?
When we talk about overclocking, we're referring to increasing the clock speed of an electronic component above its factory settings. This speed is measured in MHz or GHz, which you see in technical specifications: it indicates how many operations per second the chip can perform. Furthermore, the CPU's microarchitecture influences performance beyond just GHz.
In a CPU or GPU, the clock speed is set within a range the manufacturer considers safe: it's calculated to balance performance, power consumption, heat, and durability . Overclocking shifts that balance toward higher performance, at the cost of increased heat generation, power consumption, and stress on the silicon.
For example, a processor with a base clock of 3,7 GHz and an official turbo frequency of 5,3 GHz can run stably at higher speeds if the chip, motherboard, and cooling system are up to par. The same applies to the GPU: a card with a maximum clock speed of 1.582 MHz can handle significantly higher speeds if the silicon is of good quality and the cooling system is adequate.
This idea also applies to memory: both system RAM and graphics card VRAM can be pushed beyond their specifications, increasing available bandwidth . In practice, this translates to fewer bottlenecks in certain memory-intensive games and applications.
What does overclocking do and what benefits does it offer?
The direct effect of overclocking is simple to describe: a higher clock speed means more work per second . If the CPU or GPU can process more instructions in the same amount of time, you'll see improvements in intensive workloads: gaming, video rendering, editing, scientific computing, heavy multitasking, and so on.
In the case of the CPU, adjusting CPU performance through overclocking improves overall computing power: you'll notice a reduction in rendering times, some improvement in CPU-dependent games, smoother content creation tasks, and, in general, a somewhat more agile system when you push it to the limit.
On the GPU, overclocking translates very noticeably into more FPS and greater frame rate stability . It can sometimes allow you to jump from a choppy game to one that maintains a stable 60 FPS, or increase the graphics settings by a notch without performance plummeting.
There's also an indirect benefit: overclocking can extend the lifespan of a computer that's starting to show its age, providing a performance boost without immediately investing in new hardware. It won't work miracles, but it can postpone a costly upgrade.
However, it's important to adjust your expectations: the performance gains you'll achieve with a reasonable overclock are usually in the single or low double digits; you're not going to double your performance. In many everyday uses—office applications, browsing, streaming—the difference will be practically imperceptible.
Is overclocking safe? Real risks
The question everyone's asking is whether overclocking the CPU or GPU will eventually fry the PC. The honest answer is that, done sensibly and gradually , overclocking is reasonably safe on modern hardware because there are almost always thermal and power protections that kick in before disaster strikes.
What usually happens when you overdo it isn't that the chip catches fire, but rather that the system becomes unstable: blue screens appear, crashes occur, unexpected restarts happen, or games and applications close unexpectedly. That's a clear sign that you've gone too far with the frequency or that you're lacking voltage and stability.
The serious danger comes from two fronts. On the one hand, there's the additional heat : the more you push the frequency and voltage, the higher the temperatures rise. And heat is electronics' number one enemy; it accelerates wear and can lead to irreversible damage if not controlled. On the other hand, there's the loss of warranty : many manufacturers make it clear that modifying clock and voltage parameters voids the warranty.
Furthermore, even if the system holds up and doesn't crash, aggressive overclocking maintained for years can slightly shorten the hardware's lifespan. Whether or not this affects you will depend on your cooling system, your actual usage, and how much extra headroom you're demanding from the silicon.
One important detail: not all devices are good candidates. A desktop computer with good ventilation and oversized heatsinks is a reasonable environment for overclocking. Trying it on thin laptops or mobile devices is usually a bad idea: the thermal headroom is minimal and the risk of throttling, crashes, or even permanent failures is much higher.
When is it worth considering overclocking?
Before touching anything in the BIOS or installing any tools, you should honestly ask yourself if you really need more power. For typical use—browsing, Office, TV shows, some light editing—the factory settings usually offer more than enough performance , and adding complexity and risk isn't worth it.
Overclocking makes the most sense in demanding contexts: high-resolution gaming with resource-intensive games, 4K video editing, 3D rendering, complex simulations, or very intensive multitasking. Here, you can really notice that small performance gain and transform a barely adequate machine into something much more comfortable to use.
The second key question is whether you can do it. Not all CPUs and GPUs are designed to be overclocked. In the processor arena, for example, Intel CPUs with the K suffix or the X series are sold with unlocked multipliers. At AMD, all current Ryzen CPUs allow overclocking, as do many of their APUs with integrated graphics.
On GPUs, most modern dedicated cards—both NVIDIA and AMD—support some degree of frequency and memory tuning via software, although with increasingly strict voltage limits to protect the hardware. On integrated graphics and very basic solutions, the margin is much smaller and may not even be worth trying.
Finally, consider the collateral cost: to make it worthwhile, you should have a good cooling solution (quality heatsinks, proper airflow, perhaps liquid cooling for serious overclocks) and a decent power supply that can handle the extra power consumption without breaking a sweat.
Automatic vs manual overclocking: which option to choose
Today, you have two main ways to overclock: rely on automatic tools that adjust the settings on their own, or manually access the BIOS or specialized software and tweak each parameter yourself. Each approach has its advantages and disadvantages.
Automatic overclocking typically comes from three sources: motherboard options in the BIOS/UEFI , CPU manufacturer utilities (such as some Intel or AMD Ryzen Master tools), or third-party software like MSI Afterburner with "OC Scan" or similar functions. Some GPU apps, such as the recent NVIDIA App, also offer automatic overclocking of the graphics card.
The great advantage of these automatic modes is that they significantly lower the barrier to entry: you choose the profile or activate a button, the tool performs a series of tests and applies a conservative configuration that, in principle, shouldn't pose any serious problems. The disadvantage is clear: they fall quite short, their margin for improvement is modest and very cautious.
In real-world testing, some automatic GPU settings barely raise the clock speed by about 20 MHz over the standard configuration, which in practice results in such a small performance improvement that it's barely noticeable while gaming or rendering. Technically, it's overclocking, but the impact is minimal.
Manual overclocking, on the other hand, gives you complete control over multipliers, frequencies, power limits, voltages, and fan curves. When done correctly, it allows you to extract much more of the chip's true potential , adjusting the settings to the stability limits of your specific unit. However, it does require time, stress testing, some experience, and accepting that you'll be "wrestling" with the system for a while.
In practice, many people start with an automatic profile to see how the device behaves and, if they feel comfortable, then make the leap to manual adjustment to squeeze out that extra bit that the automatic mode doesn't dare to give.
Prepare the system before overclocking
Before adjusting frequencies, it's crucial to ensure your PC is in good working order. The foundation of successful overclocking isn't the latest software, but rather clean, stable, and well-cooled hardware . Otherwise, you'll only be adding more heat and power to a system that's already stretched to its limits.
The first thing to check is the cooling. Make sure the fans are spinning properly, the CPU heatsink is securely mounted, and there's no dust or debris blocking the vents. A thorough cleaning done on time can make a much bigger difference than any moderate MHz increase.
Next, it's a good idea to establish a baseline. Use monitoring tools to view CPU and GPU temperatures at idle and under load . Applications like HWMonitor, HWiNFO, Ryzen Master (for AMD CPUs), or the GPU manufacturers' own suites will provide real-time data on temperature, power consumption, and voltages.
Next, it's highly recommended to perform an initial stress test without overclocking to check stock stability. For the CPU, you can use programs like Prime95, IntelBurnTest, or AIDA64; for the GPU, benchmarks like 3DMark or Unigine Valley, which keep the chip running at 100% for a considerable amount of time.
Finally, perform a comparative performance evaluation before making any changes: run Cinebench for the CPU, 3DMark for the CPU/GPU combo, or other synthetic benchmarks, and note the scores and maximum temperatures reached. This is the only reliable way to determine your performance gains and whether the performance/heat trade-off is worthwhile.
CPU overclocking step by step
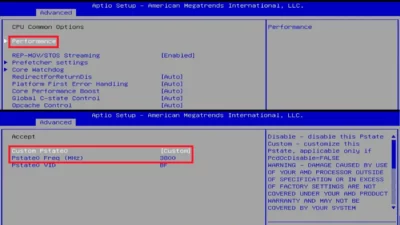
CPU overclocking is usually done through the BIOS/UEFI by adjusting the processor multiplier and, if necessary, the voltage. The general procedure, when applied carefully, is relatively simple, although it does require patience.
The first step is to access the BIOS or UEFI settings . On most motherboards, this is done by pressing a key like Delete, F2, or F10 immediately after turning on the PC. In Windows 10 and 11, you can also restart by accessing "Advanced options > UEFI firmware settings" from the system recovery menu.
Once inside, look for the section dedicated to the processor or "OC" (Overclocking), where you can see the CPU multiplier. Change the mode from automatic to manual and start increasing the multiplier very gradually, step by step, without any sudden jumps. Each increase represents a frequency boost, and if you overdo it, it can cause a spike in temperature or disrupt stability.
After each small change, save the settings, boot into Windows, and run your stress tests and CPU benchmarks again. Pay close attention to the maximum temperatures (it's best to stay well below 85°C for sustained periods) and watch for crashes, restarts, or blue screens. If any of these occur, you'll need to lower the settings or adjust the voltage.
When the CPU can't handle higher frequencies with the current voltage, you can slightly increase the vCore from the BIOS. Again, the mantra is the same: small increases, like +0,01 or +0,025 V, without exceeding the safe limits for your model (on many modern processors, going beyond ~1,4-1,45 V is already quite aggressive). More voltage means more heat and more stress , so it's best not to overdo it.
If, after restarting with a more ambitious change, you encounter a blue screen or the system fails to boot, don't panic: return to the BIOS and restore the previous settings. In the worst-case scenario, you can always load the motherboard's default values and start over more calmly.
Overclocking AMD CPUs and Ryzen APUs
AMD Ryzen CPUs have greatly popularized overclocking because the vast majority of them come with an unlocked multiplier . This also includes many APUs (processors with integrated graphics), which allow for overclocking both the CPU and GPU on the same chip.
On Ryzen, you can overclock from the BIOS following the general procedure described above, or use the official AMD Ryzen Master software, which offers a more user-friendly interface for adjusting frequencies, voltages, and power limits from within Windows. Even so, the golden rules remain the same: small steps, temperature monitoring, and stability testing after each change.
In APUs, overclocking can be especially interesting for compact or budget-friendly setups, as it improves both CPU processing power and integrated graphics performance . However, thermal limits are more critical here: you're heating the CPU and GPU within the same package, so robust cooling is essential.
One aspect that requires close attention with AMD CPUs and APUs is power consumption and thermal design power (TDP). As you increase frequency and voltage, the required cooling power increases dramatically. If the cooling system isn't adequate or the power supply is insufficient, you'll encounter thermal throttling, crashes, and potential long-term damage.
A well-designed airflow in the case, with fans that bring in and exhaust air in a balanced way, a good cooler (mid-range/high-end air or AIO liquid cooling ) and a power supply with sufficient headroom are practically mandatory if you want to get the most out of a Ryzen without exhausting its lifespan in record time.
GPU overclocking: how to get more FPS
In terms of graphics, overclocking is almost always done using software on Windows. Tools like MSI Afterburner, EVGA Precision X1, AMD's official utilities, or the NVIDIA App itself allow you to adjust the GPU core clock speed, memory, power limits, and maximum temperature.
The interface of these programs typically displays the current GPU and memory frequencies , temperature, voltage, and various sliders for power limits, temperature limits, and clock speeds. It's common practice to start by slightly increasing the core clock and then the memory clock.
A common method is to initially increase the temperature and power limits by around 10-20%, if the card allows it. This gives the GPU headroom to maintain higher frequencies without the firmware automatically throttling performance when it reaches its default limits.
Then you increase the core clock in relatively conservative increments (for example, +30-50 MHz) and apply the changes. Immediately afterward, you run a demanding graphics test: a challenging game, 3DMark, Unigine Valley, etc. If there are no crashes or visual artifacts (colored dots, streaks, corrupted textures), you can continue increasing the clock in much smaller increments , 10 MHz at a time, until you reach the limit.
For memory, the approach is similar, but the increments can be somewhat larger (for example, in 50 MHz increments), because many cards allow for a reasonable amount of VRAM overclocking before showing instability. Even so, each game reacts differently: some benefit from a significant memory overclock, while others are much more sensitive and crash easily.
Automatic GPU overclocking with NVIDIA App
A recent addition to the GeForce ecosystem is that the NVIDIA App itself includes an automatic overclocking feature for many of its cards. The idea is that the application analyzes your graphics card's capabilities and finds a "safe" configuration that provides a small performance boost without requiring you to manually adjust voltages.
The process is very simple: open the NVIDIA App, go to the "System" tab, and within the "Performance" section, enable the "Auto Tuning" option. From there, the tool performs a series of quick tests, evaluates stability, and applies a custom frequency curve for your drive.
Although this type of adjustment is much less risky than an aggressive manual overclock , it is not without consequences: you will still add some thermal load, you may notice artifacts if your chip is particularly weak, and, as a general rule, you still assume the risks associated with deviating from the official specifications.
Furthermore, the performance gain from this automatic mode is usually quite modest. In tests with certain GPUs, the frequency increase was around 20 MHz, a change so small that neither the FPS nor the rendering times showed a noticeable jump. You gain something technically, but for most users, it's not worth the effort.
If you're looking for a noticeable change—within reason—manual adjustment with MSI Afterburner or similar software and many stress test sessions remains the usual approach, provided you know what you're doing and understand that more MHz also means more heat and stress for the card.
Typical GPU overclocking problems
When a GPU can't handle the overclocking you're applying, it will make it clear in several ways. The first warning sign is usually graphical artifacts : bright spots, colored squares where they shouldn't be, horizontal or vertical lines, corrupted textures, or a "snowy" effect on the screen.
If you continue to push it, you may experience game crashes, graphics driver errors, sudden application closures, or even a complete system restart. In some cases, you might even see blue screens of death caused by the GPU driver when the system detects operation outside acceptable limits.
Another possible effect is more subtle: instead of gaining performance, the system might start to stutter, with drops in FPS caused by minor internal errors, retries, and automatic frequency reductions to try to maintain performance. If you find that your game runs worse after a seemingly stable overclock, you've probably overdone it.
Of course, all of this contributes to increased temperature and power consumption. If the card's cooling system isn't adequate or the case lacks decent airflow, the added overclocking can cause the GPU to throttle, reducing its frequency to avoid overheating and negating any gains made, while also shortening the chip's lifespan .
And don't forget the legal and support component: although extreme overheating or sudden death of a card due to overclocking is not the most common occurrence, if the manufacturer detects that you have been operating outside of specifications, it is very likely that you will lose the warranty and have to assume any repair or replacement costs yourself.
Alternatives and complements to overclocking
It's not all about increasing MHz. Very often, the bottleneck lies within the operating system itself, in background processes, or in a disk cluttered with junk files. Before you start adjusting multipliers, it makes a lot of sense to optimize your software and the overall health of your PC , for example, by testing maximum performance mode in Windows when appropriate.
Disabling applications that start with Windows unnecessarily, closing resource-intensive programs while gaming or working, keeping GPU and chipset drivers up to date, and cleaning up temporary files and installation remnants can make a real difference in smoothness and loading times.
There are specialized optimization suites that help automate much of this maintenance: from disabling third-party services while gaming to putting unused applications to sleep, removing junk files, or uninstalling software that only hogs resources. This approach can reduce the need for overclocking in many cases.
On the other hand, a small investment in well-chosen hardware—for example, upgrading from an HDD to an SSD, increasing RAM if you're running low, or installing a better heatsink—usually offers a better risk/benefit ratio than forcing frequencies in a poorly cooled or overloaded system.
In the graphics arena, an alternative to extensive tinkering is to buy factory-overclocked GPUs, which already come with high frequencies, reinforced PCBs and power phases, and cooling systems designed for that extra performance. You pay a bit more, but you save yourself a good portion of the fine-tuning work.
Ultimately, CPU and GPU overclocking is a powerful tool for squeezing a little more out of your system, but it's still a delicate balance between performance, temperature, power consumption, stability, and lifespan . Understanding how it works, proceeding slowly, thoroughly testing each change, and combining it with good hardware and software maintenance are key to getting the most out of it without turning your PC into an oven or a machine plagued by blue screens of death.