- Keep Windows and drivers updated for stability and speed.
- Control startup, clean files, and optimize storage.
- Adjust effects, power, and security for a more agile system.
- Value SSD/RAM and physical maintenance for a real performance leap.
You've just got a new computer, and yet you notice that Windows isn't running as smoothly as it should. Don't worry, it's quite common: between services that are enabled by default, applications that launch automatically, and small, untouched settings , a new PC can lose speed without you even realizing it.
This guide provides a comprehensive overview of everything you need to speed up your Windows system, from the basics to advanced techniques. It includes clear steps for updating your system, cleaning up files, managing startup applications, defragmenting hard drives, adjusting virtual memory , and much more, along with hardware recommendations and tips for different types of users.
Update Windows and drivers
First and foremost, it's a good idea to update your system. Updates bring security patches, bug fixes, and stability improvements that make a noticeable difference in daily performance. Even the What's New section in Windows often includes minor optimizations and performance improvements that add up.
To check for updates in Windows 10 or 11, open Settings and go to Windows Update. Click Check for updates, and if any are available, the system will download and install the necessary updates. When the status shows You're up to date, also check for optional updates: sometimes you'll find non-critical drivers that still improve compatibility and performance.
-
Go to Start > Settings > Update & Security > Windows Update.
-
Click Check for updates and let Windows download and install.
-
If it says You are up to date , go to View optional updates and apply the ones you are interested in.
Updating drivers is also key. From Device Manager, you can select a specific piece of hardware, right-click, and choose "Update driver" so Windows can search for the latest versions. For graphics cards, it's best to contact the manufacturer (NVIDIA, AMD, Intel) to ensure you have the latest updates, especially if you play games or use demanding applications.
Uninstall programs you don't use and organize your files
Removing unnecessary apps frees up background resources and disk space. In Settings > Apps > Installed apps, carefully review the list and uninstall anything you don't use. Avoid touching essential system apps and any software you consider indispensable for your work. This initial filter often provides an immediate improvement in your computer's responsiveness, especially if several resource-intensive programs were running in memory.
Another helpful tip is to keep your desktop clear: Windows has to render icons and shortcuts at startup, and if you're running low on resources, it shows. Group shortcuts in a folder or move them to the taskbar. You don't need to leave it completely empty, but reducing visual clutter and file clutter on your main screen is key.
To clean temporary files and junk, use the built-in tool. Press Start and type cleanmgr to open Disk Cleanup. Select the drive, let it scan, and check the boxes for what you want to delete (caches, temporary files, etc.). Confirm, and you're done. It's quick and safe. In general, avoid relying on third-party "cleaner" utilities if you're not familiar with them; there are cases where they can delete more than you intend or slow down your system.
If you handle large videos or documents, move them to another drive or an external SSD. A practical example is to make a copy on a portable SSD (for example, a compact model like the Kingston XS2000) and, after verifying the copy, send the originals to the Recycle Bin and empty it. You'll gain usable space and, on mechanical hard drives, reduce fragmentation and access time.
Don't forget to regularly clean up temporary system files. In addition to Disk Cleanup, you can enable Storage Sense in Settings > System > Storage so Windows automatically manages temporary files, caches, and the Recycle Bin without you having to worry about it.
Reduce what runs at startup and optimize the boot process.
Many applications are configured to start automatically with Windows, slowing down boot times and initial responsiveness. Press Control + Alt + Delete, open Task Manager, go to Startup Applications, and disable anything you don't need. Look at the Status (whether it starts or not) and Startup Impact (how much it slows down your system) columns so you can prioritize disabling the applications that take up the most time , such as preventing Spotify from starting automatically.
You can also do this from Settings > Apps > Startup, where you'll see an On/Off switch for each program. Keep only the essential ones active (antivirus, driver software, any critical utilities) and turn off the rest. This change alone significantly reduces boot time and initial CPU usage.
Another advanced option is to disable Fast Startup in Windows 10/11. While it can speed up shutdown/startup, it sometimes causes problems when applying updates or with hibernation. To manage this, go to Control Panel > Power Options > Choose what the power buttons do > Change settings that are currently unavailable and uncheck Turn on fast startup. Test if your computer performs better; if you don't notice any improvement or if it gets worse, you can easily turn it back on.
If you want to speed things up even further, adjust the boot menu timeout. Press Windows + R, type msconfig, and go to the Boot tab. Lower the Timeout to 3-5 seconds to avoid wasting time on that screen. It's a small change, but combined with the others, it contributes to a faster boot time.
Finally, rule out malware. Open Windows Security (Privacy & Security > Windows Security), go to Virus & threat protection, and run a Quick scan. For a more thorough scan, under Scan options you'll find four modes: Quick, Full, Custom, and an offline scan that restarts your computer and takes about 15 minutes. This check is essential if you notice sudden slowness or strange behavior in programs and your browser.

Keep the system lightweight: visual effects, transparencies, and notifications
Visual effects make Windows look great, but on less powerful machines, you might want to scale them down to improve performance. In Advanced System Settings (Start > System > Information > Advanced system settings), click Settings under Performance, and on the Visual Effects tab, choose Adjust for best performance or customize which animations and shadows you want to keep. This simple adjustment frees up CPU and GPU resources that go directly to your applications.
Interface transparencies also consume some resources. In Settings > Personalization > Colors, disable Transparency Effects. It's a subtle change in appearance, but it helps the computer feel more dynamic, especially on entry-level hardware or systems with integrated GPUs.
Take this opportunity to quiet the system. In Settings > System > Notifications, you can disable them globally or filter by app. Configure Do Not Disturb for working hours to prevent pop-ups and alerts from interrupting and consuming CPU cycles. Fewer interruptions mean more focus and, incidentally, less background load.
Storage optimized: Defragment HDD and adjust virtual memory
On mechanical hard drives (HDDs), defragmentation is still beneficial. It reorganizes scattered file fragments and speeds up access. Search for "Defragment and Optimize Drives," select the drive, and click Analyze; if applicable, click Optimize to begin the process. It's a safe maintenance task that, on HDDs, can significantly improve boot and load times. SSDs don't require defragmentation; Windows already performs specific optimization tasks, and you shouldn't force traditional defragmentation . However, if you're upgrading to an NVMe PCIe Gen5 SSD, it's advisable to check compatibility.
You can also access it through File Explorer: right-click on the drive > Properties > Tools tab > Optimize. In the Optimize Drives window, select the drive and click Optimize. Schedule automatic weekly optimization so you don't forget. This habit prevents gradual performance degradation, especially on computers that handle a lot of files.
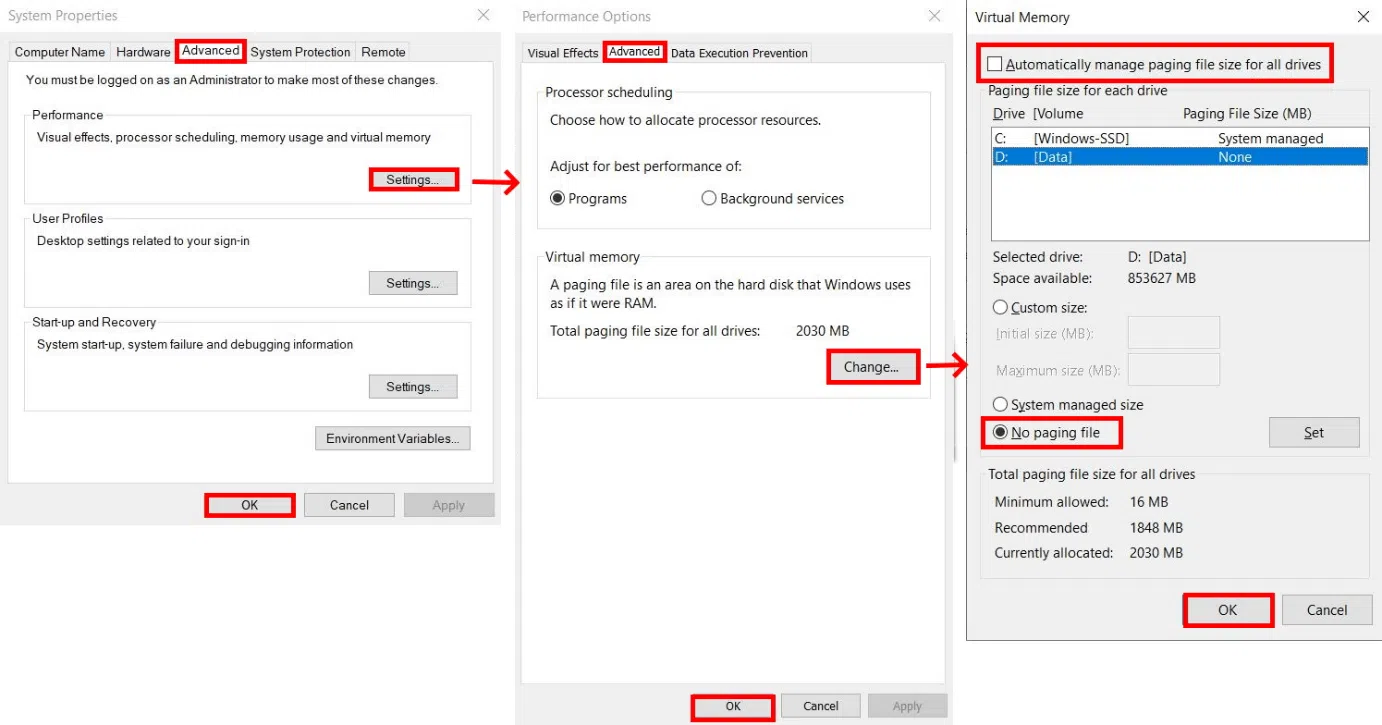
Virtual memory is another useful tool. Windows uses a page file on disk that supplements RAM. If you experience lag when opening many apps, increasing its size can help. Go to Start > System > Information > Advanced system settings > Advanced > Performance > Settings > Advanced, and under Virtual memory, click Change. Uncheck “Automatically manage…” and set a custom size. You can start by adding 1000-2000 MB to the current amount to give the system a small buffer when RAM runs low.
As a general rule, set a reasonable initial and maximum size (for example, between 1,5 and 3 times your RAM if you have limited memory). If you have an SSD, the impact of using virtual memory is much less than on an HDD, so you'll notice less of a penalty when the system uses the page file.
Drivers, analysis tools, and optimization utilities
In addition to searching for drivers using Device Manager, check if your manufacturer has its own update software (Lenovo Vantage, Dell/HP Support Assistant, Intel Driver & Support Assistant, etc.). Keeping your BIOS/UEFI, chipset, graphics, and audio drivers up to date prevents incompatibilities and can fix bugs that, without you realizing it, are reducing performance or stability . And, if you're interested in getting even more out of your device, understanding what overclocking is will help you evaluate your options.
To diagnose bottlenecks, use Task Manager (CPU, memory, disk, and network performance), Resource Monitor, Reliability History, and Performance Monitor. These tools help you identify which process is consuming CPU, which service is overloading the disk, or if there are recurring errors causing slowdowns. With objective data, you'll be more likely to find the right solution and avoid making changes blindly.
If you prefer all-in-one assistants, there are suites that promise to automate maintenance. For example, Avast Cleanup includes automatic maintenance, bloatware removal, Disk Doctor, and browser cleaning, and claims to free up gigabytes and improve speed by around 30%. Consider these figures as guidelines, and if you use them, do so judiciously and with backups. In many cases, native Windows tools are sufficient to keep your PC running smoothly at no extra cost . Also, if you want lighter or more secure browsing alternatives, check out our guide to the best web browsers.
When nothing works: reset, dust off, and upgrade hardware
If the problems persist after trying all of the above, consider resetting your computer. You'll find "Reset this PC" in Settings > System > Recovery. You can choose to keep your files or "Remove everything" to reinstall from scratch. If you opt for the more drastic solution, back up your data first. This is the most effective way to do it when the system has deep-seated errors or a buildup of software that's difficult to remove.
Another often overlooked task: physical cleaning. Dust clogs vents and heatsinks, raising temperatures and causing throttling (automatic performance reduction to prevent overheating). Power off and unplug your computer, carefully open it, and remove dust from fans and radiators with compressed air and an anti-static brush. Check the thermal paste . Maintaining proper airflow extends the life of your components and prevents performance loss.
Hardware upgrades make a huge difference. Upgrading from an HDD to an SSD is the most radical change in boot and app loading times. If you're going to migrate, check if your computer supports SATA or NVMe and the PCIe version . You can clone your current drive with software like Macrium Reflect to avoid reinstalling anything: connect the SSD, clone the drive, and replace the old one. The leap in daily performance is noticeable, even if you don't change anything else in the system.
If you often have many tabs or programs open simultaneously, upgrading your RAM is a lifesaver. Check the type (DDR4, DDR5, etc.), the maximum capacity your motherboard supports, and the available slots; also confirm your motherboard's chipset to ensure compatibility. Adding modules with the same speed and latency helps maintain performance and dual-channel functionality. And if you play games or work with 3D, video editing, or AI, a more powerful GPU is the right way to accelerate previews and effects, provided your power supply and case can handle it.
And if your PC is already quite old, weigh the cost of upgrades against buying a new machine. Sometimes an SSD and a bit more RAM can revive older machines; other times, the investment isn't worth it, and it's better to upgrade to a newer generation. The important thing is to calculate the real benefit for your daily tasks and make the decision based on your actual needs and the numbers.
Tips according to user type
For gamers, it's crucial to keep graphics drivers up to date, enable Windows Game Mode, and close anything unnecessary before launching a game. Capture programs, browsers with many tabs, and background utilities can all reduce FPS. Use High Performance power profiles and, if the game allows it, adjust graphics options to balance quality and smoothness , or choose games designed for low-spec PCs if your hardware is modest.
If you work with video editing, design, or 3D, prioritize a fast SSD for projects and caches, and as much RAM as your workflow requires. In system settings, prioritize applications in the power plan and consider reserving dedicated drives for media and proxy files. Keep your GPU and codec drivers up to date, and disable unnecessary software during long exports to avoid CPU and disk bottlenecks.
FAQ
Is formatting necessary to make your computer run faster? Not necessarily. Good maintenance (file cleanup, startup management, updated drivers, and optimized effects) is usually enough. Formatting or a complete system reset is the last resort when there are persistent problems or too much accumulated bloatware.
Does antivirus software slow things down a lot? A good product is optimized to minimize disruption, but every scan consumes resources. Keep your antivirus software updated, schedule scans during off-peak hours, and avoid installing multiple security engines at once to prevent duplication of tasks and resource consumption.
With all of the above in place (up-to-date Windows and drivers, optimized startup, clean desktop, healthy hard drive, optimized virtual memory, and, if applicable, SSD/RAM), the improvement in performance is immediately noticeable. The key is to combine regular maintenance with small, informed decisions and, when the time comes, invest in the right components so your new PC performs as expected: fast, stable, and ready for anything you throw at it.
